
Web CMS: Add Content
Download as PDFOverview
After your website structure is set, you can create your actual page content. Backstage uses flexible, modular articles, so you can easily add text, images, videos, and links exactly where you want them.
Note
To get started, check the Web CMS: Build Navigation and Pages FAQ, where you’ll learn the basics of setting up and organizing your website.
Tip
For examples of web page templates, visit our help site: howto.picturemaxx.com
Create web articles
First, add a new template-activated page as described in Web CMS: Build Navigation and Pages. Then, you can fill the template with your content.
To add a new content element:
- Navigate to Web > Content > Articles.
- For multiple websites: Select the relevant website from the Website dropdown.
- Within the Navigation panel:
- Choose a navigation section (main, footer, top-right menu) from the Tree dropdown.
- On the selected Navigation tree, pick a page where the element should appear.
- Click Edit > New to create a new element for the selected page. Below the Articles Available on the Selected Page panel, the relevant setup fields will appear.
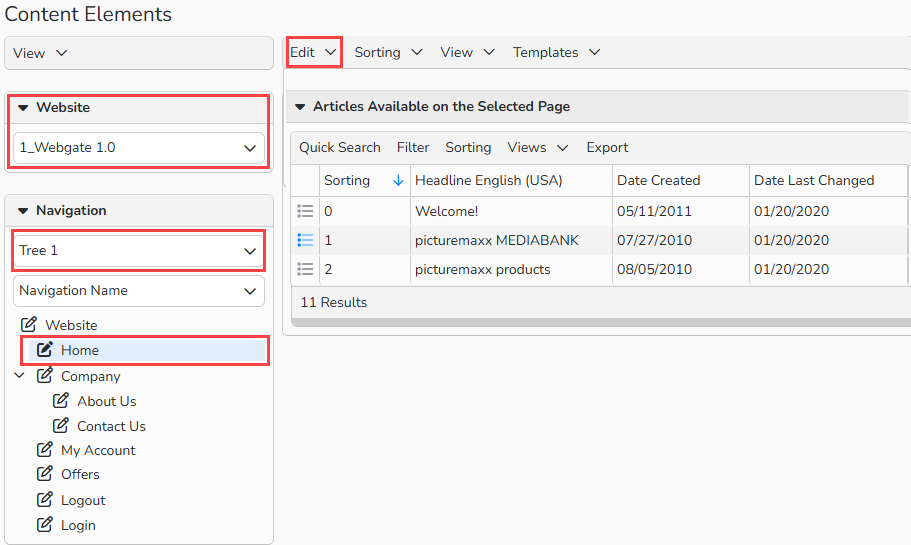
Content Elements window: Select Website, Tree, Page and the Edit menu
Note
Navigation trees are typically organized as follows:
Tree 1 = main navigation, Tree 2 = footer navigation, Tree 3 = top-right navigation.
Article Template
Select a template from the dropdown. Each template includes a description, sample layout, and a help link. Each template has its own specific fields and settings. All of these appear when you select the template.
- Fill out all the relevant content fields and click Save.
- For a multi-language website, enter your article content for each language.
- Manage web languages under Administration > Language Settings > Languages.
- If relevant for the template, switch to the Article Elements tab and add elements with Edit > New.
A list of all article templates and their layouts, including configuration options, can be found at howto.picturemaxx.com.
Note
The Article Template option becomes only available in Backstage after you have selected the Template New Page: Single Column Template under Web > Page Elements > Navigation and activated the Enable Article Templates checkbox.
Important
The Article Template can only be selected initially when creating the article and cannot be edited afterwards, as the fields specific to the template are loaded.
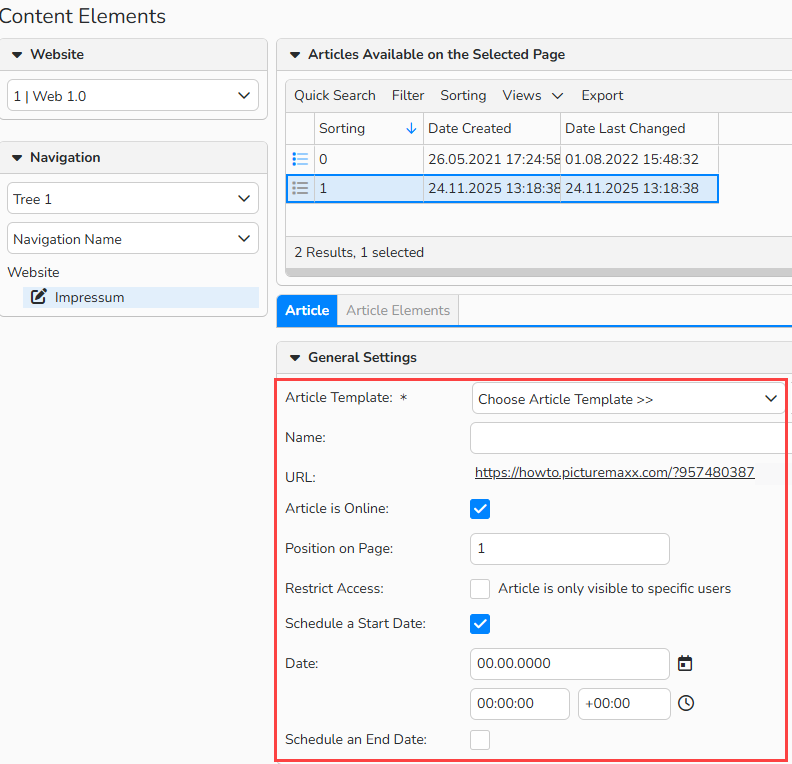
Content Elements > Article tab: Panel General settings
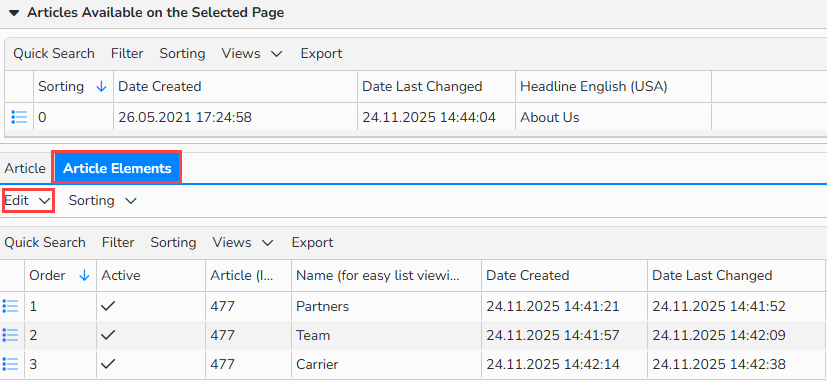
Content Elements > Article Elements tab: Edit menu
General Settings
The articles consist of the general settings, which you can find in the Article tab, and the article elements, which represent the recurring parts of the article. For example, a slider medium, a team page profile, or a text block in the accordion. To edit an article, please select it in the tabular overview to view the details. The following settings are available for configuring your article.
Note
Use the Article Reuse on any page article template to show the same article on multiple pages.
Note
The integrated table functions allow you to search, filter, and sort records. For more information on these functions, as well as how to set up custom views and use the export function, see the Advanced Table Views FAQ.
Below Articles Available on the Selected Page, in the Article tab > General Settings, configure the following:
Article is online
By checking the box, the article will be visible on the website immediately after saving.
Restrict Access
Only applicable if customer accesses are available. The article is only visible on the website for certain accesses or access groups.
- Select the desired data records from the Available accesses drop-down list and transfer them to Selected accesses by clicking the Add button.
or
- Select the desired data records from the Available Access Groups selection list and transfer them to Selected Access Groups using the Add button.
- Similarly, you can use the Remove button to remove already selected accesses or access groups from the selection list.
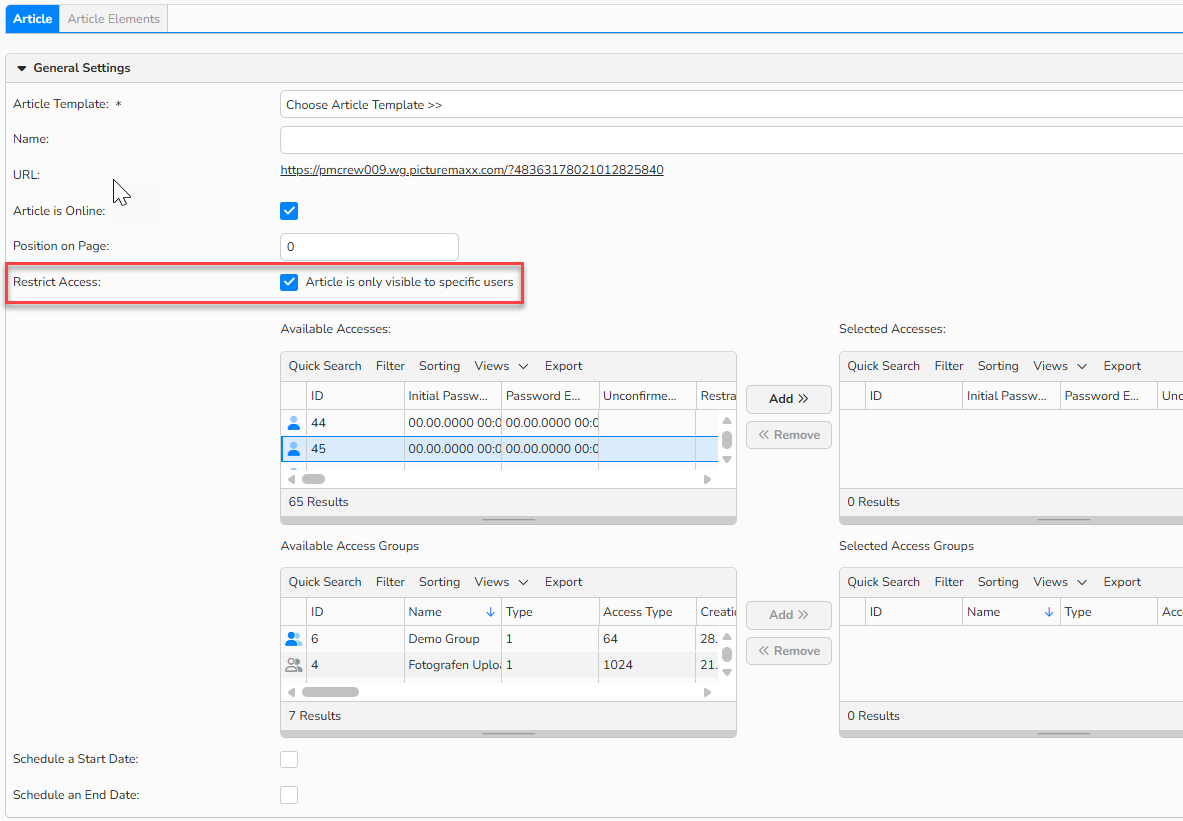
Content Elements > Tab Articles: Panel General Settings: Restrict Access
Schedule a start/end date
- By specifying a publication date and, if desired, a specific time, the article will only be displayed on the website starting that time.
- Simply specify the day and time when an article should be automatically deactivated on your website.
Change the order of articles
Select the desired article, click on Sorting, and choose from the following functions:
- Move to first place
- Move up
- Move down
- Move to last place
Copy or move web article
You can select any article and copy it, or move it to another page:
- In the table view, select the article you want to copy/move.
- To select a continuous range: SHIFT + Click.
- To select a non-continuous range: CTRL (PC) or CMD (Mac) + Click.
- Click to Edit > Copy or Edit > Move.
- Choose the position in the navigation where you want to place the article.
- Click Save.
Change display of articles
Backstage offers you the option of displaying the input mask for your items in two different ways. Select from the View menu:
- Grouped by language: The active web languages and the corresponding items are each recorded in separate areas.
- Grouped by elements: There is only one area in which items are sorted by elements, such as headings and content.
If necessary, you can also apply the desired view to all articles in the navigation point or additionally to all subordinate navigations. To do this, select either:
- View > Apply view to all articles in this navigation.
or
- View > Apply view to all articles in this and subordinate navigations.
Delete web articles
- In the table view, select the article you want to remove.
- Select Edit > Delete.
Language-dependent elements
- You can find all language-dependent elements in the respective activated languages, which you can manage under Administration > Language settings > Languages.
- By default, a separate input area with an editor is available for each language. Store your article content here.
Text Editor
Beyond the basic text editing tools, the Text editor offers these additional features:
 |
Font Family | Set the font for your text. |
 |
Font Size | Set the font size for your text. |
 |
Text alignment | Align your text to the right, center, left, or justify it. |
 |
Listing | To list the text in bullet points, choose between symbolic bullet points or numbers. |
 |
Indent | Indent the text either to the left or to the right. |
 |
Text editing | Display text in bold, italics, underlined, or strikethrough. |
 |
Linking | Create a hyperlink from the selected text. In the window that opens, configure the settings for CMS, General, Popup, Events, and Advanced. If you no longer want the link, remove the hyperlink from the selected text. |
 |
Clipboard | Use functions to edit your text, such as cut, copy, paste, and paste as text or paste from Microsoft Word. |
 |
Find and replace | Find a word within your text and replace it. |
 |
Undo/Redo | Undo text changes or repeat some operations. |
 |
Text Color | Change the color of your text or highlight it. |
 |
Source reference/ Abbreviation/Acronym/ Removed text/ Inserted text/ Attributes |
Use features to make your text traceable, such as source references, abbreviations, acronyms, inserted or deleted text, and the insertion and editing of attributes. |
 |
Subscript and superscript | Format the selected text as subscript or superscript. |
 |
Special characters/ Control characters/ Protected space |
Easily add special characters to your text and toggle formatting marks on or off while editing your article. Non-breaking spaces are also available when needed. |
 |
Styles | Apply pre-defined styles to the selected text. Styles can be defined in your site’s style sheet, which is under Web > Settings > Layout > Colors tab. |
 |
Paragraph | Apply specific predefined formats to the selected text. Paragraph formatting also is used to "tag" or identify parts of an article, e.g., “Heading 1.” |
 |
Remove Formatting | Remove formatting from the selected text. |
|
Links | Turn the selected text into a hyperlink. In the pop-up window, you can configure settings for CMS, General, Popup, Events, and Advanced. If you no longer want the link, simply remove the hyperlink from the selected text. |
 |
Insert/ Edit Images Embed/Edit Multimedia |
Add images from your document library and edit them as needed. Insert multimedia files (such as videos or audio) from your document library and update them whenever necessary. |
 |
Insert/Edit Medium | You can insert a media file from your system archive and customize its settings: Media Number – Enter the media number of the file you want to use. Alternative Text – Provide a short description for the media (important for accessibility and SEO). Alignment – Choose how the media should be positioned within the article. Dimensions – Specify the size of the media. You can also define fixed dimensions as default settings. Border – Enter the width of the media border in pixels. Vertical Spacing – Set the space between the media and surrounding text vertically. Horizontal Spacing – Set the space between the media and surrounding text horizontally. |
 |
Full Screen | Expand the editor to fill your entire screen for easier input. Change the background color while editing for better visibility. Note: The background color is only for editing purposes. It will not be saved or displayed on the website. |
 |
Change Background Color | Change the background color while editing for better visibility. Note: The background color is only for editing purposes. It will not be saved or displayed on the website. |
 |
Insert Table | Specify the table properties and click Insert. |
 |
Table Properties | Define a table’s row or cell properties. |
 |
Table Rows | Insert or delete table rows. |
 |
Table Columns | Insert or delete table columns. |
 |
Merge Cells | Merge table cells or split merged table cells. |