
Contacts
Download as PDFOverview
Add and manage contacts for your customers, partners, authors, or users. Create a contact once and link it to multiple master data records using cross-area assignments.
You can add contacts in the following master data areas:
- Sales > Customers and Partners
- Purchasing > Authors and Partners, Author Pools and Syndicates
- Administration > Users
Create contacts
You can create, edit, and manage multiple contacts within each master data record.
To add a new contact:
- Navigate to one of the master data areas (Sales > Customers, Purchasing > Authors, Administration > Users).
- Open the master data record by double-clicking it or selecting Edit > Open.
- Switch to the Contacts tab and select Manage Contacts > New.
- Enter the contact details:
- Master Data details: Salutation and name.
- Communication: The system automatically fills in phone, fax, and email from the master data record; you can edit or overwrite them as needed.
- Extra Data details: Department, role, and birth date.
- Company Data: he system automatically fills in the company details from the master data record.
- Comments: Add any notes about the contact.
- Click Save.
Assign Accesses
You can link an access to a contact if you have the access already created in the master data record.
To assign access in the Contacts tab of a master data record:
- In the Assign Accesses panel, select an access from Unassigned Accesses and click Add to move it to Assigned Accesses.
- To remove access from a contact, select it and click Remove.
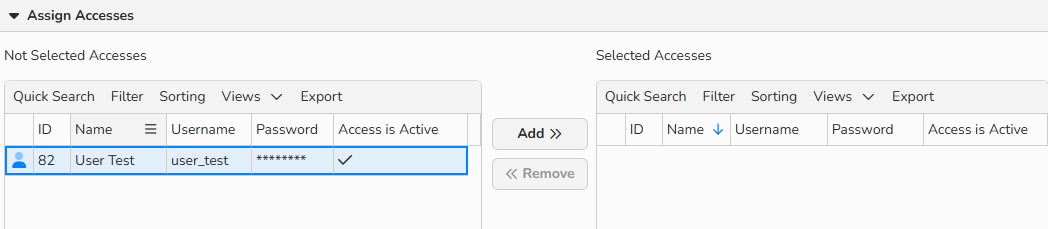
Master data record: Contacts tab: Assign Accesses panel
Assign Newsletter Lists
Newsletter lists are distribution lists for your regular newsletter. Only records assigned to a specific list will be included in the mailing.
To assign a list to a contact in the Contacts tab of a master data record:
- Select a newsletter list from Unassigned Lists and click Add to move it to Assigned Lists.
- To remove a list from a contact, select it and click Remove.
Note
For more details refer to these FAQs: Salutations, Departments and Job Titles, Newsletter Lists.
Add a contact photo
You can personalize any contact by uploading their photo:
- In the Image panel, click the lookup button to open the Document Management dialog.
- In the Document Management dialog, click Upload Files.
- In the Upload dialog, click Add Files to select the photo from your external folder, or drag and drop the image into the upload area.
- Click Upload all files and when uploading is complete click Back to Overview.
- Back in the Document Management dialog, pick the photo and click Choose.
Note
Storage Location
The media file is stored in Administration > Templates > Document Templates in the Contact Photos folder. If you also use Webgate with My Account, any profile photo the user uploads there is automatically applied to their system contact.
Link contacts to other areas
Create a contact once and use it across multiple areas, such as Sales and Purchasing.
To assign an existing contact:
- Open the master data record.
- In the Contacts tab, choose Manage Contacts > Add Existing Contact.
- From the list of all contacts, select the ones you need:
- For a continuous range: Shift + Click
- For a non-continuous range: Ctrl (PC) or Cmd (Mac) + Click
- Click Choose to confirm.
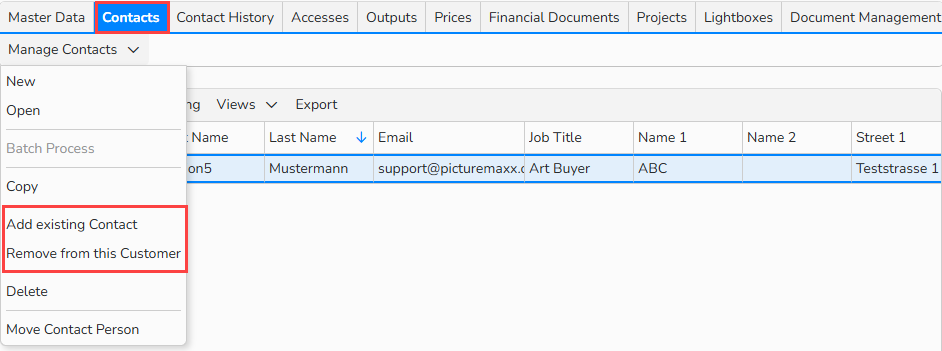
Master data record > Contacts tab: Manage Contacts menu options
Remove cross-area contacts
You can remove cross-area contacts from specific master data records without deleting them. The contact remains in the system but is no longer linked to that area.
To remove a contact:
- Open the master record.
- In the Contacts tab, select a contact you need to delete and click Manage Contacts > Remove from this Author/Customer/Partner/User.
- Click OK to confirm.
Note
Unassigned vs Deleted Contacts
You can reassign contacts that are no longer linked to any master data record at any time. If you delete a contact, the system permanently removes it from all master records, regardless of previous assignments.
Manage contacts
Management options are available in the Contacts tab of each master data record:
- To create contact, click Manage Contacts > New.
- To edit contact, select a record and click Manage Contacts > Open.
- To copy contact, select a record and click Manage Contacts > Copy.
- To delete contact, select a record and click Manage Contacts > Delete.
- To apply changes to multiple selected records at once:
- Multi-select the records you need to edit.
- Continuous selection: Press Shift + Click
- Non-continuous selection: Press Ctrl + Click (Windows) or Cmd + Click (Mac)
- Click Manage Contacts > Batch Process.
- Multi-select the records you need to edit.
Note
You can use the table’s built-in tools to search, filter, and sort records. For more details, including how to create custom views and export data, see Advanced Table Views.