
Metadata Import
Download as PDFOverview
Import metadata into the media processing area and archive using TXT or CSV files. This is useful when metadata is not embedded in media files as IPTC or when you need to update metadata in bulk. You can easily create both formats with standard desktop editors.
Import Format details
Below is a table of all available import options for CSV and TXT files. Use it as a guide to ensure your file imports correctly from an external spreadsheet application.
| Field Names | Possible Options |
|---|---|
| Field Separator | Tab Comma (,) Semicolon (;) |
| Text Start | Quotes (") Apostrophe (') |
| Character Set | Western Europe (iso-8859-1) Western Europe (Apple Macintosh) Eastern Europe (iso-8859-1) Unicode (utf-8) Unicode (utf-16) |
| Import from Line (Determines from which row onwards the metadata should be imported.) |
Select 1 - 10 |
| Mapping Basis for Import (This setting is only for the Archive; the basis in Media Processing is always File Name.) |
File Name Media Number |
Note
Choose a tab, comma, or semicolon as the field separator in your import files. Do not use spaces - imports will fail if you do.
Field Mapping details
The available field mapping options are:
| Column/Details | Possible Options |
|---|---|
| Field Mapping | Available fields selected in Administration > Database Fields. |
| Action (Standard Fields) |
Overwrite: Imported text will completely overwrite the existing metadata. Add – Beginning without space character: Imported text will be added directly before the first character of the existing metadata. Add – Beginning with space character: A space will be added before the first character of the existing metadata, and the imported text will be added before the space. Add – End without space character: Imported text will be added directly after the last character of the existing metadata. Add – End with space character: A space will be added after the last character of the existing metadata, and the imported text will be added after the space. |
| Action Special Fields Media Number |
No Action |
| Action Special Fields File Name |
File Name with Extension: Select if the File Names in your text file include a format extension, such as .jpg. File Name without Extension: Select if the File Names in your text file do not include a format extension. |
| Language (for translatable fields) |
To select between languages, your Backstage must be configured with multiple languages under Administration > Language Settings |
| Delimiter (for lists, delimiter for the content containing several parts) |
Free text input |
Note
Use different separators for field mapping than those in the import format area. This prevents conflicts with comma separation between columns and keywords.
Import metadata and assign it to media files
You can import metadata for the media files that are in your Media Processing area or that are published in Archive.
Each import file must include either the File Name or, if the media is already in your archive, the Media Number as a unique identifier. This ensures metadata is correctly assigned to the corresponding media file.
To import metadata, proceed as follows:
- Create the import file(s) externally in TXT or CSV format.
- Upload the file(s) via FTP or HTTP to any media processing folder.
- To upload via HTTP: In Media Processing, open a folder and select Edit > Upload Media.
- To upload via FTP: Use an FTP program to upload the file into an available folder.
- From the Media Processing tree, select a folder in which you want to update the metadata.
- Select Edit > Metadata Import from the menu.
- Configure the following settings:
- Text Source: Select the metadata file to import.
- Folder: Select the folder that contains the corresponding media files (only relevant for imports to Media Processing, not to Archive).
- Configure Import Format: Within this panel you can define the format details of the file you are importing.
- Mapping Basis for Import: Choose between File Name and Media Number to map the metadata, if you are importing text into your Archive. (Only relevant for imports to Archive)
- Field Mapping for the Import: Select the system metadata fields corresponding to your import file. A field mapping will be generated automatically based on the columns in your file that are recognized by Backstage.
- Action: For each metadata field, select how to apply the new metadata.
- Language: Select a language for any field that can be in more than one language.
- Separator: Set separators for lists; for example, you can separate keywords with a comma (,).
- Click Start Import.
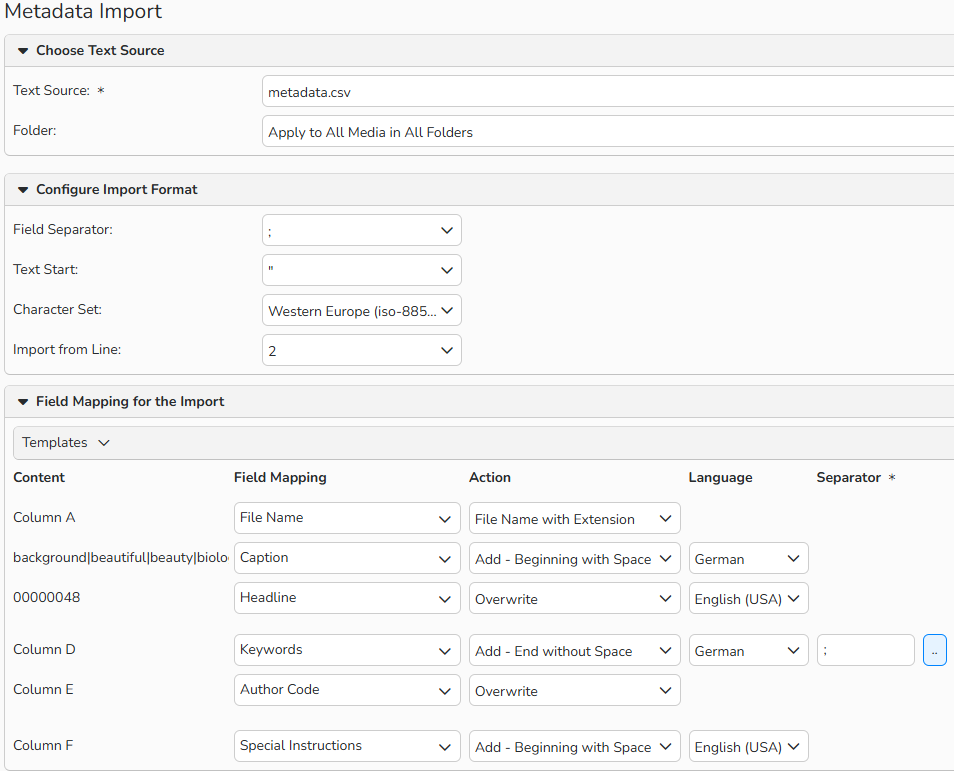
Metadata Import window (for a processing folder)
Note
Mapping basis: To associate metadata with the correct media files, File Names or Media Numbers must be part of every metadata import file. In media processing folders, it is always the file name. It is only in the Archive that you can choose between media number and file name.
Media number: Make sure full media numbers are included in your import file, especially in the case of leading zeros. You can use the preview of the import files in the system's import mask to check this.
Field mapping: This is automatically generated based on the columns in your file that are recognized by Backstage. All metadata fields activated under Administration > Database Fields are available for customization.
Action: For the File Name metadata field, you can only choose between a file name with or without an extension. No action is available for the Media Number metadata field.
Umlauts and special characters: Make sure there is the correct character set to display umlauts and special characters. You can check it in the data preview in the import mask.
Tip
Save Mapping Templates
Save import settings as templates for future imports. In the Metadata Import dialog, in the Field Mapping for the Import panel, select Templates > Save as Template. That template will then be visible under the Templates menu for later use. You can select the template and it will auto-populate the import fields.