
New customers
Download as PDFOverview
If you use Backstage as your database, you can distribute your content through:
- picturemaxx Media Network
Aggregates portfolios from image agencies, media portals, and archives. The system automatically synchronizes verified new buyers and user updates, and sends you email notifications. - Website
On your website, professional media buyers register, undergo verification, and then access your database. You control their viewing and download rights individually or via access groups.
New customers: configuration
Set the default rights for new customers to view, search, and download media without prior approval. Configure the following options:
- Navigate to:
- Sales > picturemaxx Media Network > Configuration for New Customers
- Sales > Webgate > Configuration for New Customers, click Edit > New.
- Set the permissions that new customers should have immediately after registration without your prior review. For more info refer to the Access and Access Groups FAQ.
- Click Save.
New customers: integration
When new customers register on your Webgate site, the registrations are listed under Sales > Webgate > New Customers. Here you can review them and modify their default access rights defined in Sales > Webgate > Configuration for New Customers.
If you have channels in the picturemaxx Media Network, the system will also notify you of new customers by email. Their data is automatically imported into Backstage, allowing you to manage them there.
Note
Set the notification address for your website-related notifications under Web > Settings > Email Addresses.
Integrate new customers
- Navigate to:
- Sales > Webgate > New Customers
- Sales > picturemaxx Media Network > New Customers
- Double-click the desired record or select Edit > Open.
- Adjust the customer settings if needed.
- In the Activation section, link the new customer to a master data area (Customer, Author, Partner) or an existing record. You can choose to create a new record in Backstage or add the registrant’s details to an existing company record with this options:
- New Customer: When a registrant signs up, create a customer record in Sales > Customers with contact information and access settings.
- New Partner (Sales): Create a sales partner record in Sales > Partners for registrants who sell your media.
- New Author: Creates an author record in Purchasing > Authors for photographers or other media suppliers.
- New Partner (Purchasing): Creates a purchasing partner record in Purchasing > Partners for companies supplying media.
- New Author Pool: Creates an author pool record in Purchasing > Author Pools.
- New IT User (Staff): Creates an internal staff user record in Administration > Users.
- Add to existing Master Data: Stores the registrant’s contact and access data under an existing record. To select the record:
- Click the [..] button.
- Locate and select the existing record.
- Click Choose.
- Confirm your settings by selecting:
- Save: Save changes; the customer remains in the New Customers section.
- Save and Transfer to Master Data: Save changes and transfers the customer to the master data area selected under Activation.
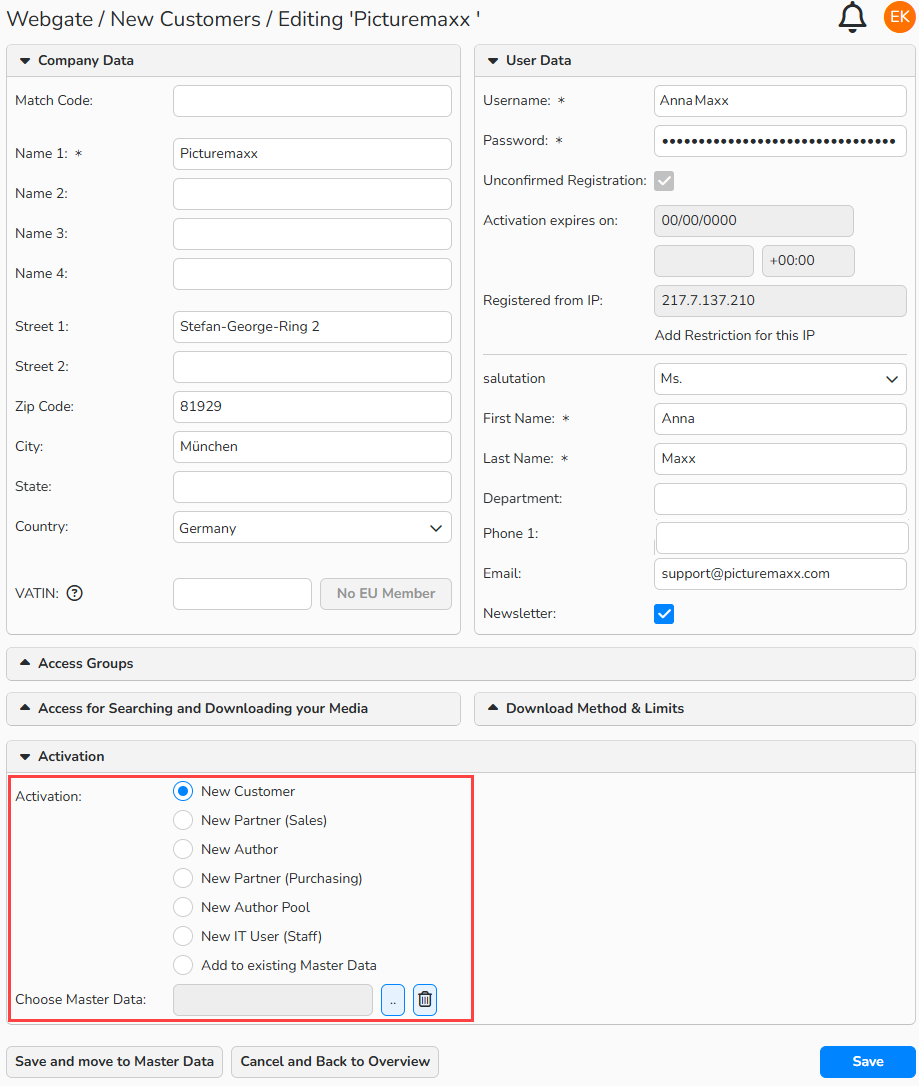
Webgate > New Customers: select master data to link new customer
Integrate multiple new customers at once
- Navigate to:
- Sales > Webgate > New Customers
- Sales > picturemaxx Media Network > New Customers
- In the overview, select all new customers you want to integrate:
- To select a range: SHIFT + Click
- To select non-consecutive records: CTRL + Click (Windows) or CMD + Click (Mac)
- Click Edit > Batch Process. In the Batch Process dialog, scroll down to the Activation section and select the appropriate master data area there.
- If a new customer does not fit your client profile, you can remove their data from your system via Edit > Delete.
Note
Your basic configuration or user settings may allow media buyers to email you to request activation. Check if the customer is active and has proper permissions. If you removed their data, contact picturemaxx to resend it to your system.
Delete customer data
Before deleting customer data, please review the following guidelines:
Rules for deleting customer data
- Deleting a Customer record
- The system deletes all Accesses linked to the customer.
- It does not delete Contacts, because a Contact can belong to multiple Customers. To remove a Contact, delete it manually under the Contacts tab.
- Deleting a Contact record
- The system keeps any Access associated with the Contact.
- Access and Contact remain separate entities.
Delete customer records
- Navigate to Sales > Customers > Customers.
- Search for and select the customer you need to delete.
- Click Edit > Delete.
Tip
If billing documents or download statistics already exist for the customer, do not remove the entire record. Instead, deactivate or delete the access.
Deactivate or delete access
- Navigate to Sales > Customers > Customers.
- Search for and select the customer. Double-click the record to open it.
- Select the Accesses tab.
- To delete an access, select the access record and then click the Manage Access submenu > Delete.
- To deactivate an access, double-click the record to open it and disable the Access is Active option.
- Click Save.
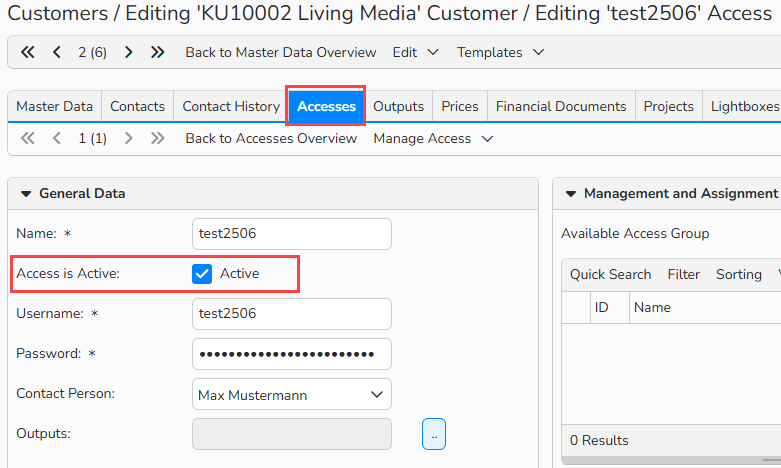
Customer master data > Accesses tab: Access is Active
Integrate updated customer data (picturemaxx Media Network)
Our team is in daily contact with your media buyers. When there are master data changes, picturemaxx verifies them first. After verification, our support team emails you, and the changes are automatically imported into the system - just like with new customers.
Integrate updated customer data
- Navigate to Sales > picturemaxx Media Network > Updated Customer Data.
- Double-click a record to open it.
- The updated details appear in the New column for easy identification.
- Select how you want to save the updates:
- Update Master Data and update existing Contact
- Update Master Data and create a new Contact
- Update Master Data only
- Click Save and Apply.
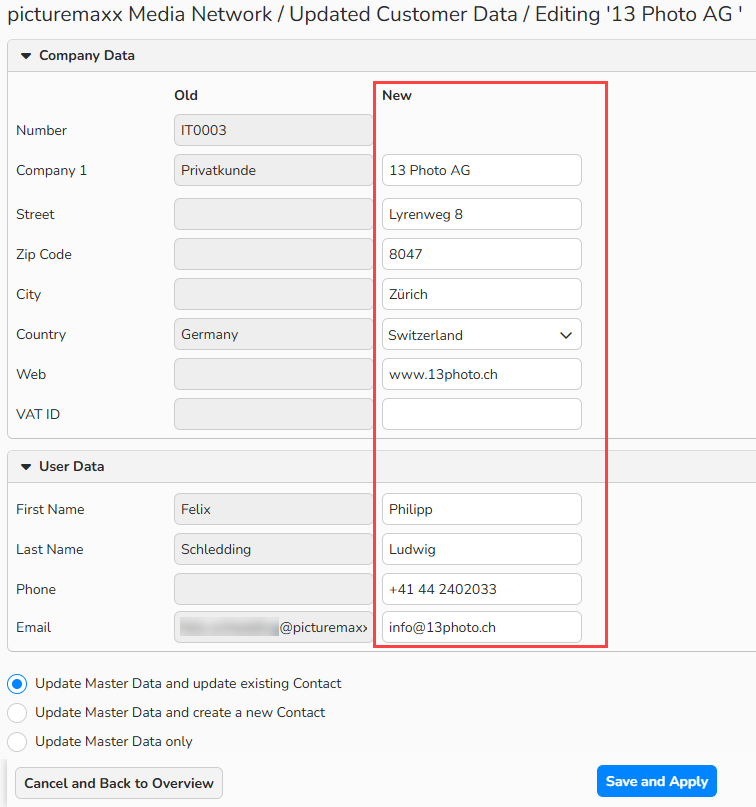
Updated Customer Data window: view and save updates
Integrate multiple customer data updates at once
- Navigate to Sales > picturemaxx Media Network > Updated Customer Data.
- In the overview, select all records you want to integrate:
- To select a range: SHIFT + Click
- To select non-consecutive records: CTRL + Click (Windows) or CMD + Click (Mac)
- Choose Edit > Batch Process.
- If you do not want to apply the changes, select Edit > Delete.