
Master Data
Download as PDFOverview
Adding, maintaining, and managing the master data of customers, authors and staff is essential for your company. It requires administrative and organizational precision. Backstage is designed to support you in meeting this challenge effectively:
- Comprehensive administrative tools for managing master data-related documents.
- Customizable views, filters, search, and export options.
- Flexible templates for master data and financial data tailored to your needs.
You can access master data in the following areas:
- Sales > Customers and Partners
- Purchasing > Authors and Partners
- Administration > Users
Create Master Data
To create master data in Backstage, proceed as follows:
- Navigate to one of the areas mentioned above (Sales > Customers, Purchasing > Authors, Administration > Users).
- Select Edit > New. The setup window opens.
- The system automatically assigns a master data number when you save the record.
- The master data number follows your settings in the number ranges under Administration > Company Settings > Number Ranges.
- Optional: You can also assign a custom master data number.
- Enter at least the required information in the mandatory fields.
- Click Save.
- Additional tabs for data entry and management become available. Each master data area has its own special features.
The following tabs are common for all master data areas:
- Master Data
- Addresses
- Contacts
- Contact History
- Accesses
- Outputs
- Lightboxes
- Document Management
- Statistics
You can learn more about specific master data-related tabs in the following sections. There is also a separate FAQ with detailed information for each tab.
Note
Use Master Data Templates
In every master data record, you shall fill in all the mandatory fields to save the record. These fields also include the language and currency settings. You can create master data templates for these settings in Finance > Templates > Financial Master Data. For additional details, please refer to the Financial Master Data FAQ.
Special Features: Global
Global Feature: Master Data Number
You can define master data numbers in your system under Administration > Company Settings > Number Ranges. When you create a new master data record, the system automatically assigns a number based on these settings. You can overwrite the assigned number at any time if needed.
Global Feature: Salesperson
In the Sales and Purchasing master data records you can assign an individual salesperson. Salesperson is an employee who is set up as Administration user. For more details, see "Administration Features: Users".
Global Feature: Billing Data
To enable in-system billing for master data records, enter the required financial information in the mandatory fields. The system automatically uses this data during billing. You shall also fill these mandatory fields for external billing.
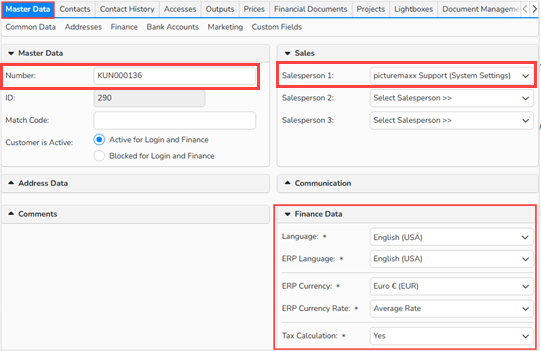
Global master data - Number, Salesperson, Finance Data
Global Feature: Copy Address
When you need an address from a master data record for external use, copy it directly from the system. In the master data record, go to Edit > Copy Address to use this function.
Sales: Customers and Partners
Customers
The master data records in the Sales > Customers area represent your direct end users. Here you can manage your own customers, as well as the master data records from the media network that picturemaxx automatically provides and transfers to your system.
Partners
In the Sales > Partners area, add partners who handle sales for you. For each master data record you create here, you can set up an outbound picturemaxx Opengate connection. This connection allows the partner to access your media and make it available to their customers.
Note
The Partner Connection tab is only displayed when you have Opengate connection to other agencies. If you are interested in such a connection, please contact support@picturemaxx.com.
Special Feature: Views
In the overview of your customers or partners in the Sales module, you can switch between the available views. This makes it easier to search, edit, and manage master data records.
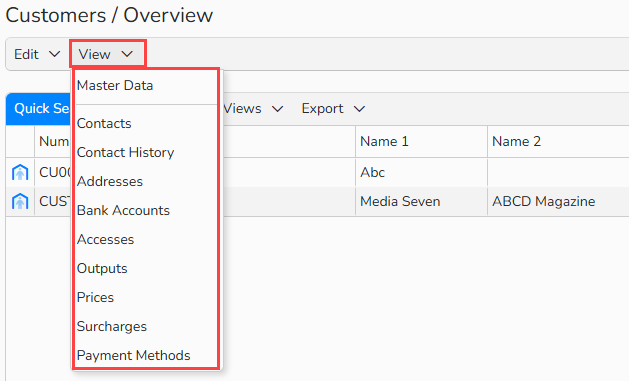
Customers overview: View menu options
Area-specific feature: Tabs
Tabs that differ from other master data areas are:
- Prices tab for Sales master records
- Partner Connection for partner master records
Purchasing: Authors, Partners, Author Pools and Syndicates
Authors
An author is an individual photographer who supplies media for your marketing purposes. You can also create and manage master data for individual suppliers from other sectors here, for example, if they are part of an author pool.
Partners
Enter partners in Purchasing > Partners, when you cooperate with other agencies and distribute their media material in other countries, for example. For each master data record, you can set up an inbound picturemaxx Opengate connection. This connection allows you to access partner media and make it available to your customers.
Author Pools/Syndicates (Optional)
Use this section to organize groups of copyright holders who collaborate and supply media. A dedicated tab allows you to assign individual members by linking existing purchasing records (authors or partners) to the pool. If you use the Finances section in Backstage, each copyright holder receives an individual royalty statement reflecting their share of the distribution.
Area-specific feature: Views
In the overview of your authors, partners, or author pools and syndicates in the Purchasing module, select the View menu to switch between the available views. This makes it easier to search, edit, and manage master data records.
Special Feature: Author Search in Archive
Access the archive search directly from a master data record and view media files archived by that author.
- To do this, in the author’s record, go to Edit > Author Search in Archive.
Special Feature: Media Processing
The byline or pseudonym stored in the master data record also appears in your media metadata and is automatically selected when you choose an author during media processing. You can, of course, overwrite the metadata field at any time.
- To enable this, in the author’s record, go to the Author search panel and enable display in picturemaxx Backstage.
Special Feature: Webgate
You can add a drop-down menu to your Webshop that lists your partners or authors. This menu serves as a search filter and displays the By-Line/Pseudonym field. The search function is enabled upon website configuration.
- To add an author to the Webshop search menu, in the author’s record, go to the Author search panel and enable the display in picturemaxx Backstage Webgate option.
- If you want the author to appear under a different name, activate the “Override By-Line/Pseudonym with another name” option and specify the desired name.
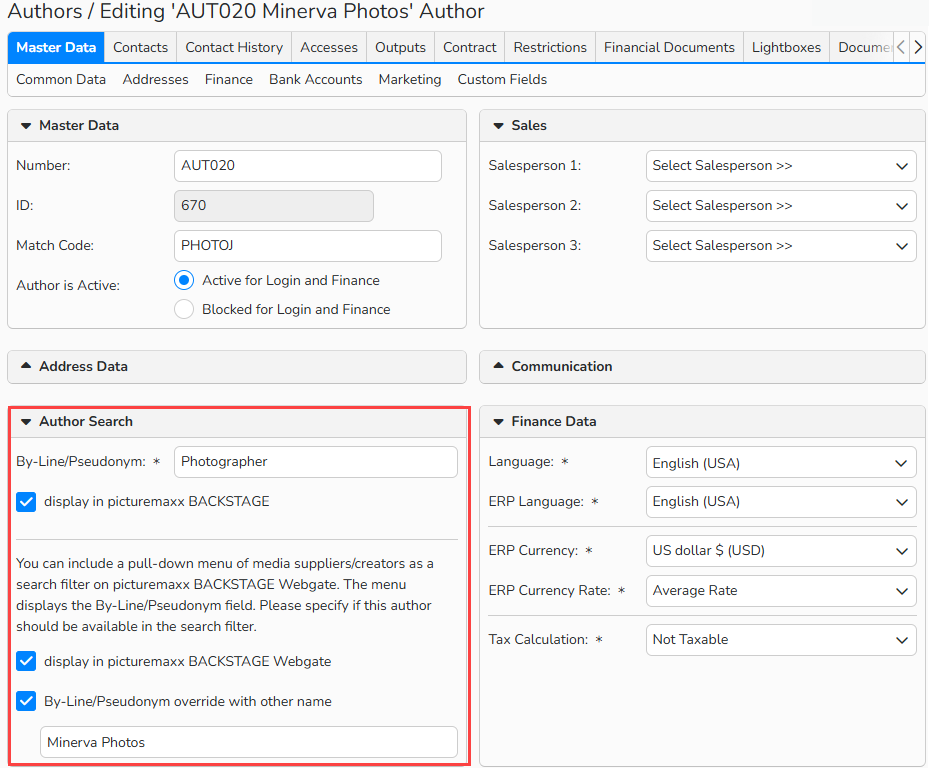
Author Master Data record > Author Search panel: author name display options
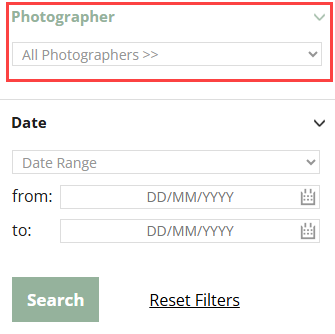
Author Search Filter in Webshop
Area-specific feature: Tabs
Tabs that differ from other master data areas are:
- Contract
- Restrictions
- Partner Connection
Note
The Partner Connection tab is only displayed when you have set up an Opengate connection to other agencies. If you are interested in such a connection, please contact support@picturemaxx.com.
Purchasing > Author Pools, Syndicates
This section can be activated upon request. If you are interested, please contact support@picturemaxx.com.
Administration Features: Users
Users
This refers to your staff members and their access rights management within the system. When you create a new user, the system automatically defines them as an active administrator by default.
Global Features: Administrators
You can store administration users as personal contacts in sales and purchasing master data records. With appropriate settings, the administrator can also appear on financial documents, such as invoices.
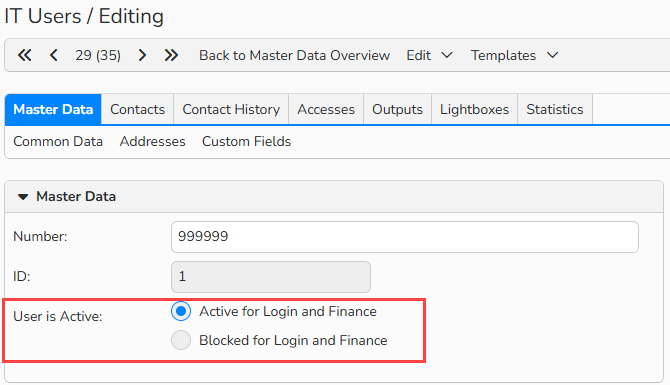
Administration user’s master data record: User is activated
Tip
Blocking vs Deleting an administration user
Blocking a user also deactivates the entire master data record. Use this when employees or interns leave, and you want to disable system access without deleting the record.
Manage Master Data
Management options are available directly in the respective master data overview:
- To create master data, click Edit > New.
- To edit master data, select a record and click Edit > Open.
- To copy master data, select a record and click Edit > Copy.
- To delete master data, select a record and click Edit > Delete.
- To apply changes to multiple selected records at once:
- In the tabular overview, multi-select the master data records you need to edit.
- Continuous selection: Press Shift + Click
- Non-continuous selection: Press Ctrl + Click (Windows) or Cmd + Click (Mac)
- Click Edit > Batch Process.
- In the tabular overview, multi-select the master data records you need to edit.
Note
You can use the table’s built-in tools to search, filter, and sort records. For more details, including how to create custom views and export data, see Advanced Table Views.
Tip
Import Master Data
For each master data area, picturemaxx provides ready-made migration lists. Enter your existing information into these lists, and we will import it into Backstage. If you are interested, please contact us at support@picturemaxx.com.