
Content Restrictions
Download as PDFOverview
Whether you're sharing your images globally or with a selected group, Backstage gives you full control over what media files are published, where, and for whom.
This guide explains the different restriction types and how to configure them step by step to suit your needs:
- Author/Partner Restrictions: Restrict files from a specific media supplier.
- Batch Restrictions: Restrict specific files.
- Metadata Restrictions: Restrict content based on metadata within your files.
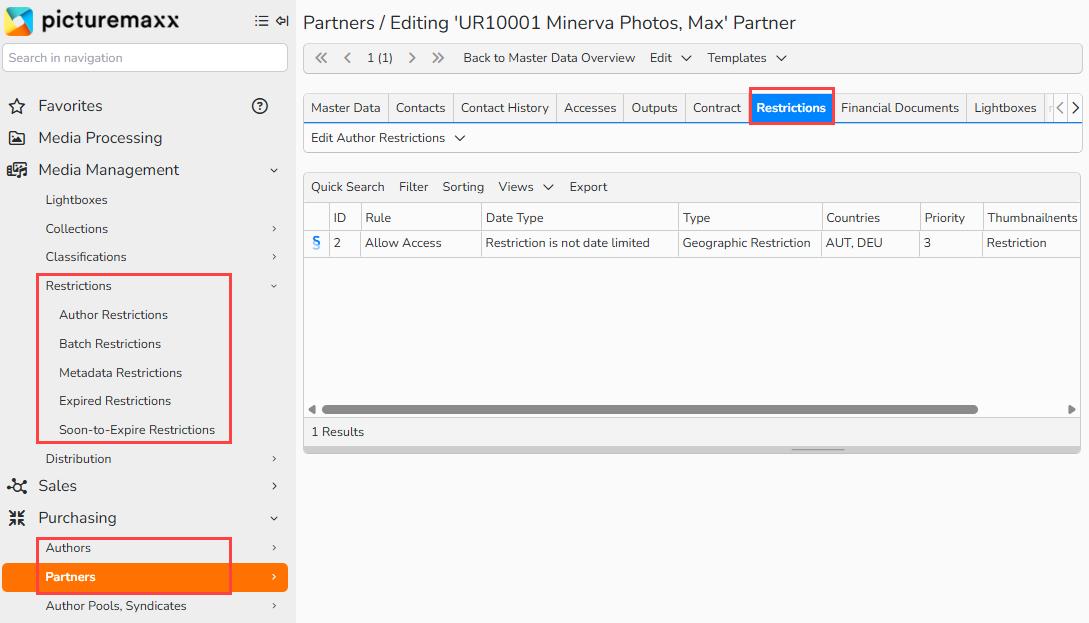
Available Restrictions: Purchasing Partner > Restrictions tab
These restriction features let you control which users can view and download specific media. You can choose from the following options:
- Time-based restrictions that start and end automatically.
- Different permission types based on countries, individual accesses, or access groups.
- Positive (grant) or negative (restrict) rights.
- A hierarchical structure where higher-priority permissions override lower ones.
Note
Admin-only restriction
If you use the pm_admin_only metadata field to apply the Only for Admins restrictions to your media files, the files will not appear on the website. These files are only visible to system users in Backstage.
Restricted media files are marked with a lock icon (Only for admins) on their thumbnails. Additionally, their Restriction tab displays the message: “This medium is only visible to admins.”
Available restriction features
Set up restrictions when you want to override the standard distribution rights for your media.
Note
Permissions vs Restrictions
To control access precisely, keep permissions general and use restrictions for exceptions.
Permissions grant access by default. You can configure view, download, and watermark permissions individually for every access in the Accesses tab of the user master data. You can assign them directly or inherit them from an access group.
Restrictions are used to limit or block access in specific situations, even when permissions are granted in general.
picturemaxx Backstage offers the following restriction features:
Author/Partner Restrictions
- Purchasing > Authors or Partners > Tab Restrictions
- Media Management > Restrictions > Author Restrictions (view only)
You can set restrictions for each of your media suppliers (Authors, Partners, Author Pools), and the restrictions will be in effect for all of their media.
This is a very broad type of restriction, allowing you to centrally control a supplier’s media distribution.
Use this restriction when your restriction should affect all the media files from a certain supplier.
Example use cases:
- Restrict Agency ABC’s media files, so only users from the United Kingdom can access them.
- Restrict Agency X’s media files from users in Japan.
- Restrict Bob Smith, so he is only able to access the media files from Agency X.
- Restrict the media files of Agency Y, so they’re only available to your “Gold Star” Access Group.
Set up these restrictions in the Purchasing module, in the Restrictions tab of any media supplier. Any restriction you put in place will affect all files that are tagged with that supplier’s Author Code.
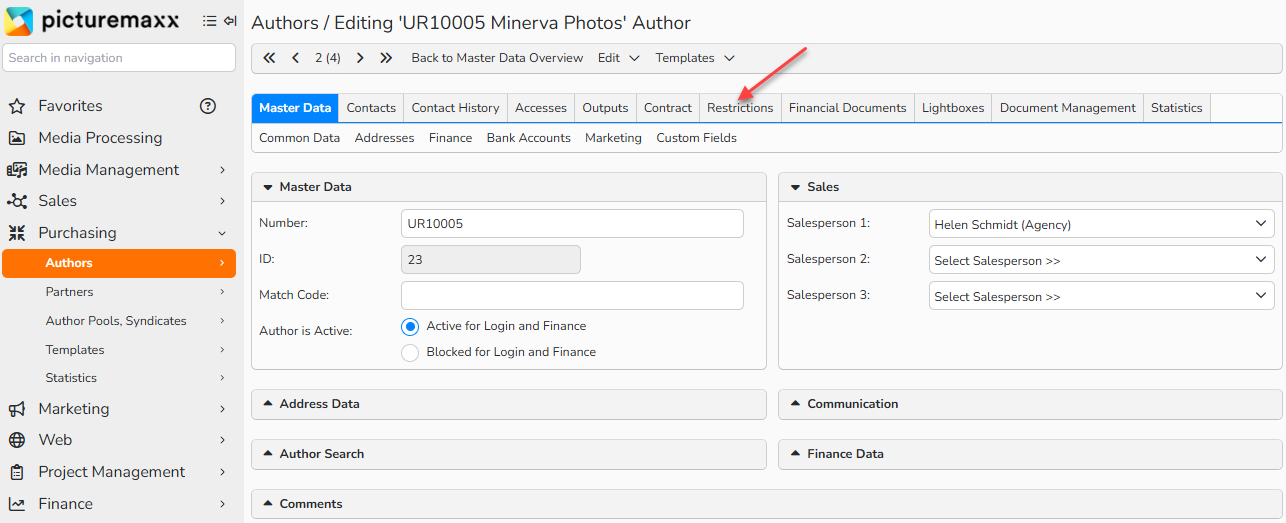
Author master data > Restrictions tab
Important
Author Restrictions: Always Start Here
Author Restriction is fundamental and should be the first type of restriction you consider and put in place when setting up your Backstage.
Don’t use a Batch Restriction when an Author Restriction will do.
Learn how to set up this feature in Define Author/Partner restriction.
Batch Restrictions
Media Management > Restrictions > Batch Restrictions
You can restrict specific media files using the Batch Restriction feature, controlling rights at the level of individual media files.
Example use cases:
- You have a series of images that should only be visible to your internal staff.
- Due to an exclusive sale, a specific image needs to be embargoed in the UK for 30 days, and you want to allow your UK clients to continue to see the image in search results but not be able to download it.
- You have a specific collection that you want to restrict from your “Scandal Publications” group, since the images can’t be published in those types of magazines.
- You have a specific batch of files that you only want to make available to a specific customer.
For the setup steps refer to Define Batch restriction.
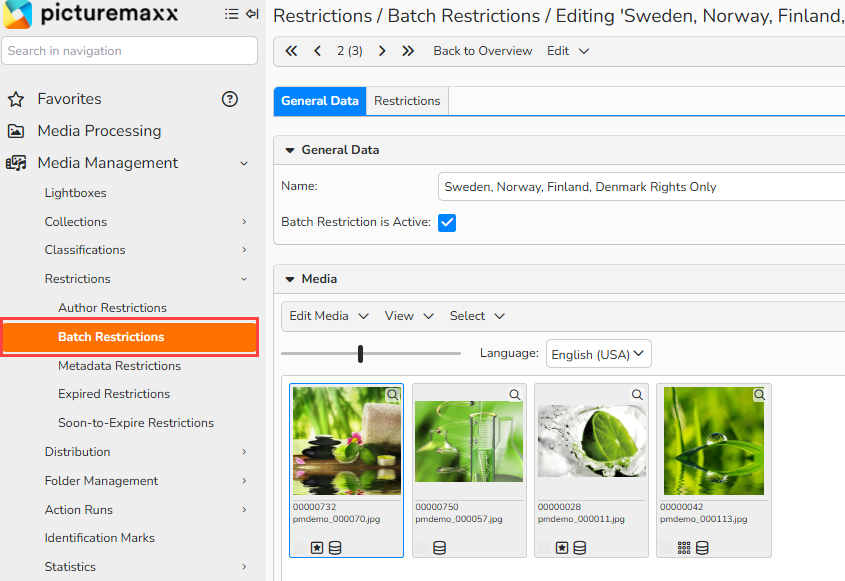
Batch Restrictions
Metadata Restrictions
Media Management > Restrictions > Metadata Restrictions
The Metadata Restrictions feature allows you to control access to media files based on the metadata they contain. You can create rules that apply automatically when media includes specific metadata Adding or removing the relevant metadata updates the associated permissions in real time.
Example use case:
You want to offer a “Sports” subscription. Add the subscribers into a specific Access Group and then restrict that group to only be able to access images that contain “Sport” in the Supplement Categories field.
Important
We strongly recommend using metadata permissions only when batch permissions are not an option.
Learn how to set up this feature in Define Metadata restrictions.
Tip
Tooltips
When setting up a restriction, if you’re not sure what each setting does, mouse over the question-mark icons to see a brief description.

Guest users and geographic restrictions
These key points explain how country-based restrictions affect users who access the website without logging in:
- Country restrictions apply to all users, including guest (not logged‑in) users.
- For visitors who are not logged in, access depends on the country set in the guest user configuration. The visitor’s real location is not used for guest access.
- If the guest user’s country is restricted, the content will not be visible to any guest users.
- To show restricted content to guest users, link the guest user to an allowed country.
Define Author/Partner restriction
Purchasing > Authors > (Author) > Restrictions
Purchasing > Partners > (Partner) > Restrictions
Purchasing > Authors Pools, Syndicates > (Author Pool) > Restrictions (if activated)
When your restriction should affect all the media files from a certain supplier, create an Author/Partner restriction. Here’s how:
Step 1. Create new restriction
- Go to Purchasing, select a media supplier’s record, and click the Restrictions tab.
- Select Edit Author Restrictions > New.
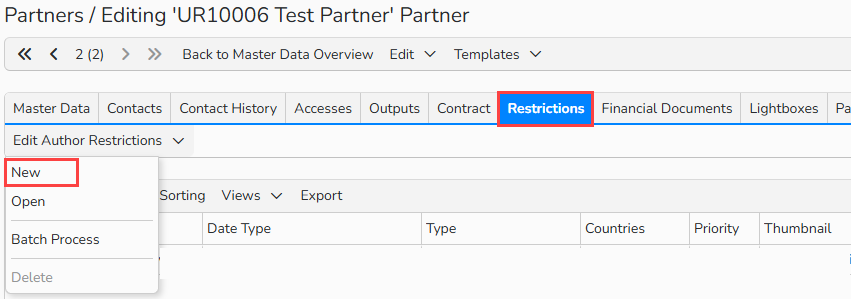
Create Partner restriction
Step 2. Configure restriction
- Select a restriction type:
- Geographic Restriction: Restriction based on countries.
- Access Username Restriction: Restriction based on individual users.
- Access Group Restriction: Restriction based on groups of users.
- Click Next and select the restriction’s rule:Select how the rule should control access. Choose the option that best fits your goal:
- No Access (negative): Block selected countries, accesses, or access groups from viewing the author’s content.
- Allow Exclusive Access (positive): Grant access only to the selected countries, accesses, or access groups. Deny access to all others.
- Allow Access (positive): Grant access to selected countries, accesses, or access groups even if other rules would normally block them from this content.
- Important: When using this rule, set Priority to 0, so the restriction has a higher priority than other restrictions.
- Limited Access (use with CAUTION): Allow selected countries, access groups, or accesses to see only the assigned media files and sizes. Deny access to any other media files. However, the assigned media remains visible to all other users as well.
- Select a Priority between 0 and 3 (highest priority = 0). In case of a conflict, the rule with the higher priority (lower number) takes effect.
- Check the boxes for the media sizes you want the restriction to apply to.
- Select the countries, accesses, or access groups you want to apply the rule to, and click Add.
- The available list (countries, accesses, or access groups) depends on the previously selected restriction type.
- If needed, configure a date range restriction.
- Enter either the number of days or a date range for each selected media size.
- In the Comments field, optionally add internal notes about the restriction.
- Click Save. If needed, create additional restrictions for this media supplier.
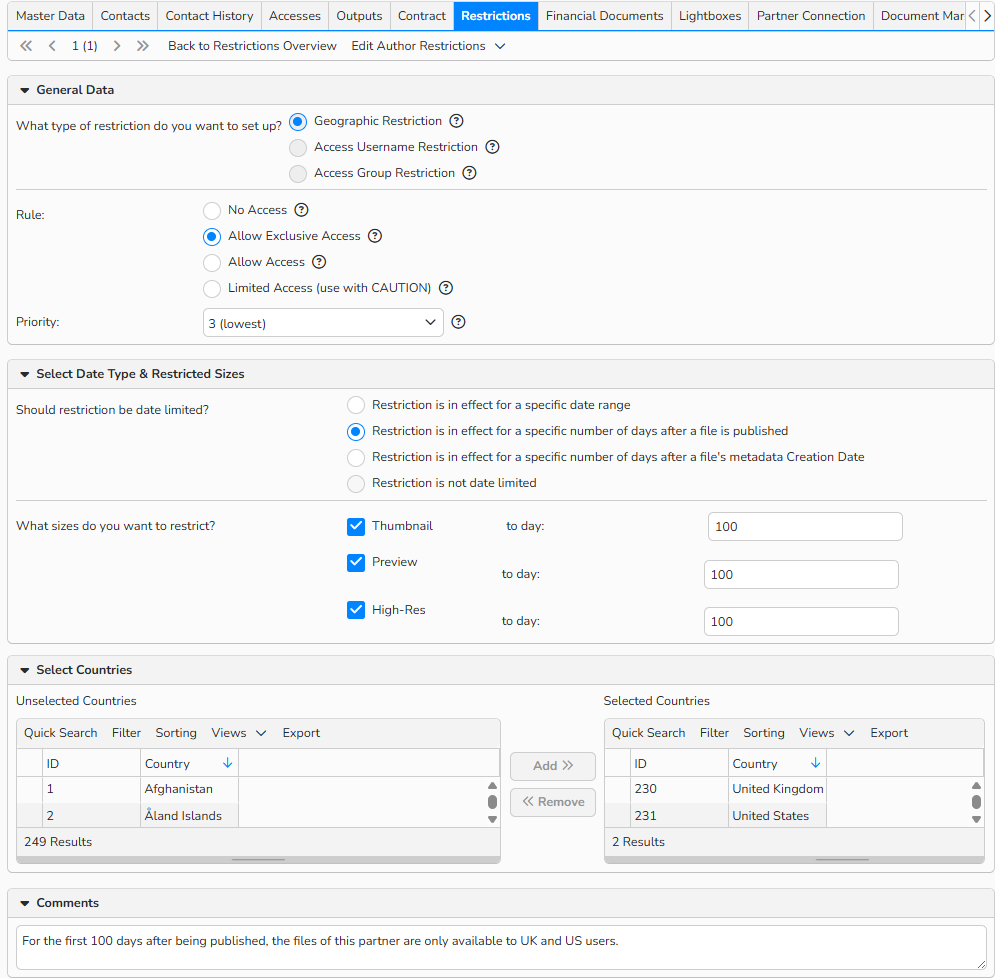
Geographic restriction setup
Define Batch Restriction
Media Management > Restrictions > Batch Restrictions
Use batch restrictions when you need to restrict a specific selection of media files.
To configure a new batch restriction, follow these steps:
Step 1. Create new restriction
- Go to Media Management > Restrictions > Batch Restrictions.
- Select Edit > New.
- Enter a descriptive name and make sure the Batch Restriction is Active option is on.
- (Optional) Enter internal notes into the Comments field.
- Click Save.
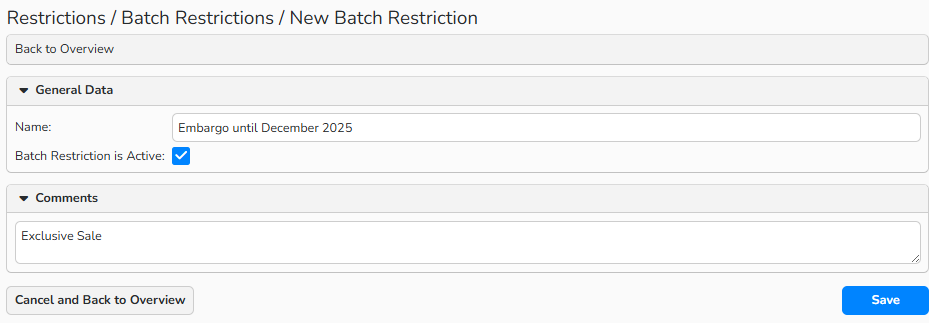
New batch restriction
Step 2. Add the media files you want to restrict
- Select Edit Media > Add Media. The Archive Search window opens.
- Enter a search term in your Archive and click Search.
- Pick the images you want to add to the restriction:
- For consecutive items: Shift + Click.
- For non-consecutive items: Ctrl + Click (PC); CMD + Click (Mac)
- Click Choose to confirm your selection.
- Click Save to add the images to the batch restriction.
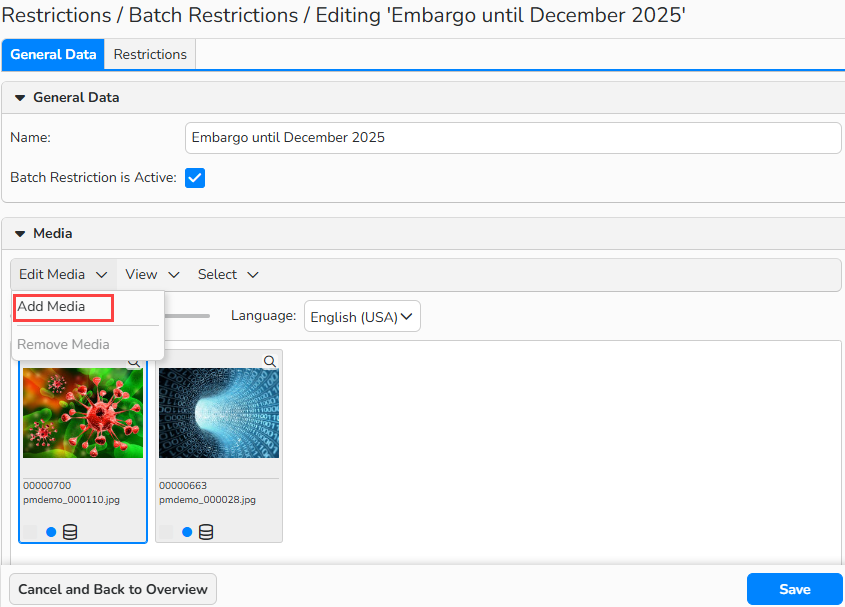
Add media to batch restriction
Step 3. Configure restriction
- Switch to the Restrictions tab and select Edit Restrictions > New.
- Select a restriction type:
- Geographic Restriction: Restriction based on countries.
- Access Username Restriction: Restriction based on individual users.
- Access Group Restriction: Restriction based on groups of users.
- Click Next and select the restriction’s rule:
- No Access (negative): Block selected countries, accesses, or access groups from viewing the associated media files.
- Allow Exclusive Access (positive): Grant access only to the selected countries, accesses, or access groups. Deny access to all others.
- Allow Access (positive): Grant access to selected countries, accesses, or access groups even if other rules would normally block them from this content.
- Important: When using this rule, set Priority to 0, so the restriction has a higher priority than other restrictions.
- Limited Access (use with CAUTION): Allow selected countries, access groups, or accesses to see only the assigned media files and sizes. Deny access to any other media files. However, the assigned media remains visible to all other users as well.
- Select a Priority between 0 and 3 (highest priority = 0). In case of a conflict, the rule with the higher priority (lower number) takes effect.
- Check the boxes for the media sizes you want the restriction to apply to.
- Select the countries, accesses, or access groups you want to apply the rule to, and click Add.
- The available list (countries, accesses, or access groups) depends on the previously selected restriction type.
- If needed, configure a date range restriction.
- Enter either the number of days or a date range for each selected media size.
- Click Save. If needed, add more rules to this batch restriction.
Important
A media file can only belong to one batch restriction at a time.
If you assign a media file to a new batch restriction, the previous assignment is overwritten. The media will then only be linked to the new batch restriction. However, each batch restriction can include multiple restriction rules.
Other ways to apply a batch restriction
Media Processing > Fast Functions
Fast Functions allow you to add images to a new or existing batch restriction directly within your Media Processing area. First, activate Fast Functions in the Settings of the relevant folder or archive:
- In Media Processing tree, right-click a folder or archive to view the context menu.
- Select Settings from the context menu.
- Open the Fast Functions tab.
- From the list of available functions, select Batch Restrictions, and click Add.
- Click Save.
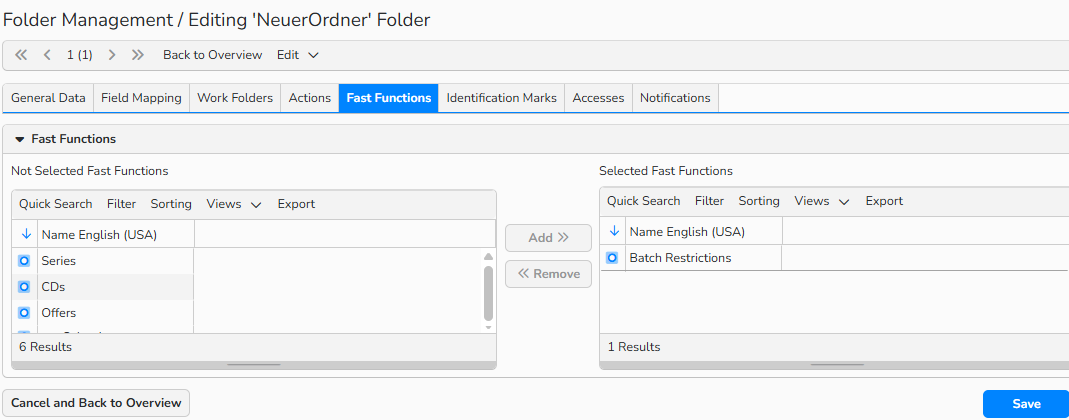
Folder context menu: Settings > Fast Functions tab: Add Batch Restrictions
The Fast Functions you activate will then be available from the Fast Functions dropdown and in the Fast Functions panel in the sidebar. Pick the images you want to restrict and then select Batch Restrictions from one of the menus. You can now either add the selected images to an existing batch restriction or create a new one.
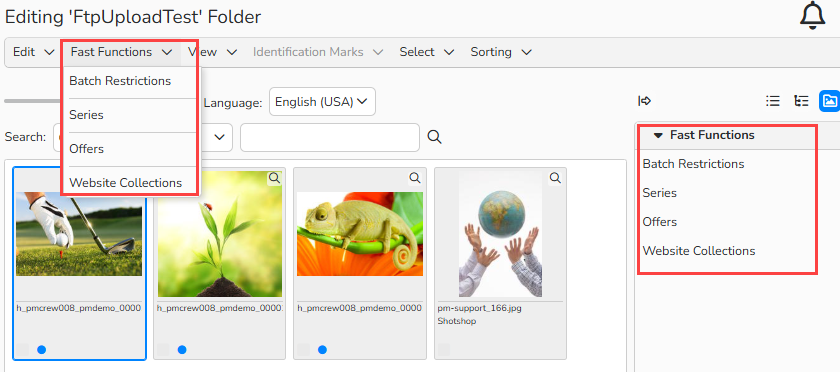
Fast Functions menus
Media Processing > Metadata Entry Form
Make sure the “Restriction” field is activated on your Metadata Entry form. If it’s not, you can change this in Administration > Form Editor > Media Processing.
You can then select existing batch restrictions for each media file directly in the form:
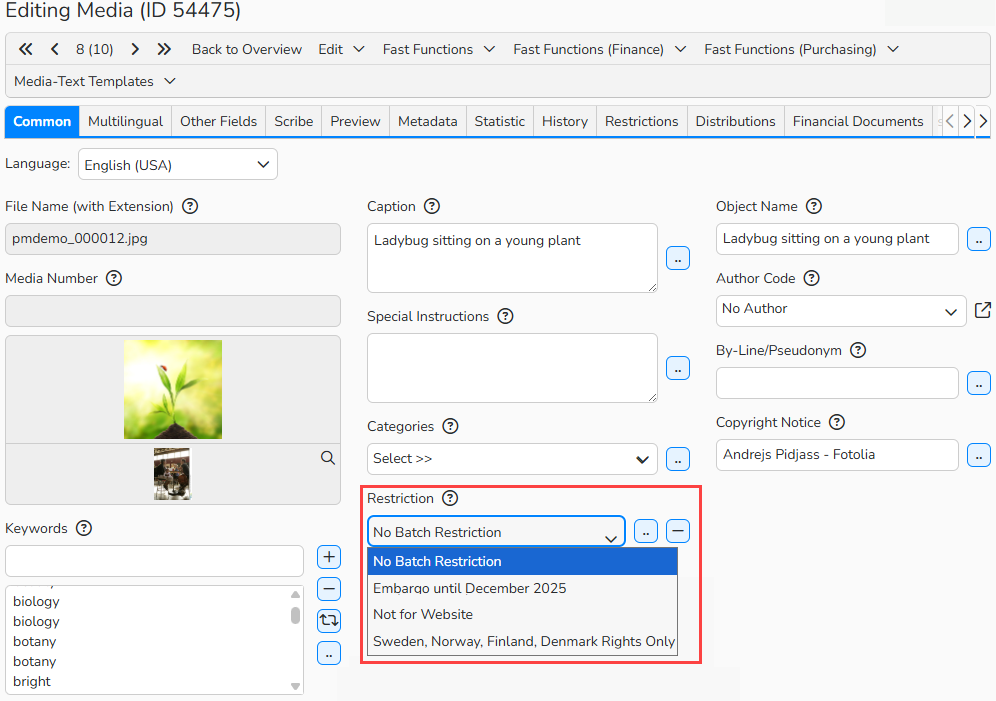
Metadate Entry tab in Media Processing: Restriction field
Media Processing > Replace and Edit
You can add a batch restriction to selected media files with the standard Replace and Edit action:
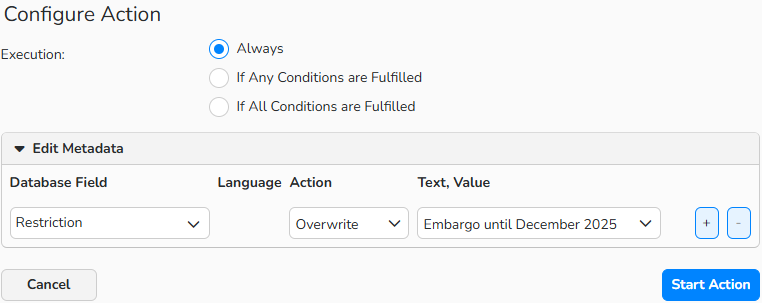
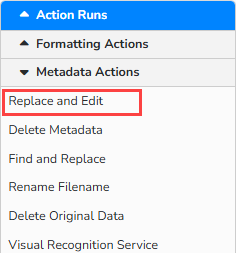
Replace and Edit action in Media Processing: Configure Action dialog
Define Metadata Restriction
Use this restriction type when you want to restrict images based on their metadata
Step 1. Create a restriction
- Go to Media Management > Restrictions > Metadata Restrictions.
- Select Edit > New.
- Enter a descriptive name.
- Make sure the Metadata Restriction is Active option is on.
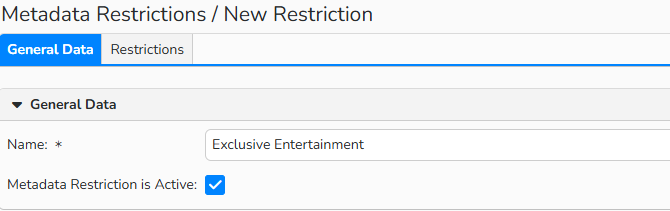
New metadata restriction: General Data
Step 2. Specify the metadata to which this restriction applies
- Select a field from the Database Field dropdown.
- Enter the actual metadata in the Value field. The field must contain that exact value.
- Click the [+] button to add more conditions.
- Click Save.
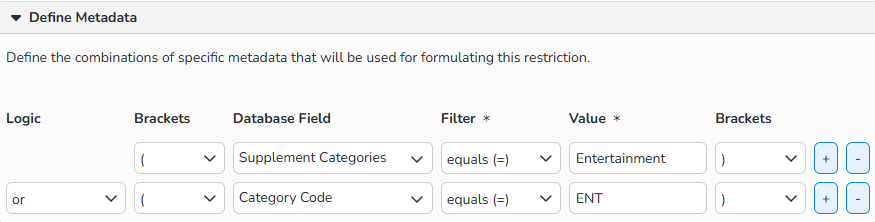
New metadata restriction: Define Metadata
Step 3. Configure the restriction
- In the Restrictions tab, click Edit Restrictions > New and select a restriction type:
- Geographic Restriction: Restriction based on countries.
- Access Username Restriction: Restriction based on individual users.
- Access Group Restriction: Restriction based on groups of users.
- Click Next and select the restriction’s rule:
- No Access (negative): Block selected countries, accesses, or access groups from the media files that contain the specified metadata.
- Allow Exclusive Access (positive): Grant access only to the selected countries, accesses, or access groups.
- Allow Access (positive): Grant access to selected countries, accesses, or access groups even if other rules would normally block them from this content.
- Important: When using this rule, set Priority to 0, so the restriction has a higher priority than other restrictions.
- Limited Access (use with CAUTION): Allow selected countries, access groups, or accesses to see only the assigned media files and sizes. Deny access to any other media files. However, the assigned media remains visible to all other users as well.
- Select a Priority between 0 and 3 (highest priority = 0). In case of a conflict, the rule with the higher priority (lower number) takes effect.
- Make sure to check the boxes for the media sizes you want the rule to apply to.
- Select the countries, accesses, or access groups you want to apply the rule to, and click Add.
- Click Next.
- If you need a date range restriction, configure it.
- Enter either the number of days or a date range for each selected media size.
- Click Save.
Note
Only the selected media sizes will be restricted.
Test the configured restriction
Test your setup using user accounts that match the restriction criteria defined in your rule. Ensure that each test account is correctly configured in the master data (e.g., country, username, or access group).
Test Scenarios by Restriction Type
Geographical Restriction
- Log in with a German account to verify that German users can view the content (if allowed).
- Log in with or impersonate an Italian account to confirm the content is blocked for Italian users (if restricted).
Access Username Restriction
- Log in with a specific user access included in the rule to confirm access behaves as expected.
- Log in with a user access not included in the rule to verify that restrictions apply correctly.
Access Group Restriction
- Log in with a user access who belongs to the allowed/restricted access group to validate the rule.
- Log in with a user from a different group to ensure the rule is enforced properly.
Tip
Impersonate user (secure and credential‑free):
This feature lets Admins temporarily step into a user’s view, without ever needing the user’s credentials. To use it:
- Open a user record in Sales, Purchasing, or Administration.
- Go to the Accesses tab, open the Manage Access menu, and select Login with this Webgate access or Login with this Backstage access.