
Replace Metadata
Download as PDFOverview
Backstage offers various options to modify the metadata of multiple media files simultaneously - from replacing entire field contents to individual characters.
Option 1: Batch Processing
This action allows you to apply changes to all selected media simultaneously:
- Completely overwrite the content of a metadata field.
- Append or prepend text to the existing content of a metadata field.
Note
For performance reasons, the number of selected media should not be too large. Batch processing is recommended only for a few hundred media files at a time.
Note
If the metadata field contains different values across the selected media, the field will appear empty.
To perform batch processing, follow these steps:
- Select the files you want to edit.
- To select a continuous range: SHIFT + Click
- To select a non-continuous range: CTRL (PC) or CMD (Mac) + Click
- From the Edit menu, select Batch Process.
- Enter data into the appropriate fields.
- Use the context menu on the left side of each field to define how to apply your data
- Add to End: Adds the new text to the end of the existing text.
- Add to Beginning: Adds the new text before the existing text in the field.
- Replace: Replaces all existing data in the field with the new data.
- No change: Leaves the field unchanged.
- Click Save.
Note
For more details, refer to Media Labeling and Form Editor.
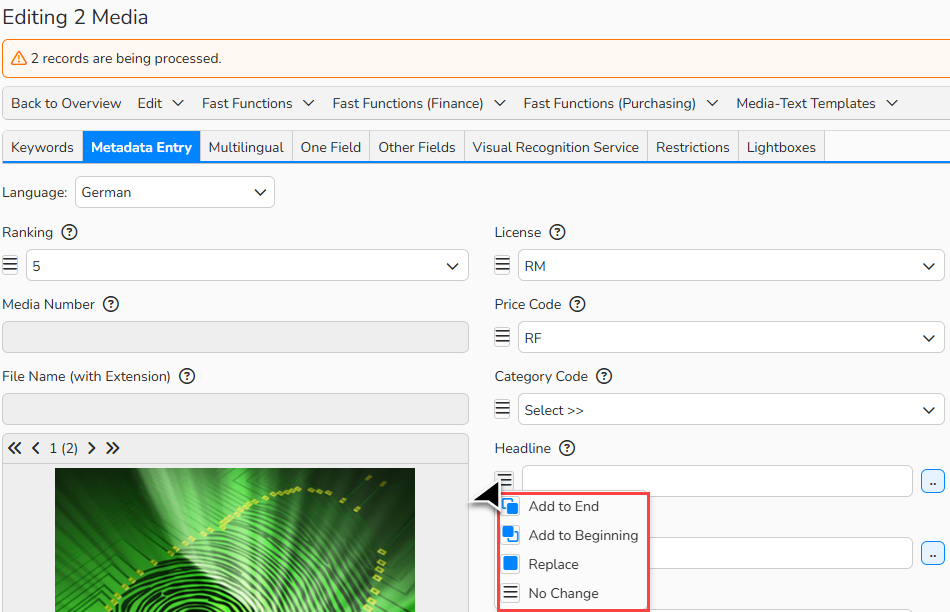
Media Processing: Batch Process context menu
Option 2: Metadata Action: Find and Replace
With the Find and Replace metadata action, you can apply changes to all selected media:
- Replace entire contents or just parts of information within metadata fields.
- Delete information from metadata fields.
Note
This action is useful, for example, for correcting spelling mistakes.
The Find and Replace metadata action is available directly in Archive or Import folders:
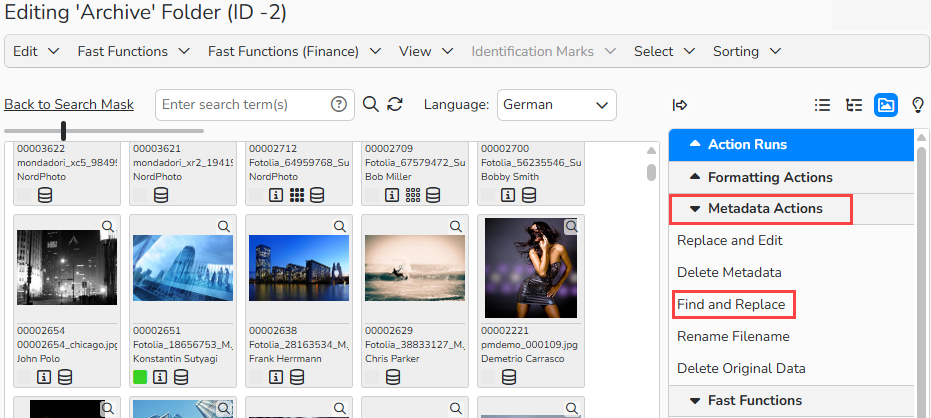
Archive Folder: Metadata Action “Find and Replace”
Note
You might need to enable the action for selected folders first. Right-click a folder to view its context menu and select Settings to open Folder Management > Actions tab. There you can add the Find and Replace action:
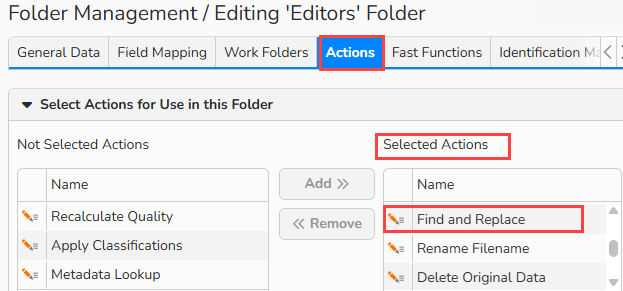
Folder Management > Actions tab: Find and Replace enabled for selected folder
To perform a Find and Replace action, follow these steps:
- Select Find and Replace from the Actions menu in the folder. The Configure Action dialog opens.
- In the Configure Action dialog, select database fields:
- Select database fields individually or enable the Select All option to include all fields.
- Select a metadata language.
- In the Find and Replace panel, configure the following:
- Filter to define how the system should handle data within the selected fields:
- contains
- equals
- starts with
- ends with
- Enter one or more words for the system to find.
- In Execute for, select one of the following options:
- Any instance: Replace words even if the value is part of a larger word (for example, “run” will also update “runway” or “outrun”).
- Only for complete words: Replace only words that exactly match the specified term.
- In Action, choose the action to process metadata
- overwrite
- delete
- Filter to define how the system should handle data within the selected fields:
- Click Start Action.
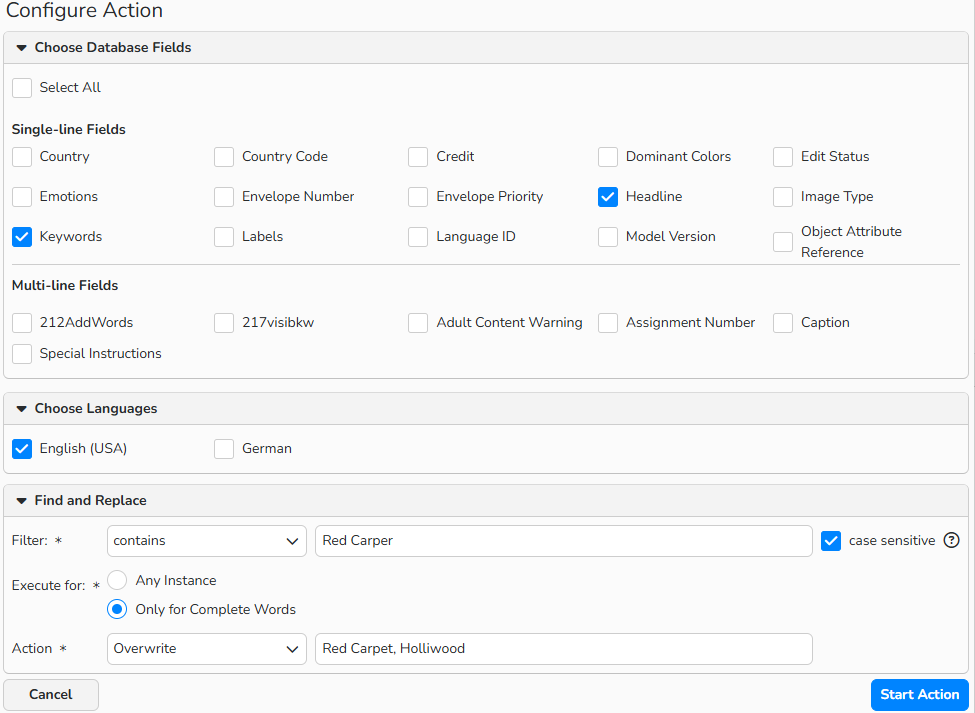
Metadata Action ‚Find and Replace‘: Action configuration
Note
This action is case sensitive, the system will find and replace only the terms with the exact same spelling. For more details, refer to Actions.
Option 3: Metadata export and import
To perform complex replacements or handle very large volumes of media files that the two methods above cannot manage, export the metadata from Backstage as a comma-separated text file. You can then edit this file in a text editor such as Notepad++ or a spreadsheet application like Microsoft Excel.
After making the changes, import the updated data back into Backstage.
Export metadata
To export metadata, follow these steps:
- In Media Processing, select Archive or other folder from which you want to export metadata.
- Click Edit > Metadata Export. In the Metadata Export dialog, configure the following settings:
- Configure Export Format: Specify the desired file format for the export. We recommend using the following settings:
- Field Separator: ;
- Text Start: "
- Character Set: UTF-8.
- Field mapping for the Export: Specify the exact metadata that you want to export by selecting relevant fields in the Field Mapping column.
- Language: Select a language for any field that can be in more than one language.
- Separator: Set separators for lists; for example, separate keywords with a comma (,).
- Add more metadata fields for export with the plus icon [+] or remove fields with the minus icon [-].
- Click Start Export.
- Configure Export Format: Specify the desired file format for the export. We recommend using the following settings:
- A metadata file is generated, and you can save it to your desktop.
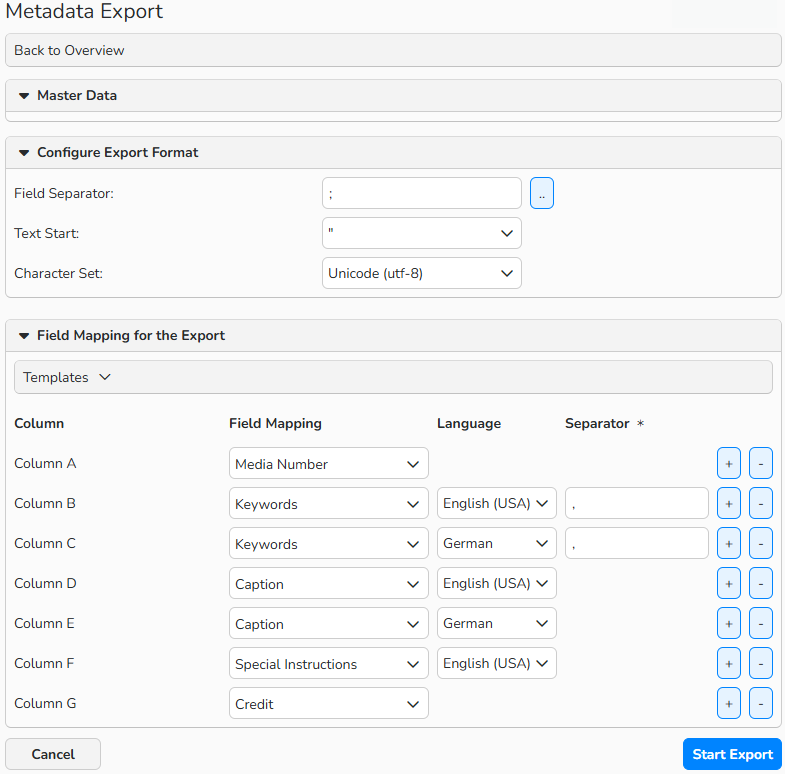
Metadata Export dialog
Note
When exporting from the Archive folder:
Always include Media Number (or the file name for images that have not yet been published). This ensures the system has a reference field for mapping during import.
When exporting from an import folder:
Use the file name.
Edit the text file
Backstage generates a .txt file during export, which you can open in applications such as Excel.
Follow these recommendations to correctly save the export file:
- When you open the file, make sure to choose the UTF-8 as the encoding format to avoid character issues.
- Excel may remove leading zeros by default, which can change media numbers. To keep the leading zeros, do the following when importing the file in Excel:
- Set the column data format to Text in Excel’s Text Import Wizard.
- Use Excel’s Find and Replace tool to adjust the metadata as needed.
- Save the list locally as a CSV file.
Important
Select the CSV (UTF-8) option when saving. This keeps the correct encoding and prevents issues with special characters.
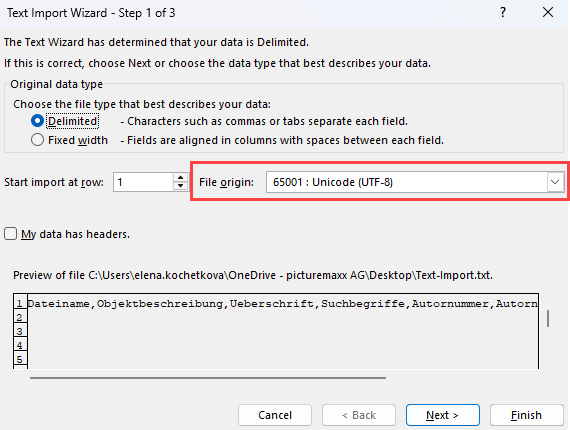
Text Import Wizard in Excel: select the Unicode (UTF-8) encoding format
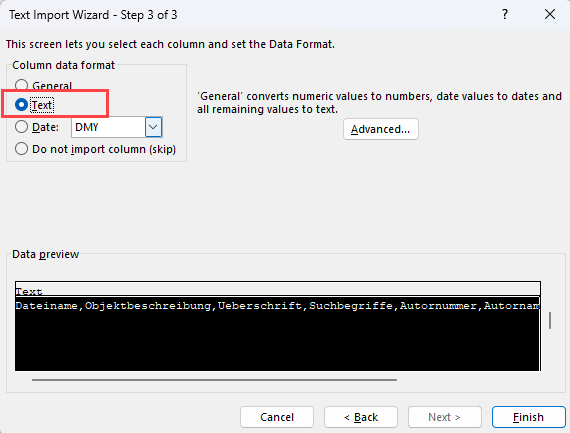
Text Import Wizard in Excel: Select “Text” as column data format

Windows “Save as” dialog: Save as type CSV UTF-8
Import metadata into Backstage
- Upload the CSV file to Backstage.
- You can use a new import folder that does not automatically publish content.
- Select a folder:
- To import metadata for unpublished media: go to Media > Media Processing and click an import folder name.
- To import metadata for published media, click Archive (under Media Processing) and do a search.
- In the selected folder, click Edit > Metadata Import. In the Metadata Import dialog:
- From the Choose Source menu, select the metadata file to import.
- In the Field Mapping for the Import panel, If you’ve completed all preparation steps correctly, the system displays the first media number from the list.
- Define what happens to the information in the other metadata fields. For each field, select:
- In the Field mapping column: a metadata field to update.
- In the Action column: an action to handle the data from the imported file. To replace metadata, select Overwrite.
- Optionally, set the language and delimiter for lists within the metadata field.
- Click Start Import. All images included in the file will now be updated. This may take some time (as a guideline: 1,000 images require approximately 5–10 minutes).
Note
You can find detailed information about the steps described in this guide in the following articles: Media Labeling, Form Editor, Actions, Metadata Export, Metadata Import.