
Media Labeling
Download as PDFOverview
Backstage provides you with various options for labeling your media. These include:
- Batch processing over several hundred media for simultaneous labeling.
- Setting up label templates for recurring information.
- Flexible design of labeling masks, etc.
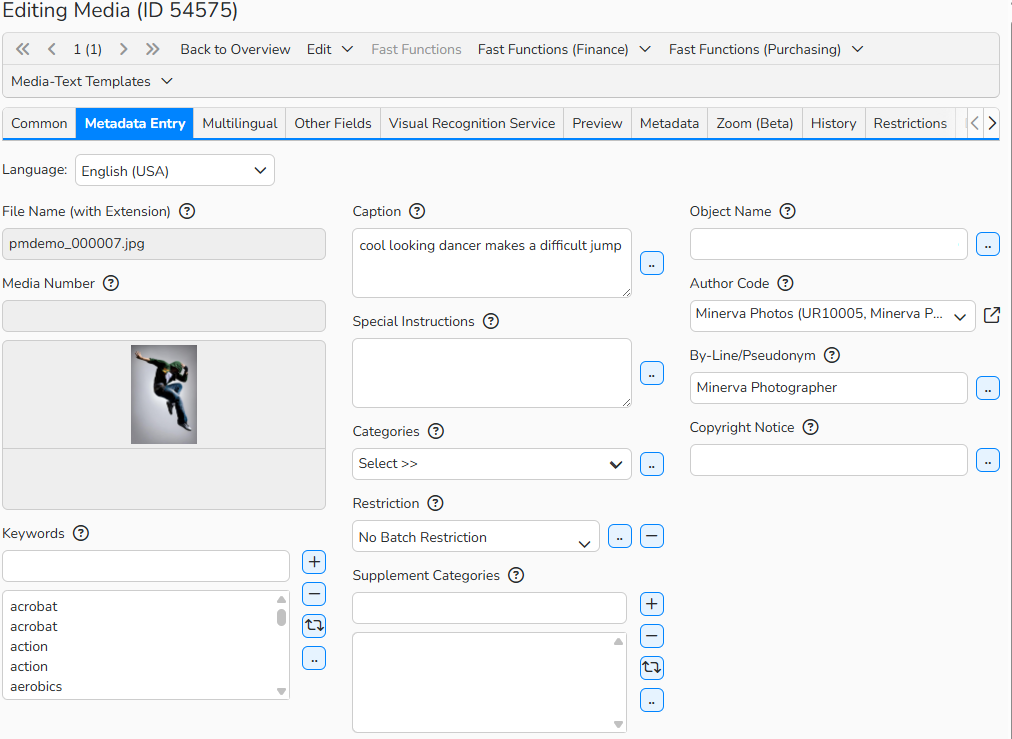
Editing Media window: Metadata labeling fields
Metadata Fields
The media labeling in Backstage offers you various field types to enter your metadata.
- Simple Text Field: Add textual metadata to media files or edit existing metadata. For example, Caption, Special Instruction fields.
Note
The field length meets the IPTC standard, so all the metadata info fits in when downloading the media.
- Preview: Metadata mask fields that contain images. Click an image to zoom it.
- Author Code: View a list of all your media suppliers (Authors and Partners). This information comes from the Purchasing master data. You can enter and modify it, respectively, under:
- Purchasing > Authors
- Purchasing > Partners
- Purchasing > Author Pools, Syndicates (optional)
Note
Click  to view the selected supplier’s master data record.
- Keywords: Enter a term or several terms separated by commas (,) and click Add or press ENTER. To avoid duplicate information, the system smartly checks for duplicates. You can remove or replace existing keywords. The last keyword entered remains in the entry field so that you can use it as a root word for other keywords, e.g. “house” and “housekeeper”.
- Restriction: View all existing Batch Restrictions. You can create and modify media-specific restrictions in the Media Management > Restrictions area. (See the Restrictions FAQ)
- Linked Fields: Certain fields, e.g., Collections, have the lookup button next to them. These fields are linked to data in other Backstage areas and the button opens a list of available items for you to choose from. (See the Media Collections: Series FAQ).
- Date: For any of the date fields, enter the date in DD.MM.YYYY format. The date display depends on your system settings. (See the Regional Settings: Numbers, Currencies, Date, Time FAQ). Alternatively, click the calendar icon to select a date from a pop-up calendar.
- Classifications: When you create a Classification, the system will link appropriate form fields to it. As you begin to type, the editor will suggest Classification tree elements for labeling. You can also use the lookup button to select a specific Classification tree. To create new Classifications, go to Media Management > Classifications. (See the Media Classifications FAQ).
- Read Only: You can define metadata fields as Read Only in Administration > Form Editor to display them in the labeling form but make them non-editable (See the Form Editor FAQ).
- Display Word/Character Count: You can activate the option for the fields in Administration > Form Editor. This can be helpful, for example, if you work with partners that set character limits (See the Form Editor FAQ).
Tip
Customize your Metadata Forms
The forms you use to edit metadata are completely customizable. You can define mandatory fields or activate special functions, such as Save Text Input to quickly autofill the field with previously input text.
Create as many different forms as you need, define which data fields a form displays and who has access to each form.
To create new forms or modify existing forms, go to Administration > Form Editor > Media Processing. For more information, refer to the Form Editor: Media Processing FAQ.
Edit Metadata of a Single Media File
To edit a single media file:
- Go to Media Processing.
- Select the Folder where the file is located.
- Double-click the file or select it and click Edit > Open.
- Optional: Select the Language of the media label you want to enter.
- Add your desired text into the available data fields.
- You have several options for saving:
- Save: to save your updated metadata.
- Save and Next: to save the updates and go to the next file.
- Save and Next (Overtake Text): to save the updates, copy all the text, and paste it to the next file.
- If you need to reset to the last saved version of a file’s metadata, click Revert.
Top Menu Options
Menu: Edit
The Edit menu offers the following options:
- Clear Fields: Remove all text from the form’s fields for the current media file.
- Download: Download the original version of a media file, i.e. as it was previously transferred to the system.
- Delete: Select files you want to delete and move them to Trash.
Note
The downloaded file will be the same as the original file you uploaded. To batch download or to download images with the latest metadata, use the Lightboxes feature. To learn more, please request the Lightboxes FAQ.
Menu: Fast Functions
Fast functions are shortcuts that allow you to connect media to new or existing collections or to define rights directly within media editing.
The Fast Functions menu offers the following options:
- Batch Restrictions: Create distribution restrictions for media. (Media Management > Restrictions > Batch Restrictions).
- Series:Create new/add to existing series - a collection with one or more main media files that represent the entire collection, for example, topic-related reports (Media Management > Collections > Series).
- CDs:Create new/add to existing CD - a collection with just one cover that represents the entire collection, for example, a CD or DVD with archive images on a specific topic (Media Management > Collections > CDs).
- Offers: Create new/add to existing offer - essentially a series of tailored topics that you collect, describe, and then present (Media Management > Collections > Offers).
- Website Collections: Group media files for your website (Web > Website Collections > Administration).
Note
Find out more about the functions in corresponding FAQs.
Menu: Fast Functions (Finance)
With finance fast functions you can create a financial document directly with the media files from your Archive. Choose between Price Quote, Order, Delivery Note, or Invoice.
- Select media files.
- Click Fast Functions (Finance) and select a required document from the menu list. A Customer overview dialog opens.
- Select a customer record from the list.
- The auto-generated document opens for editing.
- Make the necessary changes and click Save.
Media Text Templates
The Media Text Templates feature allows saving frequently used metadata so that you don’t have to retype that same text over and over again. Use the templates to autofill your form fields.
To create a new Media Text Template:
- Double-click a media file or select it and click Edit > Open.
- Fill in the file’s metadata form with the text you want to save.
- Click Save.
- Select Media Text Templates > Save as Template.
- In the Save Media-Text Template dialog:
- Name your template.
- Optional: select an Existing Template to overwrite.
- Enable the checkboxes of the fields you want to keep in the template.
- Click Save.
To apply Media Text Templates:
- Double-click a media file or select it and click Edit > Open.
- or Multi-select several files and click Edit > Batch Process.
- In Media Text Templates select a template you want to apply.
- Specify a way to transfer the metadata text:
- Append: Add the template’s text to your existing text.
- Replace: Replace your existing text with the template text.
- Specify a way to transfer the metadata text:
Note
In Media Text Templates, choose Append, Replace, or Query. Your choice determines how metadata text is applied. If you select Query, the system will ask you to choose Append or Replace each time you apply a media text template.
To manage Media Text Templates
- Go to Media Management > Templates > Media Text Templates.
- Manage the templates with the following Edit menu options:
- New: Create a new Media Text Template. Alternatively, create a new template directly in the media file: Media Text Templates > Save as Template.
- Open: Edit a selected Media Text Template.
- Copy: Copy a selected Media Text Template.
- Delete: Remove selected templates you do not need.
Note
The table functions help you search, filter and sort the templates, as well as pick which data fields to display within the table view. Find out more in the Advanced Table Views FAQ.
Metadata and Information tabs
Backstage offers the following default tabs that display available metadata and information about the media file:
| Common | This is a pre-configured individual metadata form that contains important metadata fields. You can edit them in Administration > Form Editor > Media Processing. |
| Multilingual | This form is laid out in two columns so that you can simultaneously view and enter a file’s metadata in two different languages. Your initial Backstage configuration shall be set up to support multiple metadata languages. To view your current language configuration, go to Administration > Language Settings > Languages. If you require changes, contact us at support@picturemaxx.com. Find out more in the Language Settings: Languages FAQ |
| Other Fields | This is a pre-configured individual metadata form that lists special fields for labeling. You can edit them in Administration > Form Editor > Media Processing. |
| Preview | Displays an image file in its larger preview size. Click Text Info, File Info, and Camera Info to view the file’s metadata. Click History to view a complete record of the file’s processing history in Backstage. |
| Metadata | Displays all the metadata associated with your media file. This includes the metadata you’ve entered through the form fields, as well as any other metadata that was imported along with the file. |
| Statistic | Lists all downloads and search queries for this media file. |
| History | Lists all the operations related to the media file. |
| Restrictions | Shows all permissions that affect a media file, such as copyright rights, batch restrictions and metadata rights. |
| Distributions | Offers a targeted overview of all recent or archived distributions of the media file. |
| Financial Documents | When using the Backstage Finance module, you will find all documents relevant to a media file here. For example, you can track the number of sales of a specific image, video or other media file. |
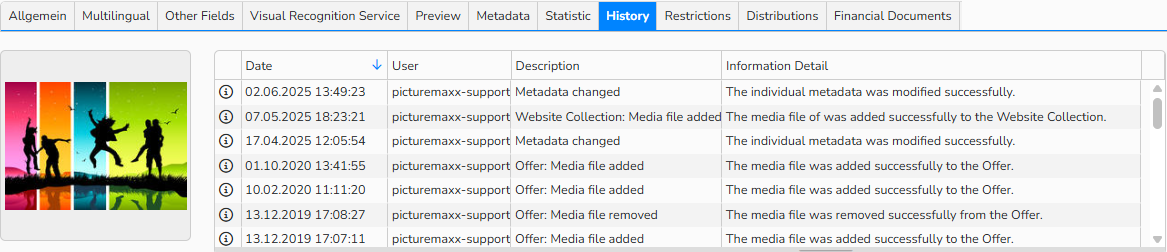
Editing Media window: History tab
Note
Only employees with full Backstage rights can view all the tabs. Your administrator can grant permissions to access selected tabs for media labeling for each user or group individually in the Administration module of Backstage.
Batch Processing
You can use batch processing to edit metadata of hundreds of media files at once.
- Select the files you need to edit.
- To multi-select a continuous range of media files: SHIFT + Click
- To multi-select several individual media files: CTRL (Win) or CMD (Mac) + Click
- Select Edit > Batch Process.
- Add data to corresponding fields.
- Use the hamburger menu to the left of each field to define a way to add the data text:
- Add to End: The new text will go after any existing text in the field.
- Add to Beginning: The new text will go before any existing text in the field.
- Replace: The new data will replace any existing data in the field.
- No Change (Default): No change will be made to the data in the field.
- Click Save.
Note
Backstage shows the number of media files you’re editing and lets you navigate through thumbnails for all files in the batch. Data fields appear empty unless every file shares the same value for that field.
By default, new data is appended to existing content. In the Form Editor, you can change this for each field, for example, to “Overwrite” or “Prefix.” Find out more in the Form Editor FAQ.
Keyboard Shortcuts
The following keyboard shortcuts are available for media editing in your Folders.
| ENTER | Open a media file |
| DEL | Delete a media file |
| CTRL + A (Windows) CMD + A (Mac) |
Select all media files |
| 1 – 8 | Assign Urgency rating to selected media files |
| SHIFT + Click | Multi-select a continuous range of media files |
| CTRL + Click (Windows) CMD + Click (Mac) |
Multi-select several individual media files |
| CTRL + S (Windows) CMD + S (Mac) |
Save |
| CTRL + ALT + S (Windows) CMD + ALT + S (Mac) |
Save and continue |
| CTRL + ALT + N (Windows) CMD + ALT + N (Mac) |
Save and continue (copy text) |
| CTRL + SHIFT + S (Windows) CMD + SHIFT + S (Mac) |
Save and back to overview |