
User Access and Permissions
Download as PDFOverview
From full access to limited permissions, you can define how much access your users, authors and purchasing partners have. Control which specific permissions and areas should be available. You can grant access permissions to individual accesses or to an entire access group.
To make rights management easier, you can assign individual accesses to access groups. These groups inherit predefined settings such as access types, view and download permissions, and media processing restrictions.
This allows to manage roles (admin users, interns, photographers, or clients) without technical expertise.
Examples:
- Allow one access group to download high-res files in the Webshop, and limit another to viewing only.
- Let your photographers update the captions of their own images within the Media Processing area, but do not allow them to access the work of other photographers or other areas of Backstage.
- You have a summer intern whose job it is to update all your customer contact data. Give them just enough access to update the customers’ address data, but not to see any of the customers’ financial data. Let them assist in keywording media but restrict them from deleting or batch processing files.
Tip
Before you start
Make sure the email address is available in the master data of the author, purchasing partner, or user. This is essential for managing a user access.
Create individual access
To create an individual access, proceed as follows:
- Navigate to a relevant master data area:
- Sales > Customers or Partners
- Purchasing > Authors/Partners/Author Pools
- Administration > Users
- Double-click a record from the overview to open it
- Click the Accesses tab and select Manage Access > New.
- Fill in the General Data details (fields marked with * are required):
- Name *: Enter an internal name for the access.
- This name helps identify access entries in Backstage, including areas like the Lightbox module and statistics.
- Access is active: enable the option to activate the access.
- Username *: Enter the username the user will use to sign in.
- Password *: Enter a secure password for login. We recommend using at least eight characters, shall include an uppercase letter, a lowercase letter, a number, a special character.
- This is an initial password, that the user will change after their first login.
- Contact person: Link the access to an existing contact person from the dropdown menu.
- Optional settings:
- Outputs: Link the access to an existing output.
- Registered on Website: Shows the website where the user account was registered, if available.
- Registered with IP address: Displays the IP address associated with the access, if available.
- You can define a positive or negative IP restriction in Administration > IP Restrictions.
- Name *: Enter an internal name for the access.
- In the Management and Assignment of Access Groups panel, you can assign the access to existing access groups. See Create access groups below.
Important
Do not send login details in the email body.
For security purposes, never send Username and Password in the email text. Attach them in a PDF instead.
Configure individual access permissions
Manage user rights and permissions for Backstage modules, website search and downloads, and media import.
Configure access to Backstage (for authors, purchasing partners, and internal users)
In the Access Settings for Backstage panel:
- Review Override Group Permissions:
- Activate the option to give individual permissions priority over the selected Access Group permissions.
- Turn off the option to use the permissions defined in the selected Access Group.
- Important: If Override Group Permissions is enabled but no individual permissions are defined, the user will have no access at all.
- Assign either Unlimited Access or Limited Access, depending on the user’s role:
Unlimited Access (Administration Users only)
To grant an Admin user full access to all Backstage areas and folders:
- Enable the Unlimited Access option.
- From the Available Forms list, select the Media Processing forms the user can access to edit metadata, click Add and Save.
Limited Access
To grant your users, authors, and purchasing partners limited access to specific areas in Backstage:
- Enable the Limited Access option and click Save to display a list of all areas and features in Backstage.
- In the list, select checkboxes to define targeted and specific permissions:
- Read: User can view the area.
- Write: User can edit existing data.
- Batch Processing: User can perform batch tasks.
- Create: User can add new records.
- Delete: User can remove data.
- Export: User can export documents from selected areas.
- Full Control: Enables all the above permissions at once. This will automatically select all available options for the row.
- Click Save.
- From the Available Forms list, select the Media Processing forms the user can access to edit metadata, and click Add.
- To configure Available Forms for Limited Access, make sure both Read and Write options are selected for the Media Processing area in the checkbox list.
- From the Available Folders list, select the Media Processing folders to let the user edit media there, and click Add.
- Unlimited Access grants access to all folders automatically.
- You can restrict specific actions, action runs, or action run groups for media processing by activating the Limit Media Processing Actions option.
- Only the functions you select will be available for this access.
- You shall also enable these functions for the corresponding media processing folder (Folder’s context menu > Settings).
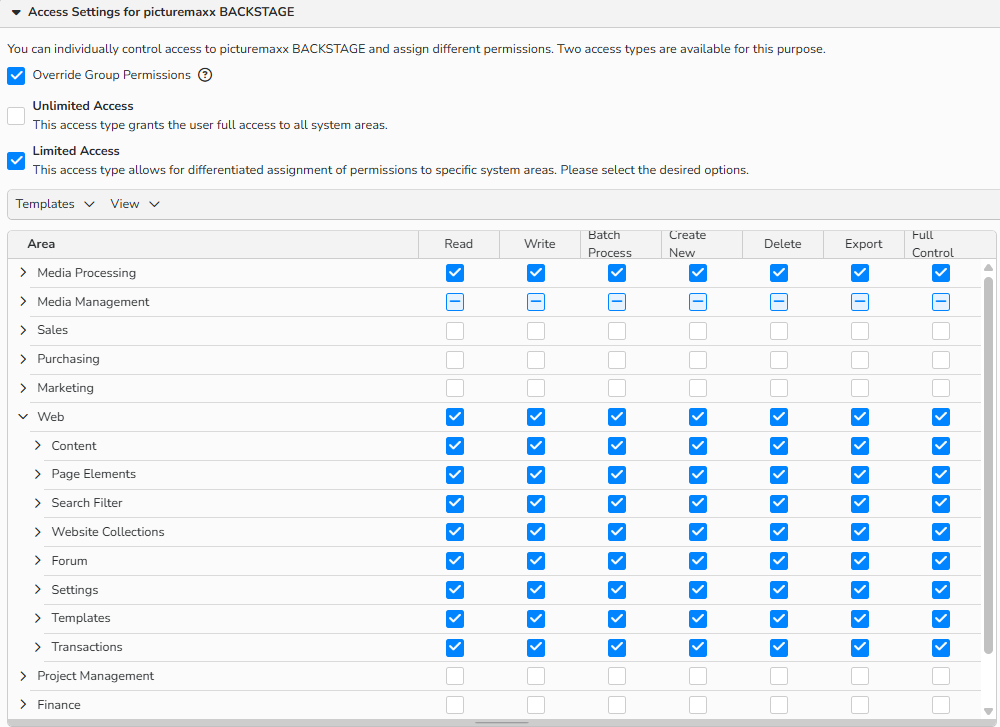
Access Settings for Backstage: Limited Access setup
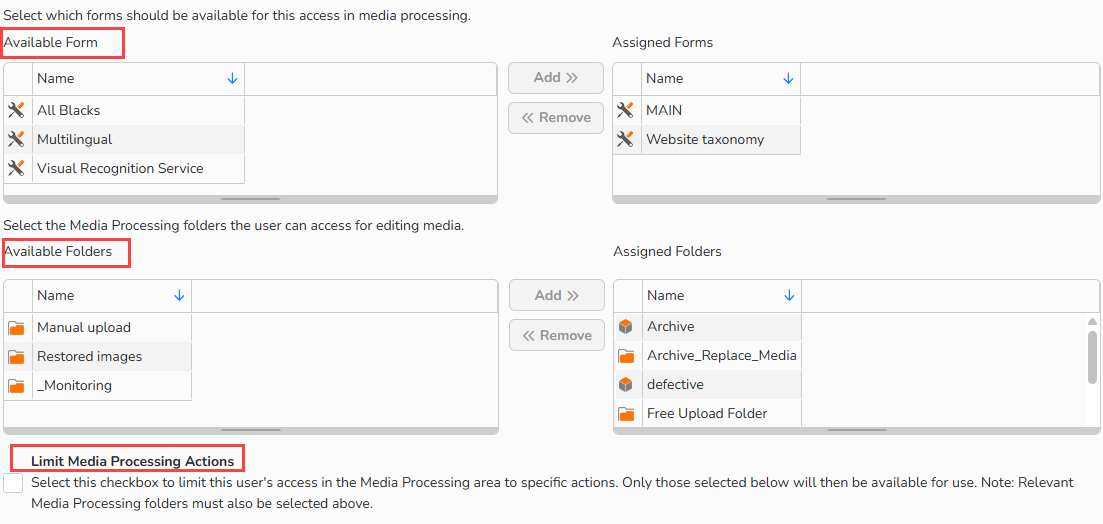
Access Settings for Backstage: Allow access to selected forms and folders, limit media processing actions
Tip
Create custom labeling forms
You can generate custom labeling forms in Administration > Form Editor > Media Processing. This is useful, for example, when you want to grant an author access only to specific metadata fields.
Configure permissions to upload media
In the Media Import (FTP/HTTP) panel:
- Review Override Group Permissions.
- Enable Media Import (for Purchasing and Administration users):
- Define the target folders where the user is allowed to import media.
Configure permissions to search and download media
In the Access for Searching and Downloading your Media panel, review Override Group Permissions and configure how users can access your media files and interact with them:
- Override Group Permissions: Check the box to prioritize individual permissions over those of the access group.
- i-picturemaxx (If the service is available for your system): Activate this option to allow professional image and media buyers to access your portfolio with the my-picturemaxx media network.
- Webgate: Enable this option to make your portfolio available on your website.
- Activate Statistics: Active by default to track search and download activities of the access.
- Important: Do not change the default setting. Turning off statistics disables search and download tracking.
- The statistics overview is available in Sales > Statistics.
- Permissions: Define display, download, and watermark permissions for each media size - Thumbnail, Preview, High-Res.
- If you use Channels, assign access rights to the available channels here.
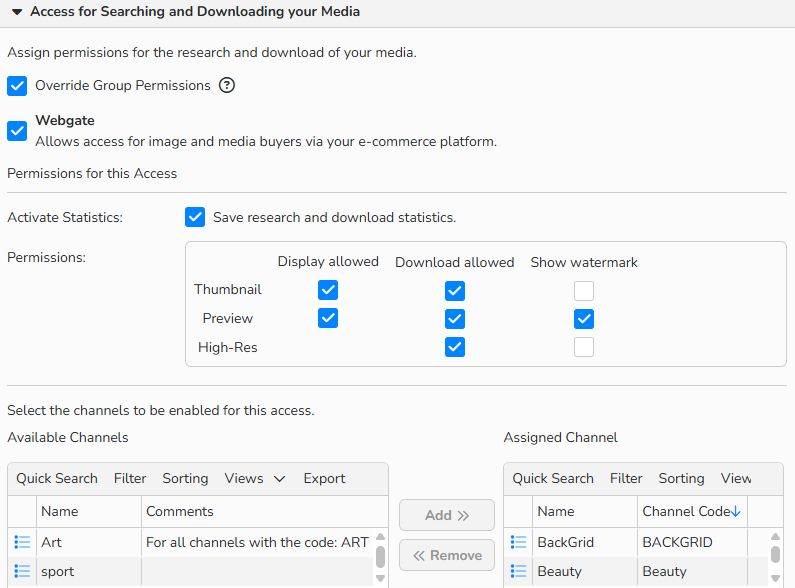
Access for Searching and Downloading your Media: Configure Webgate permissions
Configure download delivery and limits
In the Download Method & Limits panel, review Override Group Permissions and specify restrictions for your media downloads:
- Download Method: determine how the user can download assets from your webshop:
- Direct Download: Allow download directly from the interface.
- Email Download: Upon a download request, a user will receive a link to a zip file via email. You will get a copy of the email to the address set in Web > Settings > Email Addresses.
- Maximum Download Limits: you can limit the number of High-res and/or Preview downloads allowed within a time period.
Configure access validity period
In the Time-Based Access Restriction panel, you can restrict access validity to a time frame (Optional).
- Review Override Group Permissions
- Simply define the start and end dates for the activation period.
Assign additional security restrictions
In the Authentication Restrictions panel, you can define additional security restrictions for the access (Optional).
- Review Override Group Permissions
- With the IP restrictions option, you can deny system access to any user with a specified IP address.
Tip
Use templates for limited access to Backstage
For User and Purchasing master records that are to be assigned with restricted access to Backstage, you can use templates. The settings configured in an access profile for the Access Settings for Backstage section (including system areas, label templates, and available folders) can be saved and retrieved.
To save a configuration as a template, select Templates > Save Template. To apply a template, select it from the Templates menu.
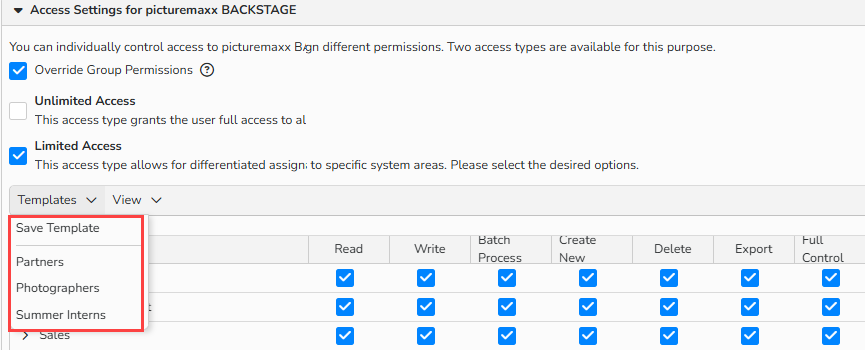
Template menu: Save templates to reuse them for other limited accesses
Note
For more information on the topics covered, refer to the FAQs on the Form Editor, IP Restrictions, Outputs and Output Groups, Contacts, Folders, Actions, Action Runs, and Action Run Groups.
Move access
Backstage allows you to move access records together with their related contact and statistics. To do so:
- Navigate to the relevant system area.
- Open a record by double-clicking it or selecting Edit > Open.
- In the Access tab, select the record you want to move.
- Click Manage Access > Move Access.
- In the Move Access dialog, select the master data record to which you want to move the access.
- Specify how to handle the related contact person details:
- Remove contact person – move the access without the contact person.
- Move contact person – transfer the access along with the existing contact person.
- Copy contact person– move the access and create a duplicate of the contact person for the new record.
- Enable Move statistics to transfer the access statistics to the new master data record.
- Specify how to handle the related contact person details:
- Click Choose.
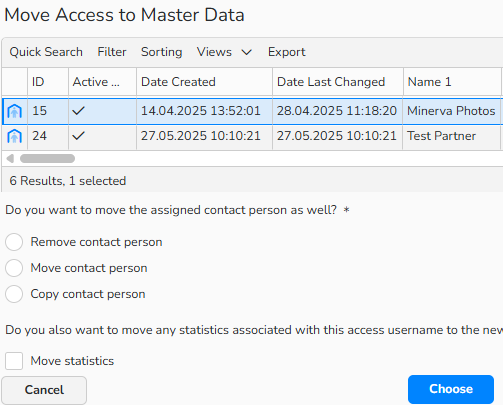
Move Access to Master Data
Manage individual accesses
You can manage access in the Accesses tab of a corresponding user entry.
Create access
Select Manage Access > New from the menu in the Accesses tab.
Edit existing access
In the accesses overview, double-click an access to open it and select Manage Access > Open.
Batch process of existing accesses
- In the accesses overview, select the access entries you want to edit. You can multi-select the entries:
- To select a continuous data range: SHIFT + Click
- To select a non-continuous data range: CTRL (PC) or CMD (Mac) + Click
- Select Edit Access > Batch Process.
Copy access
In the accesses overview, select an access entry and click Edit Access > Copy.
Delete access
Select the access entries you no longer need and click Edit Access > Delete.
Move access
Select an access entry and click Edit Access > Move Access.
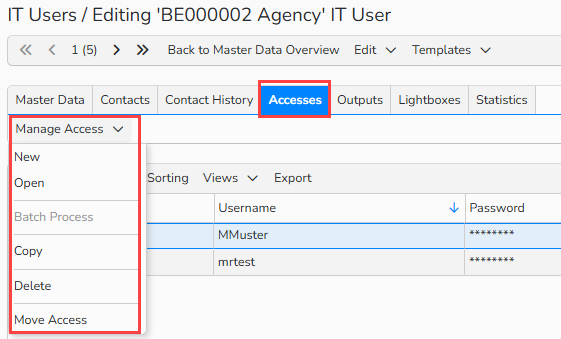
IT Users : Accesses tab: Manage Access menu
Tip
Master data-based access overview
In the Sales and Purchasing master data areas, you can display all access records assigned to the respective area. Select View > Access in the menu. Various management tools are also available here.
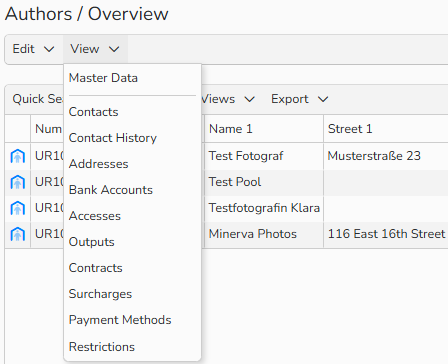
Authors overview: View menu
Create access groups
To simplify access management, assign individual accesses to one or more access groups. This allows those accesses to inherit group settings with a single click.
You can configure access groups for a single specific area or across multiple areas.
Create and activate an access group
- Navigate to a relevant system area:
- Sales > Customers or Partners > Access Groups
- Purchasing > Authors/Partners/Author Pools/Syndicates > Access Groups
- Administration > Users > Access Groups
- In the overview table, click Edit > New.
- Configure the following settings:
- Enter a group Name.
- Enable the Active option to activate the group.
- To make the group available across all system areas, enable the Global option.
Assign users to the group
In the Access Group panel, select accesses from the Available Users list and click Add to assign them to the group.
Configure group permissions
Access Group permissions follow the same configuration process as individual Access settings. See Configure individual access permissions above.
Override access group settings
You can override group permissions on any individual access with the Override Group Permissions option.
For example, photographers may share group permissions for searching and downloading media but have individual Media Import rights to access only their own FTP folders.
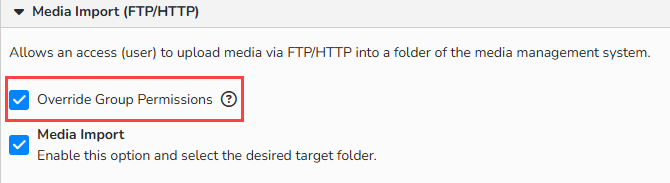
Override Group Permissions
Important
If Override Group Permissions is enabled but no individual permissions are defined, the user will have no access at all.
Manage access groups
To view your access groups, go to the appropriate system area and click Access Groups.
You can sort the list of groups by ID, Name, Creation Date or Date Last Changed.
- Double-click a group name or select it and click Edit > Open.
- Make changes and click Save.
- To copy a group: select Edit > Copy.
- To create a new group: select Edit > New.
- To delete a group: select Edit > Delete.
Note
You can use the table’s built-in tools to search, filter, and sort records. For more details, including how to create custom views and export data, see Advanced Table Views.
Tips for checking and maintaining user access
Test access after setup
After you set up permissions, check if everything works as expected. Try logging in as different user roles (the Impersonate user feature) to make sure they can only see and do what they should.
- Impersonate user (secure and credential‑free): This feature lets Admins temporarily step into a user’s view, without ever needing the user’s credentials. To use it:
- Open a user record in Sales, Purchasing, or Administration.
- Go to the Accesses tab, open the Manage Access menu, and select Login with this Webgate access or Login with this Backstage access.
Identify inactive accesses
Regularly review inactive user accesses to keep your system secure. To quickly identify accounts that haven’t been used recently:
- Go to Sales > Customers overview, change View to Accesses, and use the Sorting menu to sort by "Last Login" or "Last Download".
- If an account hasn’t been used for a long time, deactivate it.
- We do not recommend deleting user records and accesses, as this can remove important data like download statistics.Instead, deactivate their access. This prevents them from logging in while keeping their history and settings available for review if needed.
Share Credentials Securely
Never send login details within the email text. To email credentials, include them in a PDF attachment.