
Actions
Download as PDFOverview
Actions give you quick access to frequently used tools and automation features in Backstage. They are grouped into formatting, metadata, export, and processing actions.
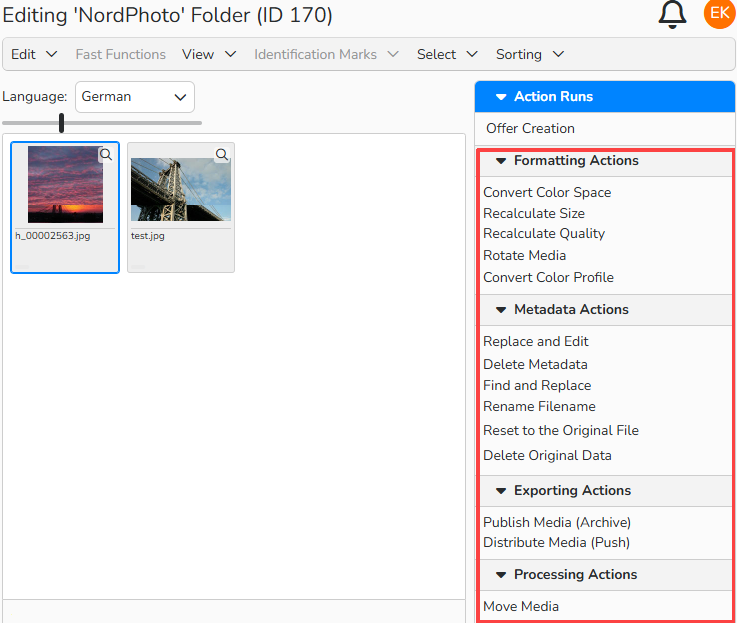
Import folder: Actions menu
Activate actions in a folder or Archive
You can make different Actions available within each of your Media Processing folders and your Archive:
- Navigate to Media Processing.
- Right-click a folder to open the context menu and select Settings.
- In the Action tab, add the desired actions.
- Click Save.
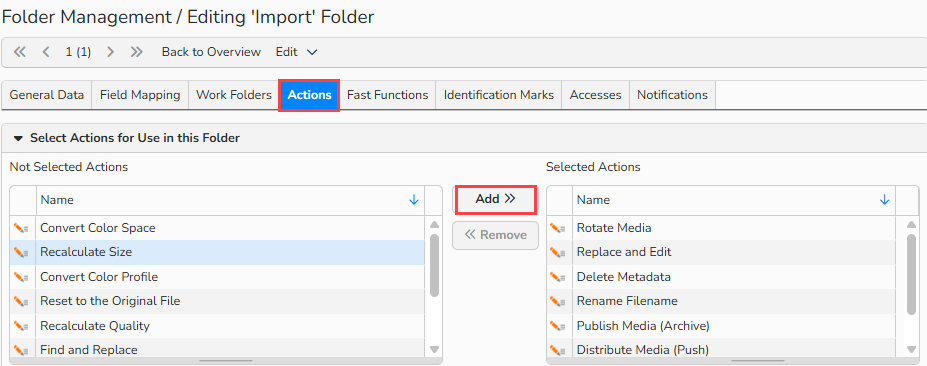
Folder settings: Actions Tab
Formatting Actions
Convert Color Space
To convert the color space of selected files:
- In Media Processing, pick a media file and select the Convert Color Space action.
- In the Configure Action dialog, select RBG, CMYK or Grayscale.
- Confirm with Start Action.
Note
To convert the color space to CMYK or to RGB, you need licenses for the respective color profiles, AppleRGB.icc and USWebCoatedSWOP.icc.
First, upload them to Media Management > Templates > Document Management. For more information, refer to the Document Management FAQ.
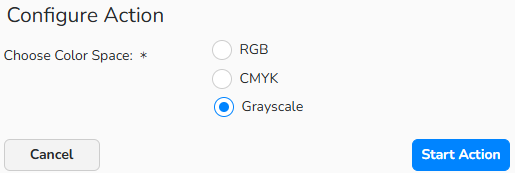
Convert Color Space action: Configure Action dialog

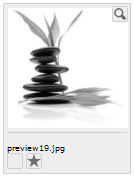
Convert Color Space action: Configure Action result
Recalculate Size
Change the size of selected media files. There are three options available:
Option 1: Change only the output size
- Pick media files and select Recalculate Size.
- In the Configure Action dialog:
- Disable the Recalculate option to change only the output size in cm or the resolution in dpi.
- Fill in the new size dimensions. If you are resizing a single image, its dimensions will automatically populate the form.
- Confirm with Start Action.
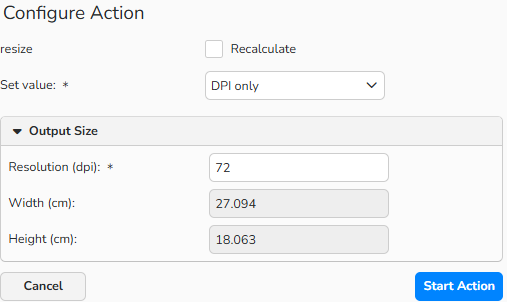
Recalculate Size action: Configure Action to change only the output size
Option 2: Resize a single media file
- Pick a single medium and select Recalculate Size.
- In the Configure Action dialog:
- Enable the Recalculate option to change both the pixel size and the output size in cm.
- Fill in the new size dimensions. The size of the image will adjust automatically again.
- Confirm with Start Action.
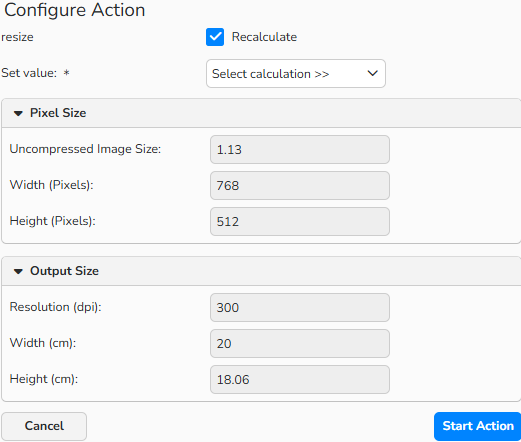
Recalculate Size action: Configure Action to resize a single file
Option 3: Resize multiple media files
- Pick multiple files, regardless of whether they are portrait or landscape format, and select Recalculate Size.
- In the Configure Action dialog:
- Enable the Recalculate option.
- In the Pixel Size area, you can now define the Longest Edge (pixels) in addition to the Width and Height.
- Fill in new size dimensions and resolution in dpi.
- Confirm with Start Action.
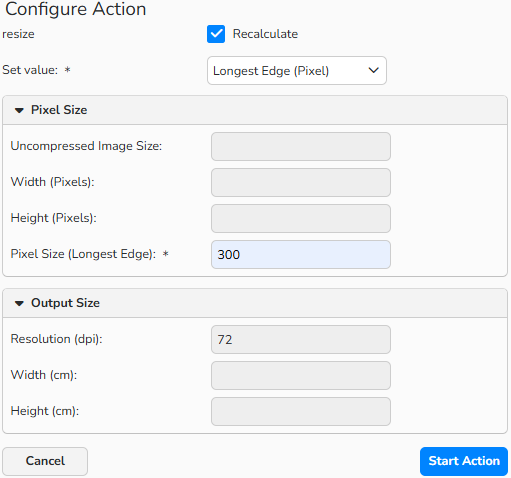
Recalculate Size action: Configure Action to resize multiple files
Rotate Media
To rotate selected images into the desired position:
- Pick media files and select Rotate Media.
- In the Configure Action dialog, select one of the following:
- EXIF data: If your files contain orientation data, rotate your images based on the data.
- 90° Counterclockwise: Rotate images 90° counterclockwise.
- 180°: Rotate images 180°.
- 90° Clockwise: Rotate images 90° clockwise.
- Enable If lossless rotation is not possible, use lossy rotation if any deterioration in image quality is acceptable.
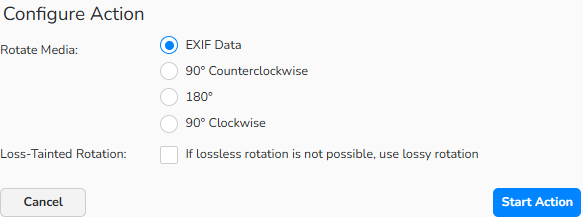
Rotate Media action: Configure Action dialog
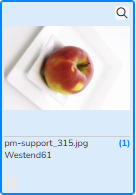
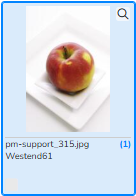
Rotate Media action: Image before and after applying the Rotate Media action.
Note
Rotating JPEGs can reduce image quality because the file is decompressed and recompressed. A lossless image remains virtually identical to the original.
If lossless rotation isn’t possible and the lossy option isn’t enabled, the file will show an Error status.
Recalculate Quality
To adjust the quality of your media files:
- Pick media files and select Recalculate Quality.
- In the Configure Action dialog, enter a Quality number, where:
- 1 = lowest quality
- 100 = highest quality
- The image will then be saved at the specified quality level.
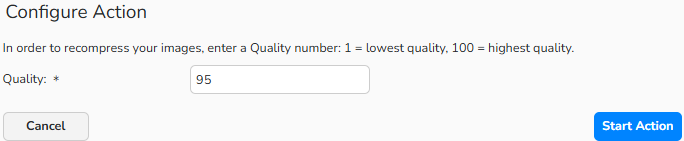
Recalculate Quality action: Configure Action dialog
Convert Color Profile
Use color profiles to control color accuracy. A color profile is a set of data that defines the color characteristics of an input or output device, as well as a color space. The Convert Color Profile action allows you to apply these profiles to selected files.
- Pick media files and select Convert Color Profile.
- In the Configure Action dialog:
- Select a color profile from the Convert Color Profile dropdown.
- Select one of the Mode options:
- To associate the color profile with the selected files, select Append.
- To convert the selected files to the color profile, select Convert.
- Confirm with Start Action.
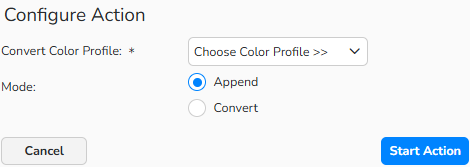
Convert Color Profile action: Configure Action dialog
Note
To customize the color profiles, you need licenses for USWebCoatedSWOP.icc and AppleRGB.icc. First upload them to Media Management > Templates > Document Management. For more information, refer to the Document Management FAQ.
Metadata Actions
Replace and Edit
Replace metadata in specific database fields of selected media files with new content. Define conditions to control when and how metadata is updated, and specify what data to use for the replacement.
- Pick media files and click Replace and Edit.
- In the Configure Action dialog:
- Select an execution type of the metadata action:
- Always: Apply the metadata action to ALL selected files.
- If Any Conditions are Fulfilled: Apply the action to the files that meet one or more conditions.
- If All Conditions are Fulfilled: Apply the action to files that meet all conditions.
- In the Conditions panel, set up rules for conditional execution:
- Database Field: Select a database field from the dropdown menu.
- Language: If relevant, select a language of the database field’s label.
- Filter: Specify how the system should handle the data within the selected database fields.
- Text, Value: Enter the text/value to search for in the metadata.
- Case sensitive: Activate this option to make database field validation case sensitive.
- Add more conditions with the plus icon or remove conditions with the minus icon.
- In the Edit Metadata panel, define which metadata to replace and what content to use as a replacement:
- Database Field: Select a database field and, if relevant, select a corresponding Language.
- Select an Action to edit the metadata details:
- Add (comma separated)
- Overwrite (comma separated)
- Delete
- In the Text, Value field, enter text manually or click the lookup button to select a database field name and use its data.
- Click Start Action.
- Select an execution type of the metadata action:
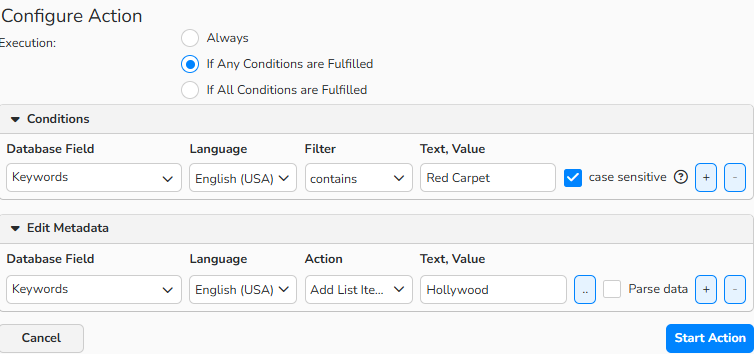
Replace and Edit action: Configure Action dialog
Optional for data parsing:
In the Configure Action dialog, enable the Parse data option to copy specific parts of the metadata content from one field to another.
- Database Field: Select a database field and, if relevant, select a corresponding Language.
- Select an Action to edit the metadata.
- Text, Value: select a field to get the content from.
- In Specify which data to extract, select one of the following:
- All
- Number of leading characters
- Number of ending characters
- Number of characters after a given number of characters
- Specific characters (comma-separated, e.g., 4, 6-8, 12-13)
- Number of characters before the delimiter
- Number of characters after the delimiter
- Select a separator for the Text, Value field:
- Comma (,)
- Hyphen (-)
- Semicolon (;)
- Slash (/)
- Backslash (|
- Pipe (|)
- Space
- Underscore (_)
- Select frequency of occurrence of the separator:
- First occurrence
- Second occurrence
- Third occurrence
- Optionally, specify the number of characters or select the extract all option.
- Select the method to trim unnecessary data
- Nothing
- Leading characters
- Trailing characters
- Leading and trailing characters
- Optionally, specify the characters to be removed.
- Confirm with Start Action.
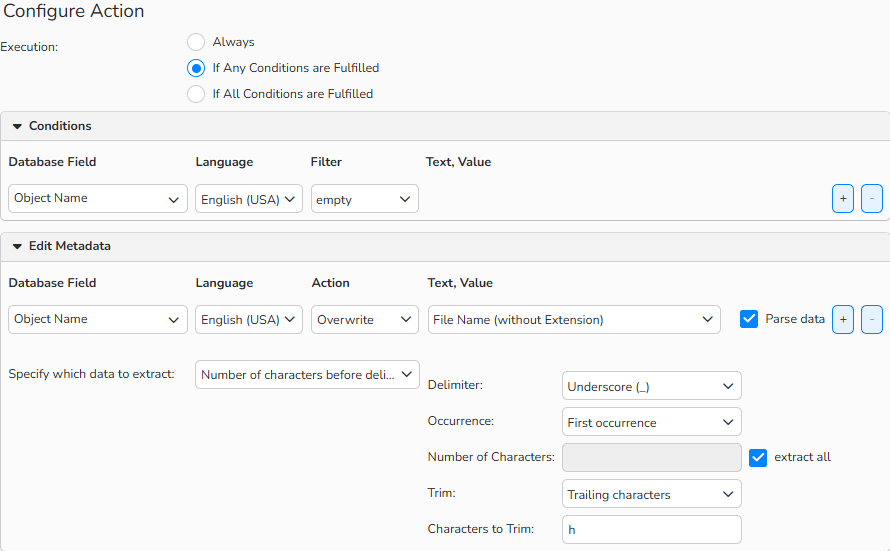
Replace and Edit action: the Parse data option enabled
Here are some real-world examples for using the Replace and Edit Action:
- One of your photographers sometimes spells his name “Josh,” and other times, “Joshua”. You want to make his Credit consistent and to apply his Author Code. Here’s how:
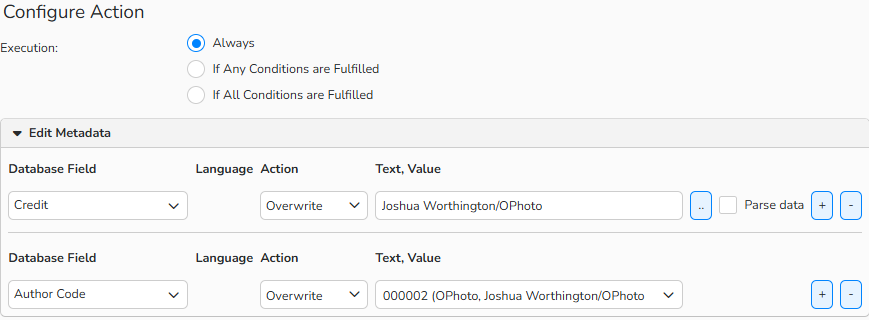
Replace and Edit action: overwrite Credit and Author Code
- Some (but not all) of your media files are missing Creation Data metadata. As a remedy, you want to copy the Digital Creation Date data into any empty fields. Here’s how:
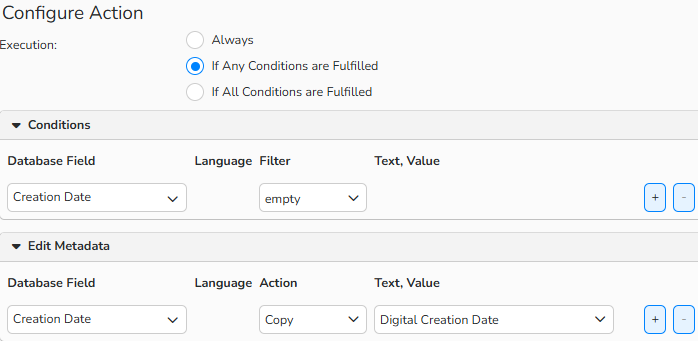
Replace and Edit action: add date info to empty fields
- Some of your media files contain Special Instructions that include an outdated restriction with an old phone number. If a Special Instructions field contains this phone number, you want to overwrite the field with a new restriction. Here’s how:
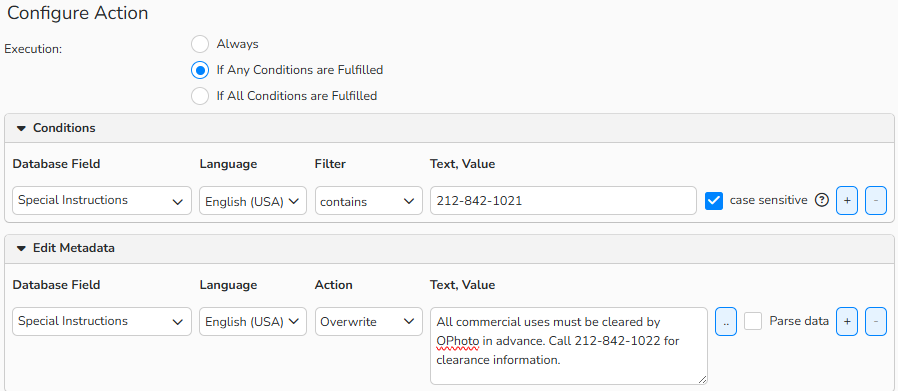
Replace and Edit action: update Special Instructions
Delete Metadata
Remove metadata from all selected media files. If you only want to delete metadata from selected files, set specific conditions. If your metadata is in multiple languages, select which languages to delete.
- Pick media files and click Delete Metadata.
- In the Configure Action dialog:
- Select an execution type of the metadata action:
- Always: Apply the action to ALL selected files.
- If Any Conditions are Fulfilled: Apply the action to the files that meet one or more conditions.
- If All Conditions are Fulfilled: Apply the action to files that meet all conditions.
- In the Conditions panel, set up rules for conditional execution:
- Database Field: Select a database field from the dropdown menu.
- Language: If relevant, select a language of the database field’s label.
- Filter: Specify how the system should handle the data within the selected database fields.
- Text, Value: Enter the text/value to search for in the metadata.
- Case sensitive: Activate this option to make database field validation case sensitive.
- You can add more conditions with the plus icon or remove conditions with the minus icon.
- In the Delete Metadata panel, define which metadata should be replaced and with what:
- Select the metadata language(s) for deletion.
- Click Start Action.
- Select an execution type of the metadata action:
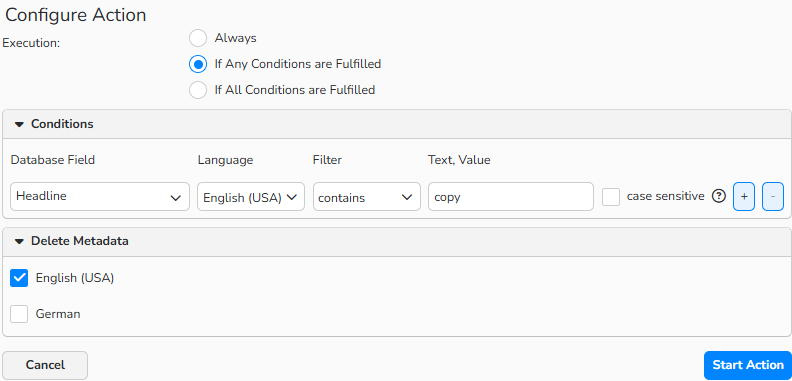
Delete Metadata action: Configure Action dialog
Note
If you only want to delete metadata from a specific field (not all existing ones), use Replace and Edit.
Find and Replace
Find and replace or delete a specific word within specified fields of your selected files. Use this action, for example, to correct typos in the metadata.
- Pick media files and click Find and Replace.
- In the Configure Action dialog:
- Choose Database Fields: Select the name(s) of the database fields that you want to search within or enable Select All to search all database fields.
- Choose Languages: Select the language(s) you want to search.
- Find and Replace:
- Select a filter to specify how the system should treat the data within the selected database fields:
- contains: The specified words are somewhere within the field.
- equals: The field contains only the specified words.
- starts with: The field’s data begins with the specified words.
- ends with: The field’s data ends with the specified words.
- Enter one or more words for the system to search for.
- In Execute for, enable one of the two options:
- Any Instance: This filter also replaces words where the value is only a part of the word. For example, in case of the word “Flow,” not only all instances of “Flow” are updated, but also “Flower” or “Flown”.
- Only for Complete Words: The filter will only replace the word that exactly matches the specified word.
- From the Action dropdown menu, select Overwrite or Delete.
- Click Start Action.
- Select a filter to specify how the system should treat the data within the selected database fields:
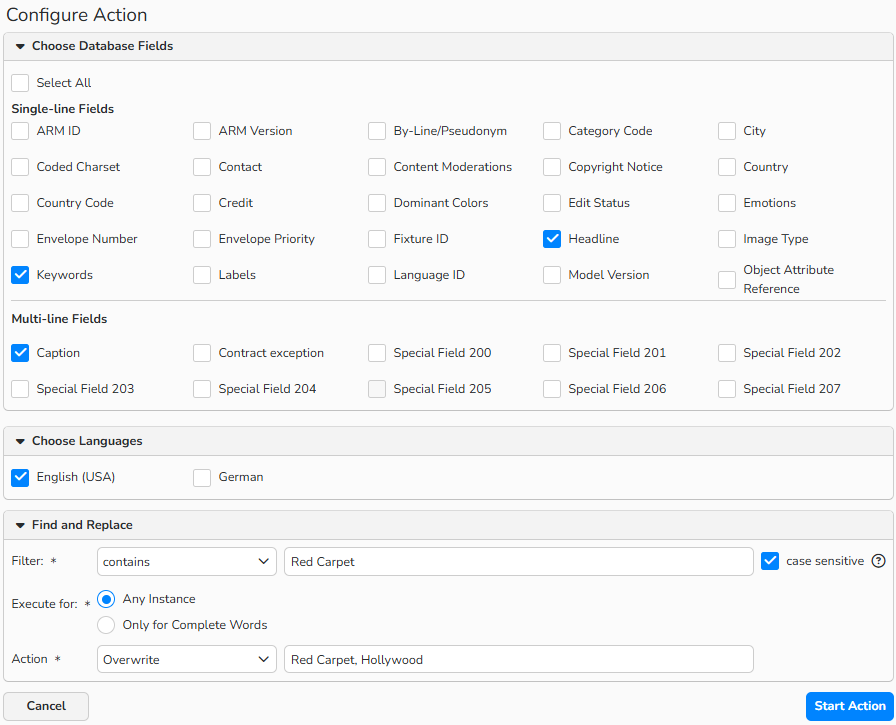
Find and Replace action: Configure Action dialog
Note
This feature is case-sensitive. The system will only find and replace the words that match the exact case you enter.
Rename Filename
Use this action to rename selected files.
- Pick media files and click Rename Filename.
- In the Configure Action dialog:
- In the Change Filename to field, rename the file using one or a combination of the following options:
- Enter your text in the field.
- Click the lookup button to select the name of a specific field. You can use multiple fields, if needed, by simply clicking the button multiple times.
- Fill in a number (example: 0001) and enable the Add Consecutive Number option. The consecutive filenames will begin with that number.
- In the Change Filename to field, rename the file using one or a combination of the following options:
- Click Start Action.
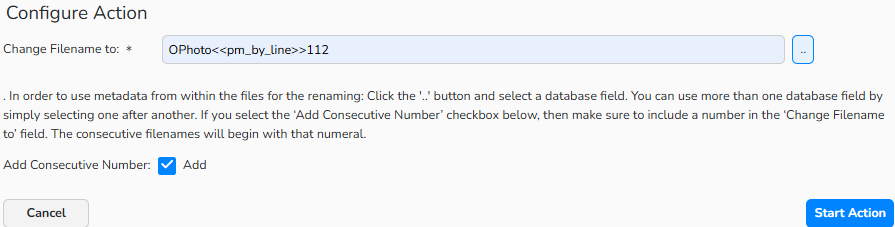
Rename Filename action: Configure Action dialog
Reset to the Original File
Revert any metadata changes you made to the selected files from the time you uploaded them to Backstage:
- Pick media files and click Reset to the Original File.
- In the Configure Action dialog:
- Select the specific languages to reset.
- Click Start Action
Note
The system lists all languages in which the metadata is available. When you reset the media file, the current field mapping of the folder that contains the media is also used.
Delete Original Data
Delete various types of original data embedded within media files. For example, you can remove EXIF data about camera settings from your media files.
- Pick media files and click Delete Original Data.
- In the Configure Action dialog:
- Select the data you want to delete and click Start Action.
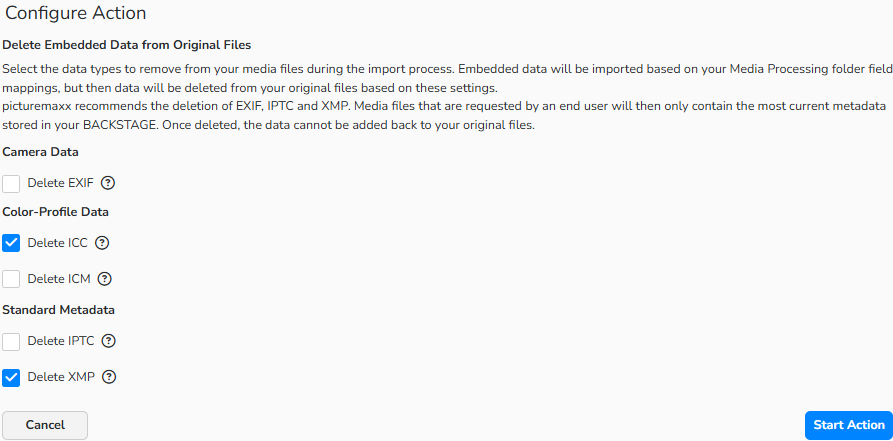
Delete Original Data action: Configure Action dialog
Note
When data is removed from the media file, it still remains in the field mappings of Backstage import folders. You can view and use this data for mapping purposes. For details, see the Field Mapping and Delete Original Data FAQs.
Set Next Free Media Number
Define the Media Number of media files before you publish them in the Archive. Use this feature to streamline workflows by making the main reference number available immediately. For example, if you name files using the Media Number, you can distribute them (push via FTP) directly from the Media Processing area without searching for them later in the Archive.
- Pick media files and click Set Next Free Media Number.
- In the Configure Action dialog:
- Archive: By default, your Archive is already selected in the field.
- Sequencing: To number media files according to their current order before publishing, select Assign Media Number in the order files were selected.
- Click Start Action.
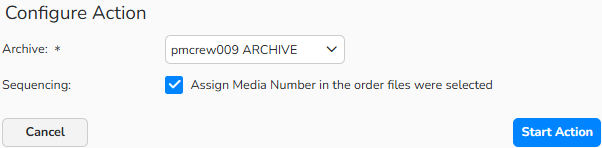
See Next Free Media Number action: Configure Action dialog
Exporting Actions
Publish Media (Archive)
Move all selected files from the current folder into your Archive in the Media Processing tree. This will make the media files available for your marketing channels.
- Pick media files and click Publish Media (Archive).
- In the Configure Action dialog:
- Archive: By default, your Archive is already selected in the field.
- Sequencing: To number the media files in their current order before publishing, select Assign Media Number in the order files were selected.
- Click Start Action.
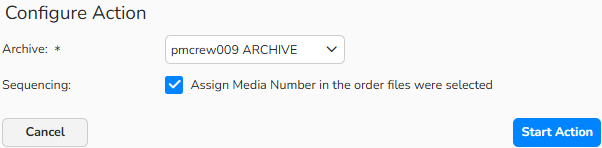
Publish Media (Archive) action: Configure Action dialog
Distribute Media (Push)
Distribute selected media files via the picturemaxx BROADCAST media push service or manually at any time if needed.
To distribute media files, proceed as follows:
- Pick media files and click Distribute Media (Push).
- In the Configure Action dialog, select one of the three different options:
- Direct Distribution: For direct distribution, you can use templates that contain all the fields required for distribution. Fill in a distribution Name, select a Template (if templates have been created), and start the action.
- Create New Distribution: To create a brand-new distribution, you can select an existing Template as a starting point. Then click the Create New Distribution button and follow the onscreen instructions.
- Use Previous Distribution:If you are sending additional media on the same subject, you can select a previously used distribution. Select Name of previous Distribution and either start the Action directly or click the Edit Selected Distribution button to first update the Distribution’s settings.
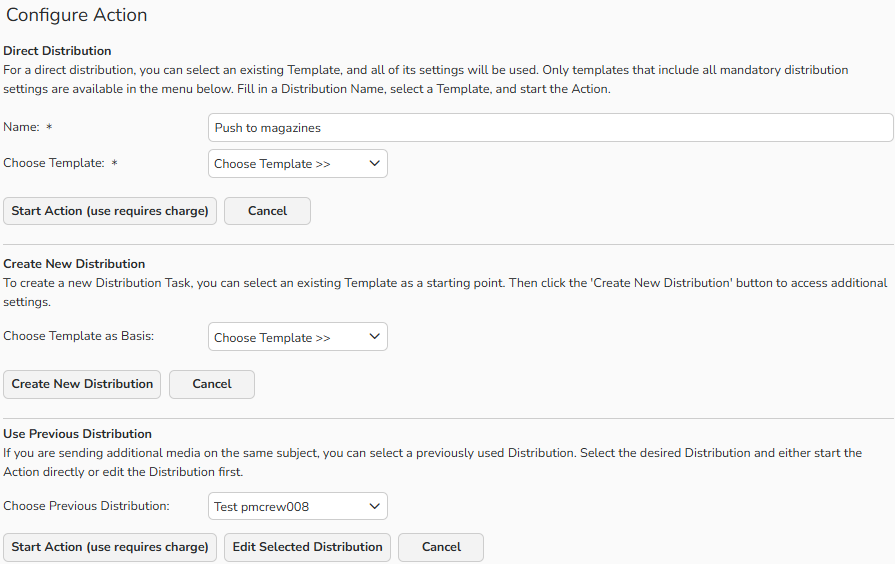
Distribute Media (Push) action: Configure Action dialog
Note
To learn more about the picturemaxx BROADCAST Media Push features, refer to the Media Distribution FAQ.
Processing Actions
Move Media
Move selected media files from one Media Processing folder to another.
- Pick media files and click Move Media.
- In the Configure Action dialog:
- Select a destination folder with the lookup button.
- Confirm selection with Choose.
- Click Start Action.
Note
You can also select files and then drag and drop them into a different folder.
Note
You can group multiple Actions into an Action Run - a custom sequence that automates routine media processing tasks. Create new Action Runs under Media Processing > Action Runs. For more details, see the Action Runs and Understanding Actions, Action Runs, and Action Run Groups FAQs.