
Identification Marks
Download as PDFOverview
Identification Marks are icons that show a file’s status at a glance. Use the Identification Marks menu in Media Processing to apply or remove marks on selected files. Backstage automatically adds some standard marks during import; others, like “Approved,” can be applied manually. You can also customize urgency levels with labels and colors.
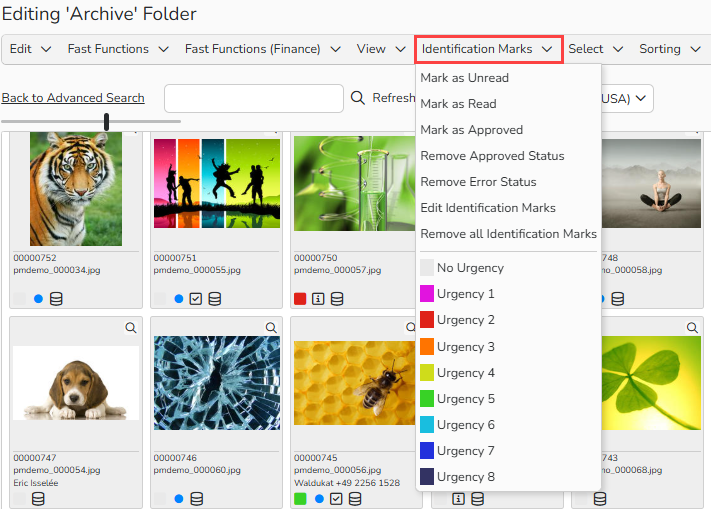
Archive folder: Identification Marks menu
Standard identification marks
In Media Processing, use the Identification Marks menu to apply or remove the following standard marks:
 Unread |
Newly imported media files are automatically marked as Unread. To change the status, select the file and choose Identification Marks > Mark as Read. |
 Error Status |
If an error occurs during processing, the system marks the file with this icon. To check the reason, select the file and click History in the View Metadata panel below the media display. |
 Approved |
Use this mark to indicate approval of a media file. Apply it with Identification Marks > Mark as Approved. |
 Urgency |
Use colored marks to show urgency (levels 1–8). Select No Urgency to remove this mark. You can rename, recolor, or hide these levels under Administration > Database Fields > Media: Locate the Urgency field and select Edit > Set Menu Items. |
 Media from Database |
All media published from Media Processing to your archive automatically receive the Media from Database status. If you use an Opengate connection, this mark helps distinguish your media from partner files. |
 Media on Series |
Indicates that a media file belongs to an offer or series. |
 Custom |
Files with this icon have a user-defined mark, such as a specific workflow step. Hover over the icon to view details. |
Custom identification marks
Create identification marks that reflect your internal workflows, from quality check to labeling, approval, and publishing. After completing a task, apply the corresponding mark to show file status.
To create a new set of Identification Marks:
- Navigate to Media Management > Identification Marks and select Edit > New.
- In the General Data panel:
- Fill in a descriptive Name for your Identification Mark set. The name will appear on the Identification Marks menu in Media Processing.
- Enable the Active option once you’re ready to start using the set.
- Each set can include multiple marks for different workflow steps. Enable Steps Must Be Performed in Order to enforce sequence and prevent users from skipping steps.
- Click Save.
- In the Configure Identification Mark panel:
- Select Edit > New to add multiple marks for different workflow steps.
- Use the Sequencing menu to define the sequence of marks for media processing.
- Remove marks you no longer need via Edit > Delete.
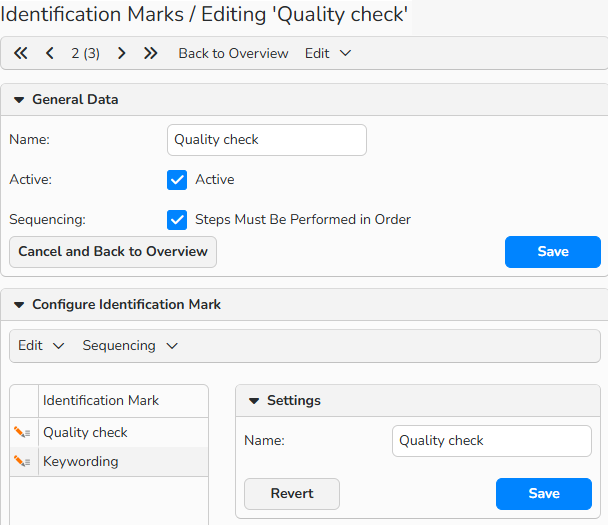
Create custom Identification Mark set
Enable custom identification marks for a folder
After creating marks for different tasks, activate them in Folder Management of the specific folders where you want the set’s marks available. By default, no custom marks are visible in a folder until activated.
- In Media Processing, right-click a folder to open its context menu and select Settings there. The Folder Management dialog opens.
- Alternatively, go to Media Management > Folder Management and select a folder name.
- In the Folder Management dialog, select the Identification Marks tab.
- From the list of unassigned marks, select the ones you need and click Add. To remove marks, click Remove.
- Click Save.
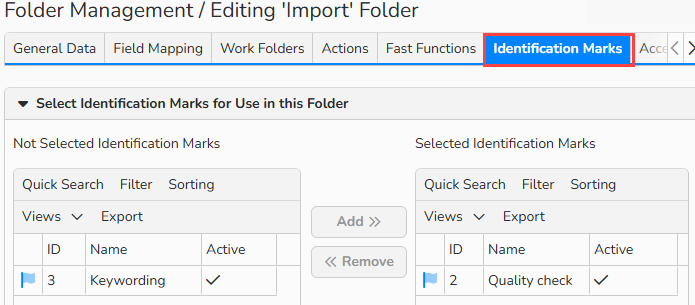
Folder Management > Identification Marks tab
Customize urgency levels
Backstage provides a set of color-coded marks for urgency, showing priorities 1–8 directly on media files.
You can tailor labels and colors for the urgency menu or hide labels you don’t need. Add marks to thumbnails or metadata-editing forms via the Identification Marks menu or number keys 1–8 on your keyboard.
To customize the urgency list:
- Go to Administration > Database Fields > Media.
- Click Quick Search and type Urgency in the search field, press Enter.
- Select the list entry and choose Edit > Set Menu Items.
- In the Edit Urgency Fields dialog, apply your changes and click Save.
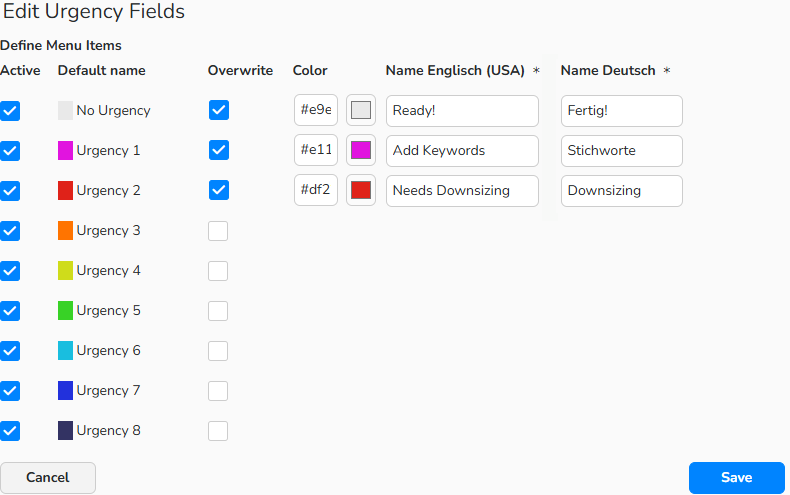
Edit Urgency Fields
Manage custom identification marks
All identification marks are listed under Media Management > Identification Marks.
Create a new mark
- Select Edit > New.
Edit an existing mark
- Select the mark, choose Edit > Open, make changes, and click Save.
Copy a mark
- Select the mark and choose Edit > Copy.
Delete a mark
- Select the mark(s) and choose Edit > Delete.
Note
The integrated table functions allow you to search, filter, and sort records. For more information on these functions, as well as how to set up custom views and use the export function, see the Advanced Table View FAQ.