
Action Runs
Download as PDFOverview
An “Action” is a standard media processing procedure, such as finding and replacing metadata, while an “Action Run” is a custom sequence of interlinked Actions.
All individual actions available in Backstage can be combined into action runs. Create processes tailored to your needs to standardize your work and reduce errors.
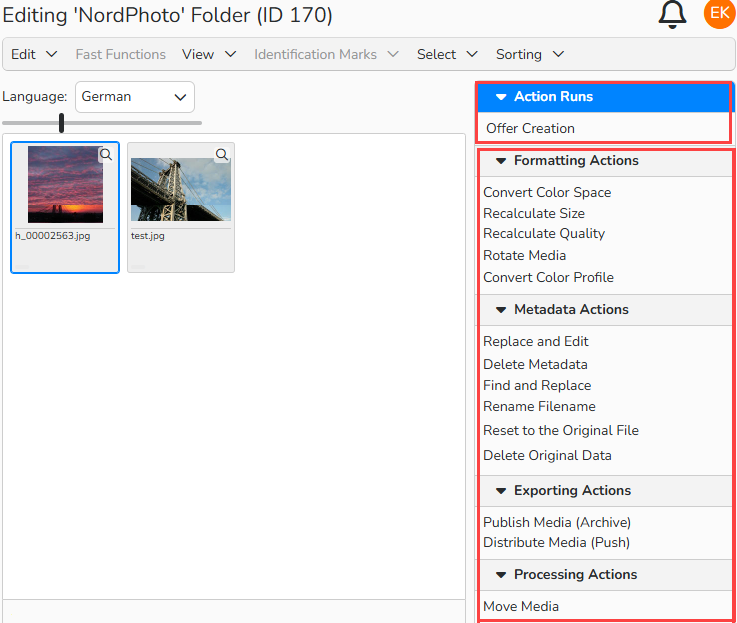
Import folder: Action Runs and Actions
Create action runs
To create an action run, proceed as follows:
- Navigate to Media Management > Action Runs and select Edit > New.
- In the Action Run setup dialog, fill in the Name field.
- Use a descriptive name that will allow you to easily identify the Action Run in other areas of the system.
- Enable the Action Run is Active option to activate the action run.
- Click Save.
- The General Data panel now displays optional settings:
- In Case of Error, Execute Action Run: Choose an alternative action run for the files with errors.
- In Case of Error, Move to Folder: Select a folder to move files with errors there.
- Available Action Run Groups: Assign the action run to a selected action run group.
- Available Folders: Select a folder where the action run shall be executed.
- Confirm with Save.
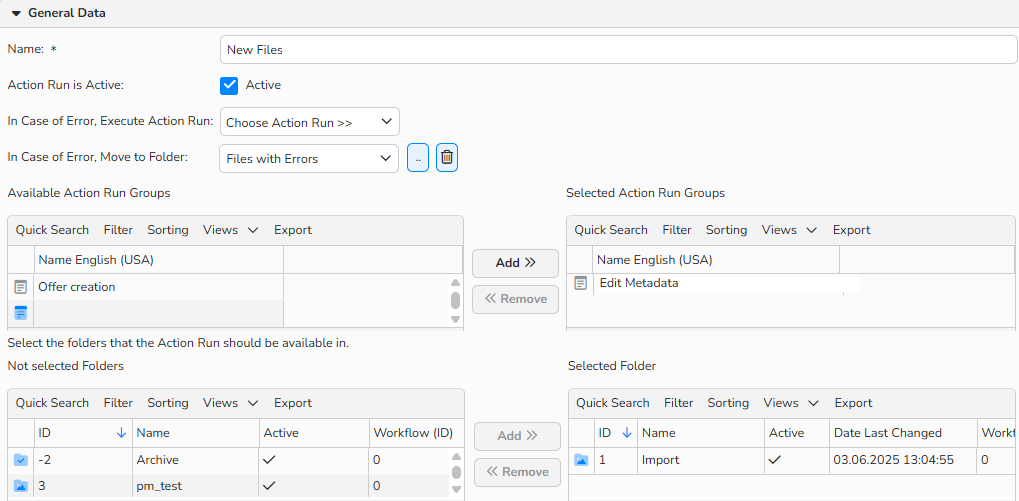
Action run setup dialog: General Data panel
In the Configure Action Run panel:
- Select an action for your action run:
- New Formatting Action
- New Metadata Action
- New Fast Function Action
- New Exporting Action
- New Processing Action
- Specify the following general settings for each action:
- Action Name: Enter an internal name that reflects the purpose of the action.
- Position: Specify the order in which the action will be executed. You can modify the order in the Sequencing menu (Move Up, Move Down, etc.).
- Action is Active: Enable the option to execute this action in the action run.
- Error Conditions: Enable the option to execute all the individual actions within the action run, regardless of whether any errors are encountered.
- Execution: Specify the execution type of the action:
- Always: Select to always apply the action to all selected files.
- If Any Conditions are Fulfilled: Select to apply only to the files that meet one or more conditions.
- If All Conditions are Fulfilled: Select to apply only to the files that meet all conditions.
- Optional for conditions:
- Database Field: If you have selected an execution type with conditions, specify the database field to be checked.
- Language: Select the language of the database field where applicable.
- Filter: Specify how the system should handle the data within the selected fields.
- Text, Value: Enter the text/value to search for in the metadata.
- Case sensitive: Enable this option to ensure the database field validation is case-sensitive.
- You can add/remove criteria with the plus and minus icons.
- For each action, click Save Settings.
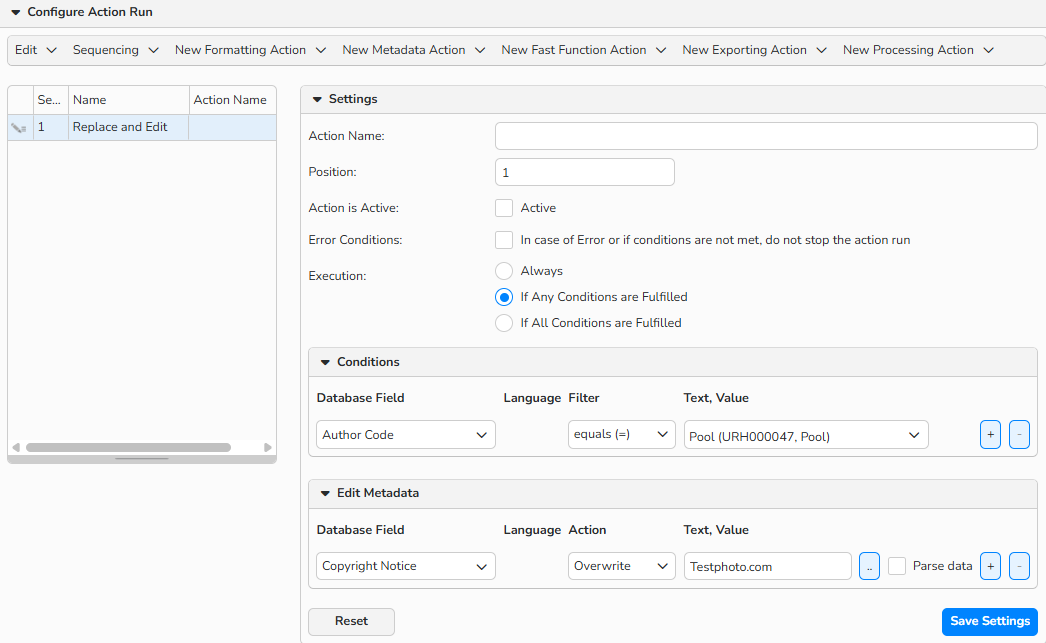
Configure Action Run panel
Tip
Set Action Order
Define the order in which Actions run. The Action Run starts with the first Action listed and continues in sequence, so each step can build on the previous one.
To change the order:
- In the Configure Action Run panel, select an Action.
- Use the Sequencing menu (Move Up, Move Down, etc.) to adjust its position.
- Click Save Settings.
Note
- An action run can bundle as many individual actions as you wish. You can temporarily “turn off” individual actions by disabling the Active option. You can also remove the actions with Edit > Delete.
- For more information on what actions can do or how to configure them, refer to the Actions and Understanding Action, Action Run, or Action Run Group FAQs.
Important
Automatic Offer, Automatic Collection, Conditional Execution, and Execute Action Run explained below are unique functions and can only be used in action runs.
New Fast Function Action: Automatic Offer
Backstage can help you automatically create offers based on various criteria. Set offers to inactive for manual approval or automatically approve them all at once.
Navigate to Media Management > Action Runs to edit an existing Action Run or create a new one.
Settings panel
- In the Configure Action Run panel of the Action Run setup dialog, select New Fast Function Action > Automatic Offer.
- Configure general settings as described in the Create Action Runs section above.
Conditions for the Creation of Automatic Offers panel
When setting up the Offer, you need to identify which metadata fields and what specific metadata, if any, will determine whether a media file is added to an Offer.
- Set criteria for media selection with Execution conditions as described in the Create Action Runs section above.
- Select the Database Field and corresponding Language that you want to use to create an offer.
- Offers can be created automatically based on identical metadata in a specific field. Example: Create automatic offers from all media files that share a common headline, so that all images with the same headline form separate and distinct offers.
- You can add criteria with the plus icon or remove unnecessary criteria with the minus icon.
- Select the time period during which media files that match the criteria will be assigned to one offer. After the period expires, a new Offer will be created.
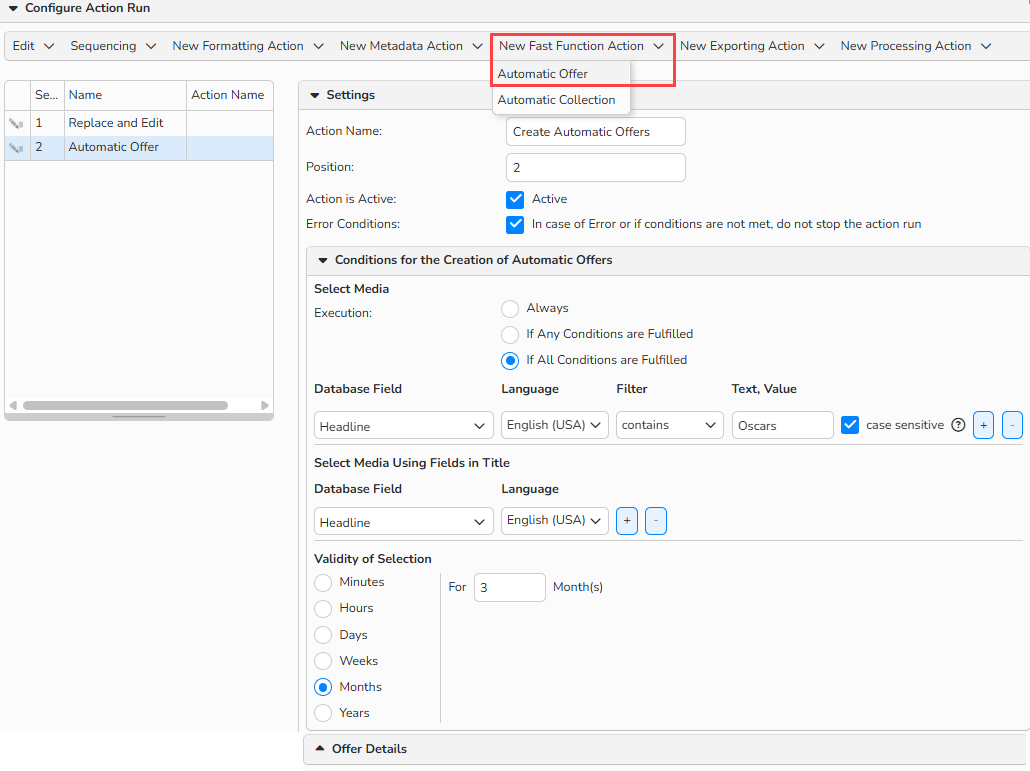
Configure Action Run panel: Automatic Offer setup
Note
Once the selection period ends, a new offer will be created - even if the files still meet the selection criteria.
Offer Details
- Define offer settings manually or use the lookup button next to a field to select specific metadata. Use as many metadata fields as you want by clicking the lookup button again.
- Title
- Description (this text will appear on your Webgate offers tab)
- Copyright
- Set the Author for this offer. Choose from the following:
- No Author
- Acquire From Author Code Field
- Select Author
- Specify how to activate the offer. Choose from the following:
- No: activate the offer manually.
- Immediately: activate the offer right away.
- When Minimum Number of Media is Met: enter the number of media required to activate the offer.
- Optional Settings:
- Top Offer: Select the option to feature this offer on your website.
- Restrict Visibility: Select the option to make the offer available only for the set period.
- Restrict Accesses: Enable this option to let only selected accounts access the offer.
- Restrict Channels: Enable this option to display the offer only on selected channels.
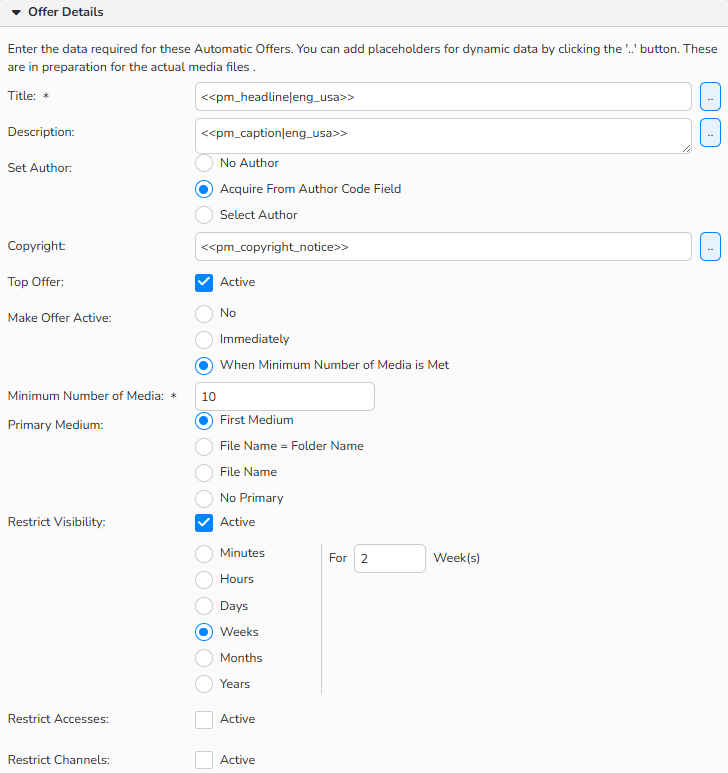
Configure Action Run panel: Automatic Offer > Offer Details section
Note
If the images in the offer are subject to author restrictions, it is still recommended to specify an author. This ensures that users without access to that author's media don't see an empty offer.
New Fast Function Action: Automatic Collection
Automatically create new collections based on conditions and choose from the following:
| Series | CD (optional) |
|---|---|
| A collection with one or more "primary" media files that represent the entire collection. For example, a series of reportage images that convey a story. | A collection with a single "cover" that represents the entire collection. For example, a CD or DVD of stock images that involve a theme. |
Navigate to Media Management > Action Runs to edit an existing Action Run or create a new one.
Settings and Conditions for the Creation of Automatic Collection
- In the Configure Action Run panel, select New Fast Function > Automatic Collection.
- Configure general settings as described in the Create Action Runs section.
- Enter criteria for media selection as described in the Automatic Offer section above.
Collection Details
- Define specific collection settings:
- Kind of Collection: Series is set by default
- Title: Set the name manually or use the lookup button next to the field to create a title dynamically using specific metadata.
- If you use multiple label languages, enter a title for each language.
- Optional Settings:
- Order by Filename Number: Enable this option if you use numbering in file names to organize media.
- Top Collection: Enable the option to automatically display the collection created by the action run on your website.
- Specify how to activate the collection. Choose from the following:
- No: activate the collection manually.
- Immediately: activate the collection right away.
- When Minimum Number of Media is Met: enter the number of media required to activate the collection.
- Each collection can have one or more “primary media” to represent the collection. In the Primary Medium section, choose from the following:
- First Medium: Automatically make the first file in the collection the primary media.
- File Name = Folder Name: If the media file name matches the name of the Import folder, set the file as primary.
- File Name: The system searches for the media file with the specified name. This file is then automatically set as primary.
- No Primary: No files are automatically set as primary.
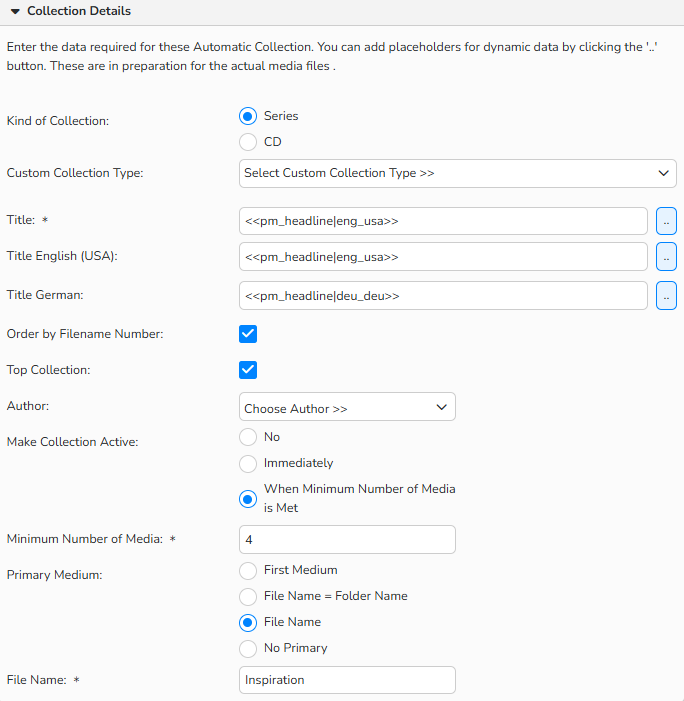
Configure Action Run panel: Automatic Collection > Collection Details section
New Processing Action: Conditional Execution
Set conditions that trigger specific actions. If the conditions are met, the system either runs an Action Run or moves the selected files to a designated folder.
Examples:
- Move files missing keywords to a folder for keyword updates.
- Resize images automatically if they exceed a certain file size.
Navigate to Media Management > Action Runs to edit an existing Action Run or create a new one.
Settings
- In the Configure Action Run panel, select New Processing Action > Conditional Execution.
- Configure general settings as described in the Create Action Runs section above.
Conditions
- Define criteria for media selection using conditions as described in the Create Action Runs section.
- In the If Conditions are Fulfilled section, choose how to handle the media files:
- Execute Action Run: Automatically run an additional Action Run for the media files after processing. Select the action from the Action Run dropdown.
- Move Media to Folder: Move the media to a specific folder for post-processing. Select the folder from the Folder dropdown.
- Click Save settings to confirm.
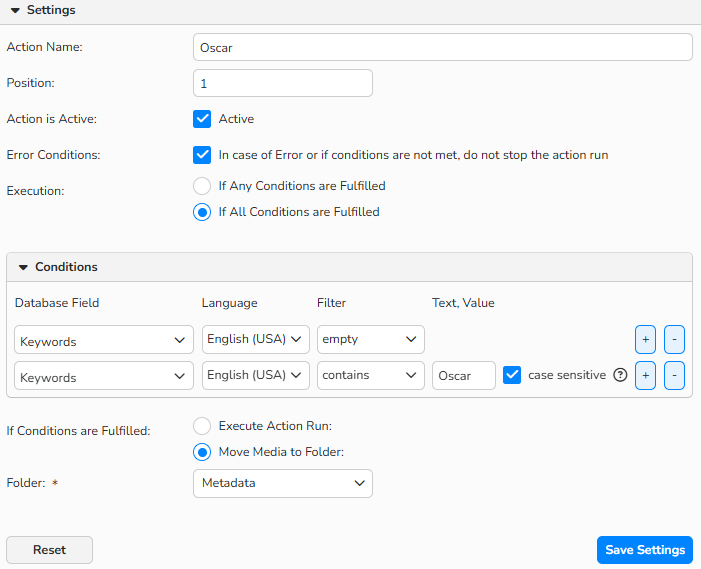
Configure Action Run panel: Conditional Execution setup
New Processing Action: Execute Action Run
With the Execute Action Run action you can add an existing Action Run to another Action Run. This can help you save time and effort when processing your media.
Navigate to Media Management > Action Runs to edit an existing Action Run or create a new one.
Settings:
- In the Configure Action Run panel, select New Processing Action > Execute Action Run.
- Configure general settings as described in the Creating Action Runs section.
- Specify the additional action run to be executed:
- Action Run: In the dropdown menu, select an action run available in your system. Then it can be used as part of the current run.
- Click Save Settings.
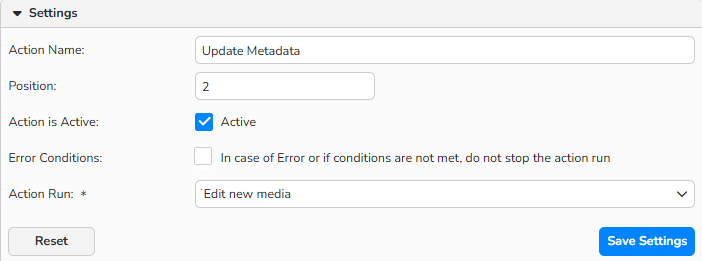
Configure Action Run panel: Execute Action Run setup
Note
The Execute Action Run function starts another Action Run, so processing always occurs in parallel with the current run.
Manage Action Runs
In Media Management > Action Runs you can find a list of all your existing Action Runs.
To create an Action Run
- Select Edit > New.
To edit an existing Action Run
- Double-click its name or select the record in the overview table and click Edit > Open.
- To deactivate an Action Run: open the record, disable the Active option, and click Save.
To duplicate an Action Run
- Select it in the overview table and click Edit > Copy.
To delete an Action Run
- Select it in the overview table and click Edit > Delete.
Note
The integrated table functions allow you to search, filter, and sort data records. You can also learn how to set up custom views and use the export function in the Advanced Table View FAQ.
Tip
Define Action Run Groups
Just as actions can be combined into action runs, action runs can also be bundled into action run groups. Learn more in the Action Run Groups FAQ.