
Offers
Download as PDFOverview
In Backstage, the term 'Offers' refers to collections of images or other media related to specific topics. You can assemble images related to a particular theme or event, provide a description, and present them to the customers in my-picturemaxx and/or through your webshop.
Your newest Offers appear on the Offers tab in your Webshop. You can also use Offers to automatically refresh your website with your latest content.
In the picturemaxx media network offers are displayed to media buyers under the 'My Offers' function with the date, title, and description in available languages. Customers can search by date and by keywords.
Create new offer
Important
Offer Visibility
Images in the Import folders are not visible to customers. Move all images you want to use in an offer to the Archive folder with the Publish Media (Archive) action. See Actions for details.
Media files left in Import folder won’t appear in offers, and if all assigned images remain there, the offer won’t appear on the website.
You can create an offer and set its options from two places:
- In Media Management > Collections > Offers, select Edit > New.
- The New Offer setup window opens.
- In Media Processing, on the search results page:
- Pick the images you want to assign to the offer. You can use Select > Select all in the top menu.
- Select Fast Functions > Offers, in the top menu or the right-hand panel.
- The New Offer setup window opens with the selected images.
In the New Offer setup window:
- Fill in a Title for the offer that briefly describes its content.
- You can additionally enter the title in the languages you have enabled in Administration > Language Settings > Languages.
- You may choose to fill in the following optional fields:
- Description: Add more details about the offer.
- Author: Select a record from the dropdown list to assign an author.
- Copyright: Fill it if you want the offer to appear with specific Copyright information.
- To make the offer available to your customers, enable the Offer is Active option.
- If you feature specific offers within your website content, enable the Top Offer option to display the offer at the top of your website.
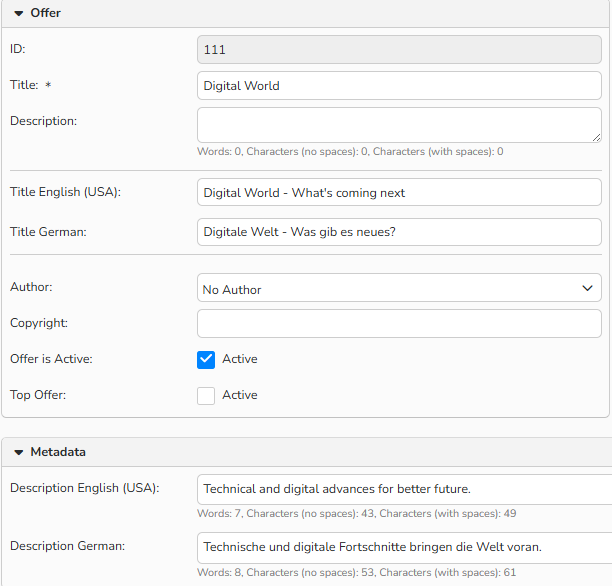
Offers window: Offer is made available
Note
The language-independent Title field is mandatory. It is displayed when no localized title is available. Along with the Description field below, it ensures visibility across all languages.
If you do not need language-specific content, simply enter your information in this language-independent section.
To learn how to enable additional languages in Backstage, refer to the Languages FAQ.
Important
Display offers based on author restrictions
When you create an Offer, always select the photographer’s name from the Author dropdown. This ensures that any existing restrictions on the author are correctly applied to the offer.
- If you select the author:
Users who are restricted will not see the offer at all. - If you do not select the author:
Restricted users may still see the offer, but only with “no permissions” thumbnails, which can be confusing.
- In the Date Settings panel, you can specify exact dates when the offer will be available.
- Enter the start date for the offer. From this date onward, customers can find the offer in searches.
- To set exact availability dates for the offer, enable the Restrict option and then provide a From and To date and time.
- You can also change the overall Date of an offer if you want to modify its display order. Newest offers always appear first to buyers.
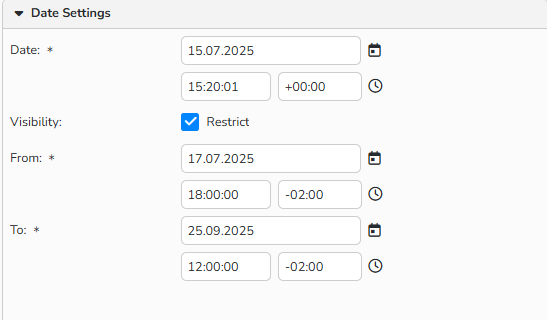
Offers window > Date configuration
- In the Access Restriction panel, you can restrict an offer to specific Accesses or Access Groups. For example, you can create exclusive offers or respond to individual requests.
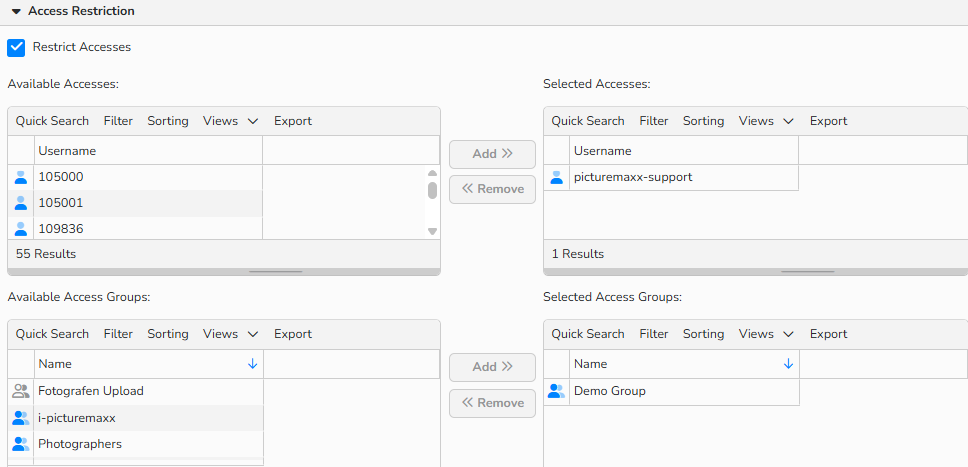
Offers window > Access restriction
- In the Media panel, add the media files from your Archive (skip steps 1 and 2 below if you create the offer via Fast Functions):
- Enter the search terms into the Search box or select Edit Media > Add Media to open the Archive Search window.
- Select the images you want to add to the offer and click Choose.
- To select a continuous range of images: SHIFT + click.
- To select a non-continuous range of images: CTRL (PC) or CMD (Mac) + click.
- The selected images now appear in the Media section. By default, the system sets the first image as the primary media to represent the offer.
- To change it, select a different image and click Edit Media > Mark as Primary.
- A dedicated icon flags the primary media file.
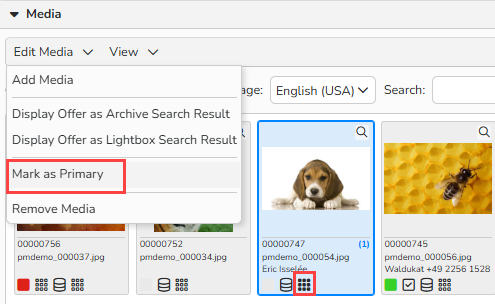
Offers window > Add media to the offer: Select primary image
Tip
To change the order of how media files appear in the offer, simply drag and drop the images to rearrange them.
Menu: Edit Media
The menu offers the following functions:
| Add Media | Add your archive’s media to the offer. |
| Display Offer as Archive Search Result | Display the offer’s media in the Archive folder for further media processing with actions and action runs. |
| Mark as Primary | To present your offer as an "Introduction" or "Teaser" (optional) later, always set a primary image. It should be the most meaningful part of the offer and form a single content unit with the title and description. |
| Remove Media | Remove the selected media from the offer. |
Menu: View
With the View menu you can choose how to display your media files:
| Thumbnail | All media files appear as thumbnails with the media number, file name and author. |
| Thumbnail and Text | All media files appear in a list view with thumbnail, media number, file name, description and keywords. |
Note
For more information, refer to the Media Processing FAQs.
Set up offer templates
You can save recurring settings (such as Title, Active status) as a template for new offers. Follow these steps:
- Open the offer you want as a template.
- In the top menu, select Template for new Offers > Set Current Text and Settings as Template.
- To automatically mark the first media file of the offer as the primary image, select Template for new Offers > Mark First Media File as Primary Automatically.
Add images to offers in Archive
You can assign media files to an offer directly from your Archive.
- Go to Media Processing > Archive and perform a search.
- Select the images you want to form into an offer.
- From the top menu or the right-hand side panel, select Fast Functions > Offers. The New Offer window opens.
- Choose one of the following:
- Create New Media Collection
- Add to Existing Media Collection
- Enter a Title.
- You can enter a title in each available language. If you choose not too, the main title you enter will be used for all languages.
- Optionally, configure the offer settings as explained above in Create new offer.
- Enable the Active option.
- Click Save.
Create direct links to offers
You can share a direct link to a specific offer by email or to add it to a webpage.
Create a direct link to any offer in your Webgate Archive using this format:
http://YOURNAME.wg.picturemaxx.com/offer/OFFERID- YOURNAME = Your Webgate Archive name
- OFFERID = The unique ID of each Offer (found under Media Management > Collections > Offers).
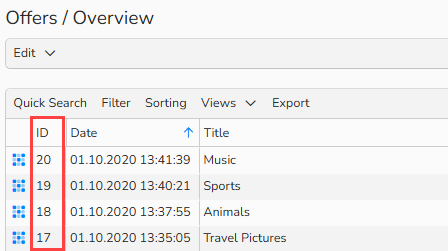
Offers overview: Offer ID
Create automatic offers using action runs
An action run is a series of actions executed one after another. Use the Action Runs feature to automatically create new offers based on defined conditions.
In Media Management > Action Runs, within an Action Run, you can set this up under New Fast Function Action > Automatic Offer.
Note
To learn more about Action Runs and creating automatic offers, refer to the Action Runs FAQ.
Manage Offers
In Media Management > Collections > Offers you can find a list of all existing offers.
Create a new offer
Select Edit > New.
Edit an existing offer
- Select a record item and click Edit > Open.
- Make the necessary changes and click Save.
Batch process existing offers
In the table overview, select the offers you want to edit.
- To select a continuous range of items: SHIFT + click.
- To select a non-continuous range of items: CTRL (PC) or CMD (Mac) + click.
- Select Edit > Batch Process from the menu.
- Configure the settings and click Save.
Delete an offer
Select an offer in the table overview and click Edit > Delete.
Note
The integrated table functions allow you to search, filter, and sort data records. You can also learn how to set up custom views and use the export function in the Advanced Table View FAQ.