
Media Distribution
Download as PDFOverview
The Media Push Service enables efficient and cost-effective distribution of media files, for example, via FTP.
It offers flexible configuration options for setting up distributions. You can trigger distributions manually at any time or automate recurring tasks. A clear overview of all ongoing and completed distributions is provided.
A key feature is the ability to define output exceptions. These exceptions apply per customer, regardless of the standard delivery process. For example, a customer may require custom folder labels or prefer to receive only metadata instead of image files.
Prerequisites
Configure the following before you perform a distribution:
| Media sizes | To push individual sizes, define them under Administration > Media Attributes > Media Sizes. Learn more in the Media Sizes FAQ. |
| Output | In the Output tab of your partners’ Master Data, set up an output with recipient data from the FTP server. |
| Activate the Action in Media Processing | Add the Distribute Media (Push) action to the sidebar of a corresponding folder. Learn more in the Folders FAQ. |
| Optional: Output groups | If you want to distribute media to multiple outputs simultaneously, you can group them under Media Management > Distribution > Output Groups. |
| Optional: Distribution templates | You can save templates for repeated media pushes with the same settings. See Distribution templates below. |
Backstage offers you two distribution options:
- Distribution as Action: Manually initiate a one-time distribution to a specific output or output group. Select the images in Media Processing and start the process.
- Distribution as Task: Distribution starts automatically at a specified interval and distributes media according to a specific metadata rule.
Distribution settings
To access distribution settings, navigate to Media Management > Distributions > Task Management and select Edit > New.
- In the New Task window, set the following in the Master Data panel:
- Name: Enter the name of the distribution.
- Type: Media is selected by default.
- Task is Active: Activate the defined settings (additional for Tasks).
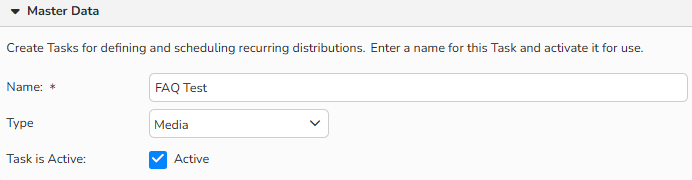
Task Settings window > Master Data panel
- In the Timeline for Execution panel (additional for Tasks), define the recurrence and the start time and end time of the task’s duration:
- Task Recurrence: Determines the time interval.
- Task Duration: Defines the start and end times.
- Current Task Status: Specifies the last and next date for run.
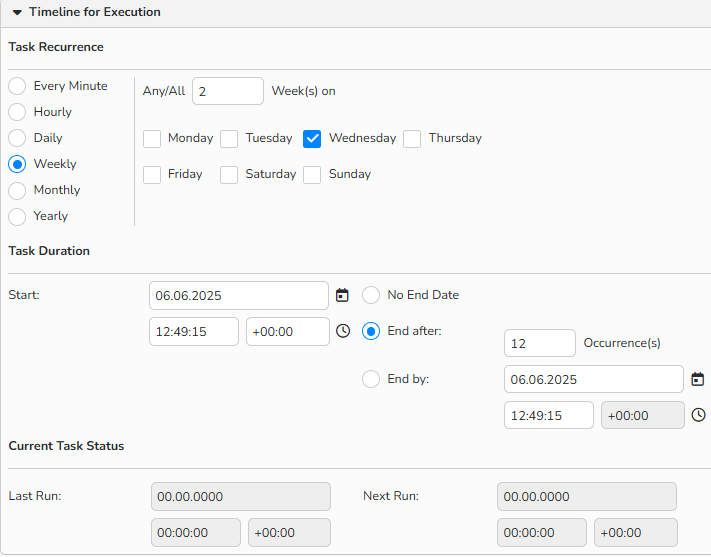
Task Settings window > Timeline for Execution panel
- In the Assign Outputs or Output Groups panel:
- Select Outputs or Output Groups to set up this Distribution Task for Output Groups or for individual Outputs.
- Add outputs that you want to associate with this distribution.
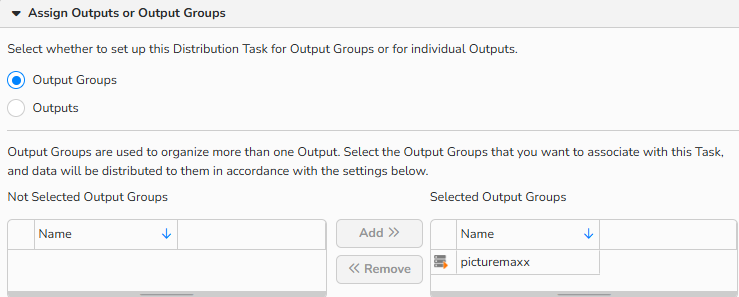
Task Settings window > Assign Outputs or Output Groups panel
- In the Select Media panel (additional for Tasks):
- For recurring distributions, you can select all media from specific Media Processing folders and then further filter your selection using metadata.
- Select media by folder: Select the folders you want to distribute.
- Select media by metadata: Specify further selection criteria using metadata.
- Database Field: Specify the database field you want to use as a selection criterion.
- Language: Select the language of the database field label.
- Filter: Specify how the system should handle the data within the selected database fields.
- Text, value: Enter the text/value to search for in the metadata.
- Case sensitive: Enable this option to ensure that database field validation is case-sensitive.
- Resend Already-Sent Media: Enable the option if you want to send the data to an output or output group again/multiple times.
- For recurring distributions, you can select all media from specific Media Processing folders and then further filter your selection using metadata.
Note
For recurring distributions: We do not recommend enabling Resend already-sent media. If you do, all matching media will be resent to recipients.
For one-time distributions: We recommend enabling this option. It lets you redistribute previously shared media for special occasions, such as an actor’s birthday.
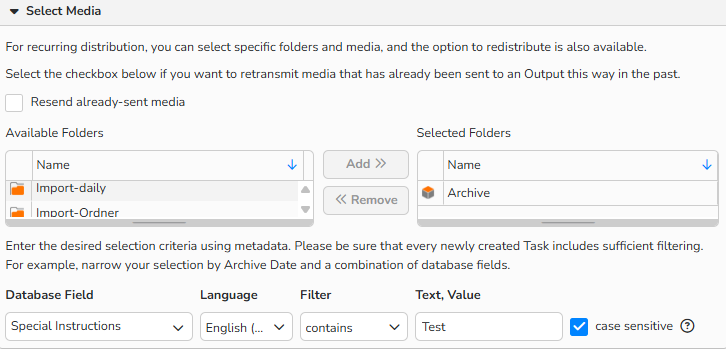
Task Settings window > Select Media panel
- In the Media Settings panel:
- Create Folder: enable the option to create a new folder for your media files on the destination directory. Then, enter a name for this folder.
- Main Folder Name: Name of the folder to be created on the customer's FTP server.
- Folder Name = Distribution Name: Select this option to use templates for direct distributions (actions) and still use individual folder names for each dispatch.
- Only Send Metadata: Enable this option to send metadata only (and not media). (This option can be useful for internal backup scenarios.)
- Filename: You can create alternative custom filenames for the distributed media. To use existing metadata to rename the files, click the
 button and select one or more database fields.
- Add Sequential Number: Enable this option to assign a sequential number to each media.
- You can specify individual media sizes and media settings for an individual Output.
- Name/Type/Size/Resolution: The displayed sizes and settings derive from Administration> Media Attributes > Media Sizes. For task-specific media sizes, you can enter this information manually.
- Prefix: Specify a prefix for the file name for each media size.
- Watermark: Specify a watermark for each media size.
- Folder name: Specify a folder name for each media size.
- To add or remove media sizes, click
 or
or  .
.
- Create Folder: enable the option to create a new folder for your media files on the destination directory. Then, enter a name for this folder.
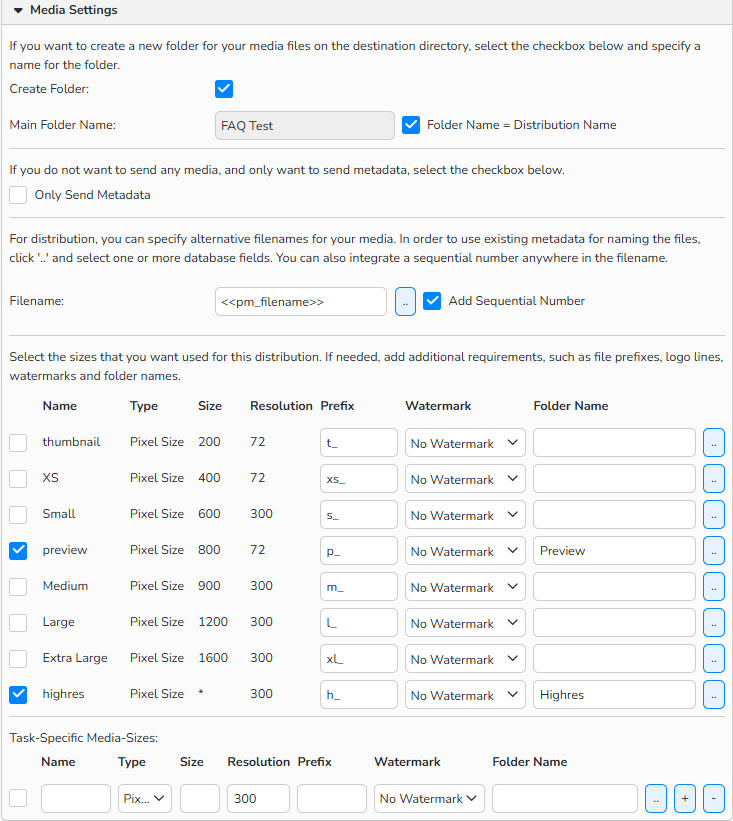
Task Settings window > Media Settings panel
- In the Metadata Settings panel:
- Embed Metadata: Enable the option to send media with embedded metadata. Select a language for the metadata, if applicable.
- Send Metadata File: Enable the option to send a separate metadata file.
- Filename: Enter a name for the metadata file.
- Create Folder for Metadata: Enable the option if the file needs to arrive in a separate folder in the destination directory. Name the folder in the Folder Name field.
- Configure the metadata file:
- Field Separator / Field Delimiter / Character Set, and language of the metadata file.
- See the Metadata Export FAQ for details.
- Field Separator / Field Delimiter / Character Set, and language of the metadata file.
- Column: Select the data to be delivered, the data will appear in the order of the columns set here. Define the language and delimiters if necessary.
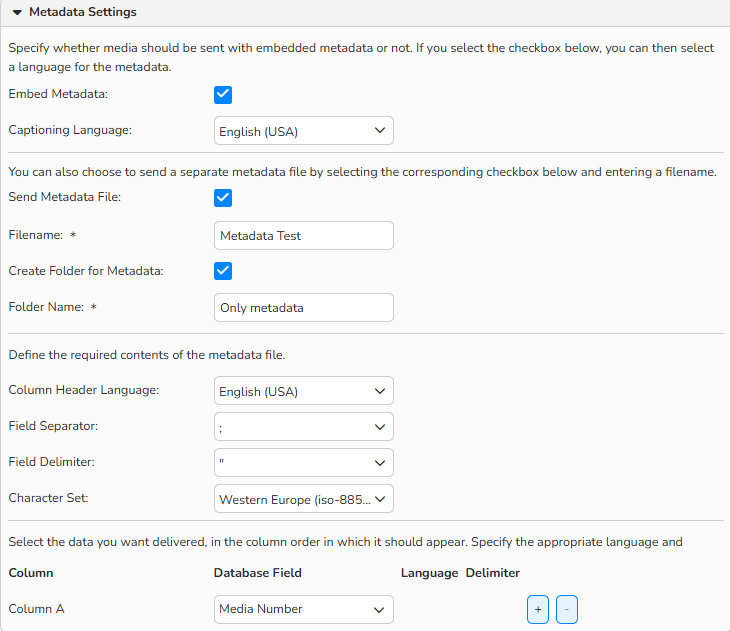
Task Settings window > Metadata Settings panel
One-time distributions from Media Processing
To distribute media directly from the Media Processing area, proceed as follows:
- Select media files.
- In Exporting Actions, click Distribute Media (Push).
- In the Configure Action dialog, select a distribution type:
Direct Distribution
- To initiate a direct distribution, you can select an existing template - all its predefined settings will be applied automatically.
- Only templates that include all mandatory distribution settings appear in the list.
- Enter a distribution name, select a template, and click Start Action.
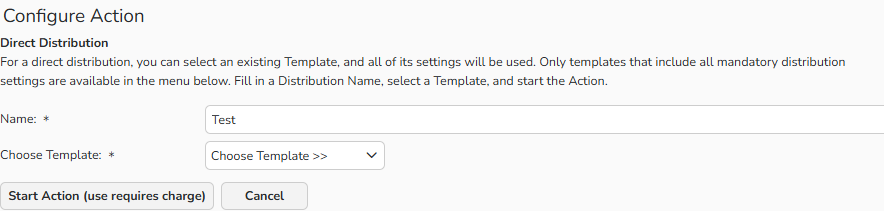
Configure Action dialog: Direct Distribution
Create New Distribution
- To create a new distribution task, you can use an existing Template as a starting point.
- Click Create New Distribution to access additional settings and configure the distribution.
- See Distribution Settings section above.
Use Previous Distribution
- To send additional media files related to the same subject, you can reuse a previously executed distribution.
- Select a previous distribution from the dropdown.
- To start the task with the predefined settings, click Start Action.
- To update the distribution’s settings first, click Edit Selected Distribution.
Automatic recurring distributions
To set up a new distribution, proceed as follows:
- Navigate to Media Management > Distribution > Task Management.
- Select Edit > New.
- Configure the settings as described in the Distribution Settings section above.
- Click Save to confirm.
Edit an existing task
- Select a task from the list and click Edit > Open
- Modify the distribution settings.
- Click Save
Copy an existing task
- Select a task from the list and click Edit > Copy.
Delete an existing task
- Select a task from the list and click Edit > Delete.
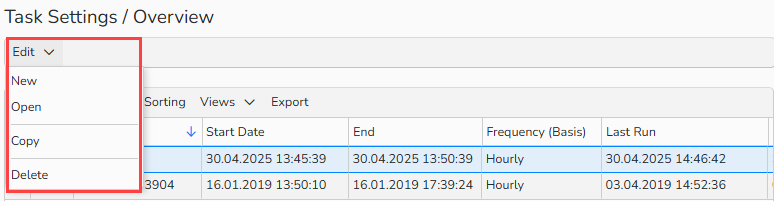
Task Settings overview > Edit menu
Note
An Action Run can handle media distribution based on your chosen criteria. For more information, see the Action Runs FAQ.
Note
The integrated table functions allow you to search, filter, and sort data records. For more information on these functions, as well as how to set up custom views or use the export function, see the Advanced Table View FAQ.
Distribution templates
Distribution templates help manage typical workflows and provide quick access to content in daily media processing.
To create a new distribution template:
- Go to Media Management > Templates > Distribution Templates.
- From the Edit menu, select one of the following options:
- New Action Template: Use this template for one-time distributions.
- New Task Management Template: Use this template for recurring distributions.
- New Action and Task Management Template: Use this template for both one-time and recurring distributions.
- Note: When used for an Action, any additional settings available for Tasks will be ignored.
- Configure the settings as described in the Distribution Settings section above.
- Click Save.
Edit an existing distribution template
- Select a template from the list and click Edit > Open
- Modify the distribution settings.
- Click Save
Copy an existing distribution template
- Select a template from the list and click Edit > Copy.
Delete an existing distribution template
- Select a template from the list and click Edit > Delete.
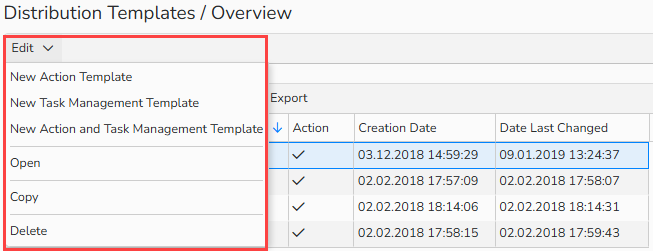
Distribution Templates overview > Edit menu
Note
The integrated table functions allow you to search, filter, and sort data records. For more information on these functions, as well as how to set up custom views or use the export function, see the Advanced Table View FAQ.
In-progress distributions
To get an overview of ongoing distributions, navigate to Media Management > Distribution > In-Progress Distributions.
The data columns display the following information:
| Output | Name of each Output, as stored in Master Data in Task Management. |
| Error | If an error occurs during distribution, a message from the receiving server will appear in this column. |
| Progress | Status bar for all in-progress transmissions. |
| Next start | Date and time of the next transfer. |
| Name | Name stored for the corresponding distribution. For single-time distributions, it is optionally generated during execution or from templates. For automatic distributions, it is the name of a corresponding task. |
| Protocol | Type of transfer protocol (FTP or SCP) used by Output. |
| Status | Current send status (In Progress or Waiting) for each individual Output. |
| Retries | Number of retries of the distribution. |
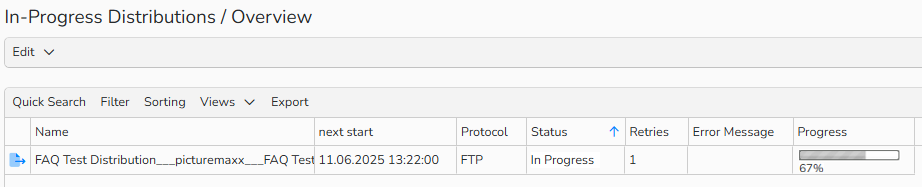
In-Progress Distributions overview
Cancel in-progress distributions
- In Media Management > Distribution > In-Progress Distributions, select the record(s) from the overview and click Edit > Cancel selected distributions.
Note
The integrated table functions allow you to search, filter, and sort data records. For more information on these functions, as well as how to set up custom views or use the export function, see the Advanced Table View FAQ.
Completed Distributions
To view and evaluate a full history of all your completed Distributions, go to Media Management > Distribution > Completed Distributions.
The following tabs are available:
- Recent Distributions: Lists all completed distributions.
- Distributions with error messages or cancelled runs are not sent to the Historical Distributions list.
- Historical Distributions: Contains all distributions that are successfully completed and are older than approximately 6 weeks.
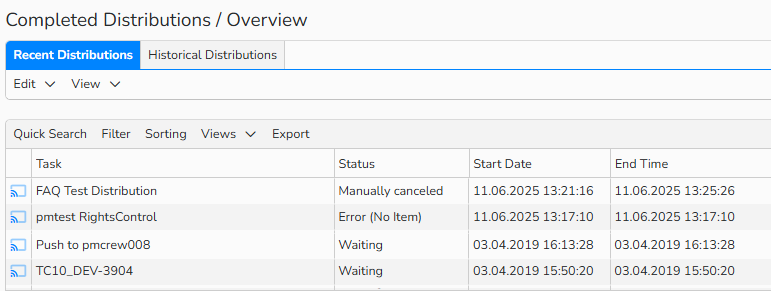
Completed Distributions overview: Recent Distributions tab
Backstage also provides an overview by output and a detailed view of the distribution settings. To view more distribution details, double-click on a completed distribution or select Edit > Open.
The following tabs are now available:
- Output Overview: Lists all distributions of the selected output. To see an overview of the data transmitted to the output and the transfer details, such as folder or possible error messages, select View Details > Open.
- Distribution settings: Shows the specific distribution settings.
Distribution volume tracking
You can keep track of the volume of distributed media in Media Management > Distribution > Data Volume.
Double-click a record to view more details:
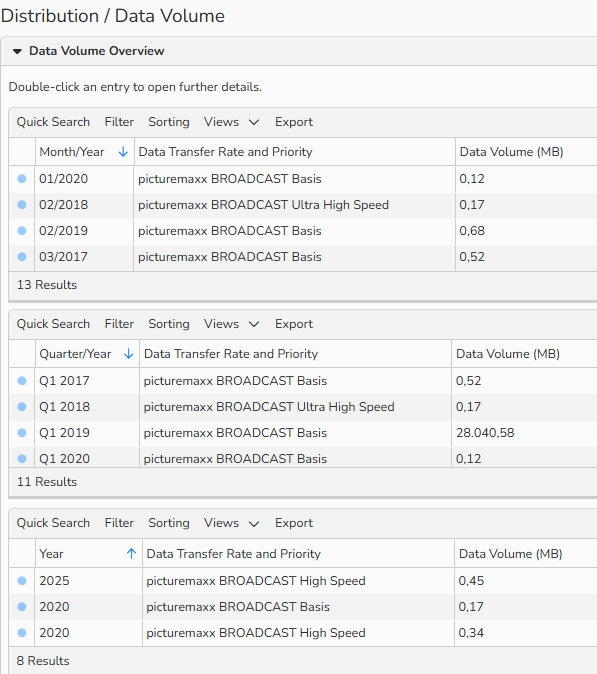
Distribution > Data Volume: overview by time period