
Deletion Tasks
Download as PDFOverview
In the Deletion Tasks module, you can remove selected media files from the archive based on specific selection criteria such as author, media type, age, or file size. You can also choose which media formats to delete - high-res, preview, or thumbnail.
Caution
Deletion in this area is final. Deleted media CANNOT be restored!
Confirm you’ve read the warning and accept the risks before creating or running deletion tasks. The system will let you start only after confirmation.
Note
To control who can access this module in Backstage, go to Administration > Users > Accesses tab of a selected user record. There you can set rights and roles to define exactly who can perform deletion tasks.
Structure of the module
Open the module under Administration > Deletion Tasks. It consists of three sections:
- Deletion Tasks tab: Lists all deletion tasks and lets you configure new ones.
- Shows the overall task status, while the other two tabs show the status of individual runs.
- Deletion Tasks in Preparation tab: Displays deletion tasks in progress and waiting for approval.
- Executed Deletion Tasks tab: Lists all executed deletion tasks or runs.
- Deletion task: Defines criteria for removing media. A single deletion task can include multiple runs.
- Task run: Executes the deletion process based on the deletion task’s criteria.
- In the Deletion Tasks in Preparation and Executed Deletion Tasks tabs, the individual task runs are therefore listed in reference to the corresponding deletion tasks.
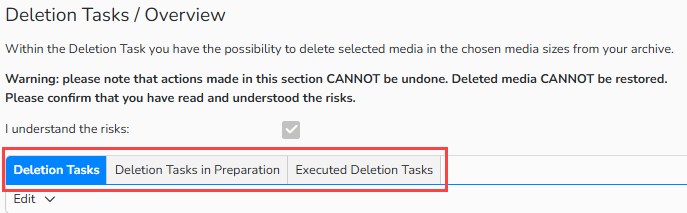
Deletion Tasks: all tasks, tasks in preparation, and executed tasks
Configure a deletion task
Before creating or executing deletion tasks, you must confirm that you have read and understood the associated risks. Full access to this area is only granted after this confirmation.
To create a deletion task, proceed as follows:
- Go to Administration > Deletion tasks and select Edit > New in the Deletion tasks tab.
- Set up deletion criteria in the following panels:
Master Data
- Enter a name for the deletion task.
- Set the deletion task status to Active to execute it. You can run only active deletion tasks.
- Choose the Media Sizes to delete:
- High-res: Delete high-resolution files and replaces them with thumbnails.
- Preview, High-res: Delete high-resolution and preview files, replacing them with thumbnails.
- Thumbnails, Preview, High-res: Permanently delete all three media formats.
- Assign Batch Restriction, if needed. With this option you can add media files from the deletion task to the batch restriction. We recommend assigning a batch restriction for large-scale deletions (up to 500,000 items). See Best Practices below.
- In Maximum number of media without confirmation, specify the approval threshold:
- If set to 0, every task run requires manual approval
- If set to 100, only the task runs with more than 100 media files require approval.
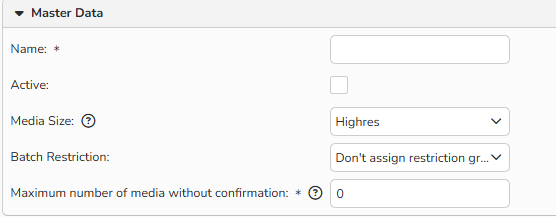
Deletion Tasks: Master Data
Timeline for Execution
In this panel, you can define whether to run a deletion task once or at regular time intervals.
- For Single Execution you don’t need to input any further information.
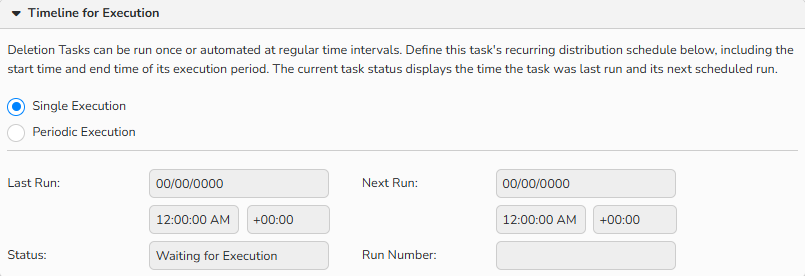
Deletion Tasks: One-time task setup
- For Periodic Execution, specify the following:
- Task Recurrence: Select the recurring schedule.
- Task Duration: Define the start and end time of task execution.
- Current Task Status: View execution times for the last run and next scheduled run.
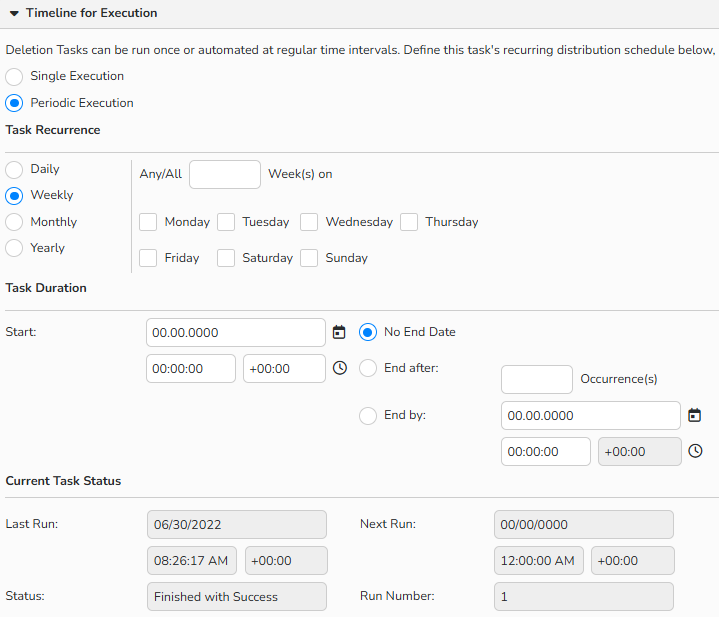
Deletion Tasks: Recurring task setup
Media Selection
Here you can configure how to filter media files for the deletion task: by date, author(s), or metadata.
Medium Date Filter
Select the reference date field and the period or due date for media deletion. Click Apply Filter to view the number of media files matching the selected filter criteria.
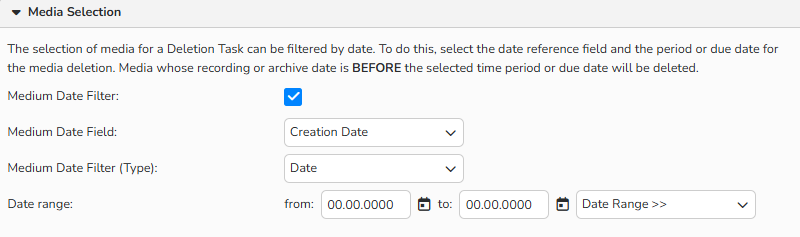
Select media for deletion task: filter files by date

Apply filter button and the file count field: number of files matching the filter criteria
Author Filter
Select authors, partners, author pools, or syndications to filter media files for deletion tasks. Click Apply Filter to view the number of media files matching the selected filter criteria.
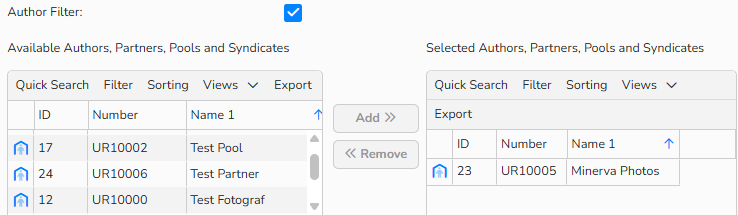
Select media for deletion task: filter files by author
Metadata Filter
Choose how to narrow the selection – via full-text search, a specific metadata field, or by media type. Click Apply Filter to view the number of media files matching the selected filter criteria.
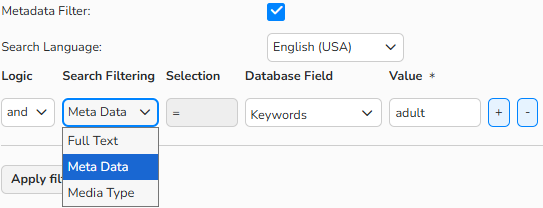
Select media for deletion task: filter files by metadata
Exclusion of media in financial documents
Prevent deletion of files linked to finance records such as invoices, cancellations, or credit notes. You can either:
- Exclude all linked media files, or
- Apply a date filter (e.g., exclude only the files linked to finance records of the last 2 years).
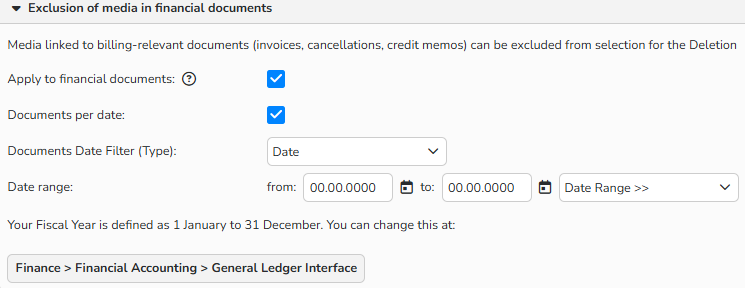
Exclude media files linked to finance records from deletion task
Exclusion of downloaded media
Prevent deletion of media files previously downloaded as High-res. The following options are available:
- Apply to downloaded media: Exclude all media ever downloaded as high-resolution files.
- Number of Downloads: Exclude media files based on how often they were downloaded (e.g., exclude only the files downloaded at least twice).
- Downloads by Date: Define a time range for exclusion (e.g., exclude the files downloaded after January 1, 2021, or within the last 10 days/six months).
- Downloads by Access (Sales/Purchasing/Administration): Specify which downloads by which access groups (e.g., only exclude the files downloaded by customers or sales partners).
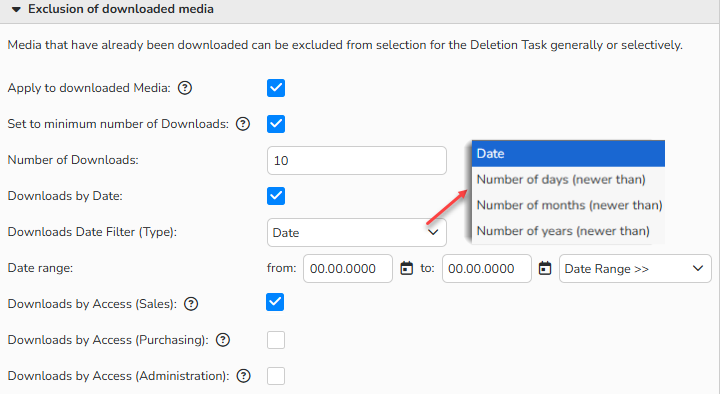
Exclude media files previously downloaded as High-res
Important
You can exclude only High-res downloads from the deletion task. Preview downloads do not affect the task.
Start a deletion task
Choose one of the following options to initiate a deletion task:
- Save and execute now: the system selects the media files to delete and either executes the task immediately or waits for approval, depending on the configuration. In both cases, the system sends the task to the Deletion Tasks in Preparation tab.
- Save and execute according to recurrence (for periodic execution): the system automatically starts selecting the media files at the configured time. Then, it sends the run to the Deletion Tasks in Preparation tab.
Execute a deletion task
When you initiate a deletion task with Save and Execute now or Save and execute according to recurrence, the system sends the task runs to the Deletion Tasks in Preparation tab. The tab displays all deletion tasks currently in progress or waiting for approval.
- After you have configured and initiated a deletion task in the Deletion Task tab, switch to the Deletion Tasks in Preparation tab.
- Double-click a deletion task record to review its configuration settings and media files selected for deletion.
- Scroll the configuration settings down to the Media for deletion panel with a list of all the media files to be deleted.
- Review the media files selected for the deletion task.
- You can export the Media for deletion list.
- Click Approve media for deletion to start the run.
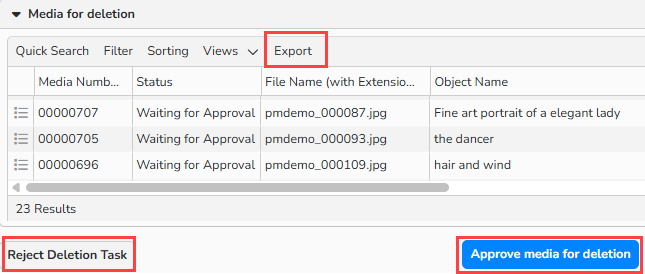
Deletion Tasks in Preparation tab > Media for deletion: Export the list, reject the deletion task, or approve media for deletion
Important
You can only start a new run after the previous one finishes. This is especially important for periodic execution tasks. Make sure you approve them regularly or automatically, refer to Best Practices below for details.
Best Practices
Follow these best practices to ensure safe and efficient deletion of media files.
Batch restrictions
- If you choose not to delete all media formats, the remaining thumbnail or preview files are no longer needed to the same extent. In this case, use the batch restriction feature. The system automatically adds media files from a deletion task to the assigned batch restriction.
- If you excluded some media files (finance documents/downloads) from a deletion task, the system does not add them to the batch restriction.
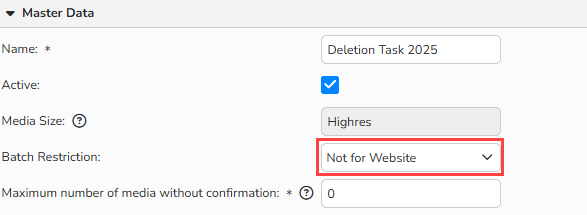
Assign batch restriction to the deletion task
Note
To assign a batch restriction, first configure it in Media Management > Restrictions > Batch Restrictions.
Re-execute and modify a deletion task
You can execute multiple runs for a deletion task again, even if it is not periodic. To do this, manually trigger the selection again. The option is useful when you add more files that match the defined criteria. The system automatically skips the files of the same deletion task that have already been deleted in previous runs.
You can also modify a deletion task after executing a run:
- Modify and re-run a single-execution task.
- Modify a periodic-execution task before the next scheduled run.
Important
You can change all settings except the media size. The system applies these changes only to future runs; completed runs remain unchanged.
Deleting additional media files from media that have already been deleted
If the high-resolution files for certain media have already been deleted in a deletion job and you also want to delete the previews at a later time, you must create a new deletion job.
Delete large volume of media (over 500,000 files)
You can delete up to 500,000 files in one run. For larger deletion tasks, use batch restrictions.
- All media files of the deletion task are managed within a batch restriction.
- To make sure the system skips the media files already deleted, exclude the batch restriction assigned to the deletion task with the Metadata Filter setup.
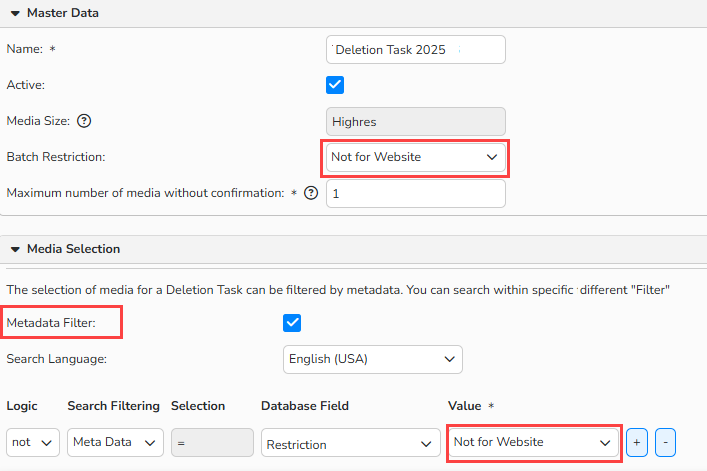
Metadata Filter: exclude assigned batch restriction
Runs in periodic tasks
The system starts selecting media for a new run only if no previous run of the same deletion task is still awaiting approval in the Deletion Tasks in Preparation tab.
Periodic deletion tasks with short intervals (daily or weekly) work best for runs that don’t need extra review or approval. Specify Maximum number of media without confirmation accordingly.