
Editing Media
Download as PDFOverview
Backstage equips you with tools to edit media metadata and offers advanced functionality, including:
- Scalability: Batch processing the metadata over hundreds or even thousands of media files at a time.
- Flexibility: Numerous display options to review and edit your media files.
- Ease of use: Templates of frequently used metadata.
- Multilingual: Metadata entry in more than one language.
Media Processing tree
In Backstage your media files are organized into folders within the Media Processing tree:
- Archive: Contains the published media that you make available to your customers via the webshop and my-picturemaxx marketing channels.
- Replace Media (Archive): A special FTP input folder to replace media files in Archive.
- Upload and Editing folders: Represent suppliers’ FTP-input channels. The files in these folders are still being processed by the system and are not visible to customers.
- Trash: When you delete a media file from the archive or a folder, it is moved to Trash. To permanently delete files from your database, remove them from Trash.
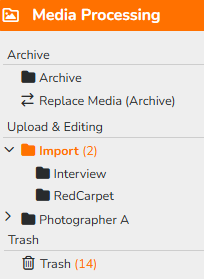
Media Processing tree
Archive folder and search options
Your Archive contains all the published media - the files that media buyers can search and purchase. Backstage provides you with a variety of search options and combinations of these.
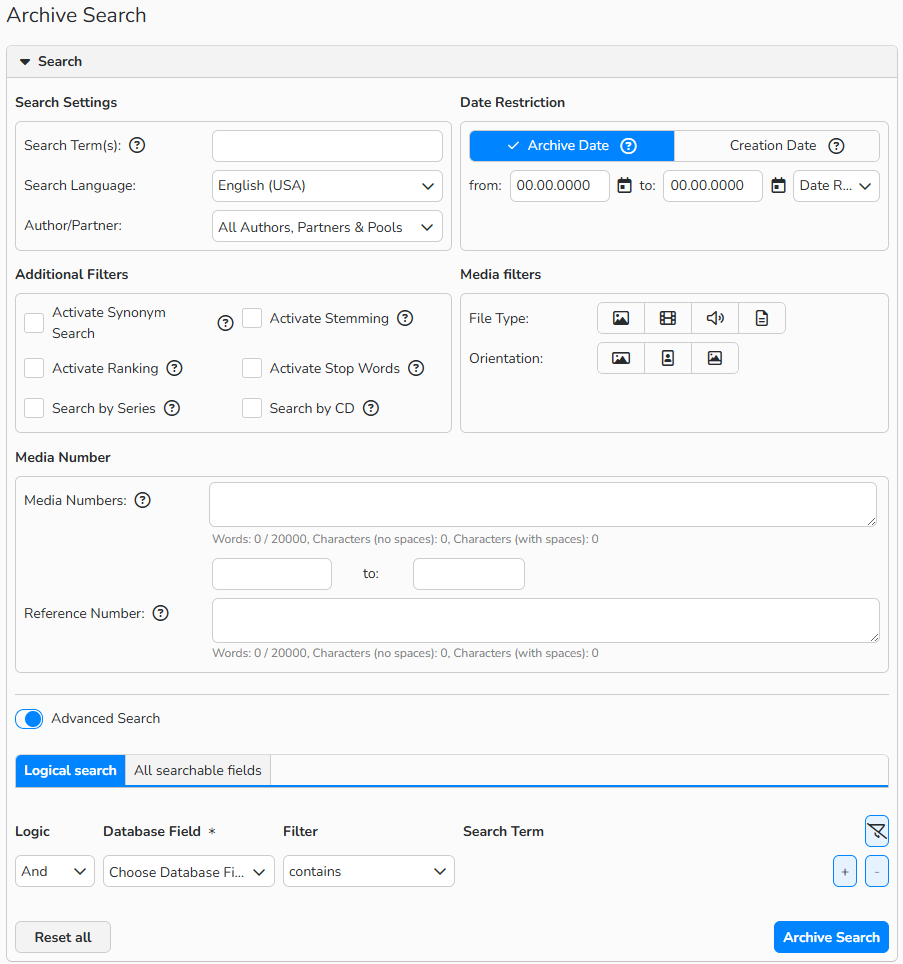
Archive Search window
Search settings, additional filters and Advanced Search options:
| Search Term(s) | Search across all metadata fields of your media. You can limit this full-text search with Exact or Hashtag search options, AND or OR term combinations (see Advanced Search > All searchable fields below). | |
| Search Language | Select a mask language to search, if your masks have multilingual labelling. | |
| Author/Partner | Search for all the media files linked to an author, partner, or author pool selected from the drop-down. | |
| Activate Synonym Search | Enhance your search with a predefined list of synonyms. Define synonym groups in Media Management > Classifications > Synonyms. | |
| Search by Series | Get only the primary media of each of your series (Media Management > Collections > Series). | |
| Activate Stop Words | Ignore common words like "an," "in," and "on" that don’t affect search results. Stop words are automatically excluded from website and picturemaxx network search, but Backstage’s default search includes them. Enable the option to see how the current stop words work. View or edit the default list of stop words in Media Management > Classifications > Stop Words. |
|
| Date Restriction | Search by Archive Date (the media’s publication date) or Creation Date (the value in the ‘Creation Date’ metadata field). | |
| File Type | Limit your search to a selected file type. | |
| Orientation | Search for media with the specified orientation type. | |
| Media Numbers | Explicitly search by media numbers. Enter media numbers space or comma separated, or range your search with start and end values. Important: When you search by media numbers, all other search options are ignored |
|
| Advanced Search > Logical search |
Search individual fields and link them using the logical operators AND and NOT. In addition, the contains and is empty filters are available. Click the [+] button to add more search criteria. | |
| Advanced Search > All searchable fields |
Limit your full-text search by adding AND or OR to your search terms. |
Note
All the search options are also available for your Lightbox search.
The Archive search and Lightbox search are now visually distinct, and the action buttons clearly show your choice:
- Archive Search – your archive only
- Lightbox Search – all publicly accessible media, including partner content (if available)
Replace Media (Archive)
Use this special FTP inbox folder to replace existing media files in your Archive.
To configure the Replace Media folder:
- Right-click the folder to open the context menu, and select Settings.
- In the General Data tab, configure the following:
- In Mapping Basis for Replacement, specify the reference of the newly uploaded media files (e.g. filename = media number). Select an option to name the replacing files:
- Media number
- Media ID
- Filename
- File name (with extension)
- In Metadata, specify whether to update the metadata of the replaced files.
- If you choose the Overwrite the existing metadata of replaced files using the associated field mapping option, set mapping to other folders in the Field Mapping tab.
- In Mapping Basis for Replacement, specify the reference of the newly uploaded media files (e.g. filename = media number). Select an option to name the replacing files:
Important
Make sure that the reference is unique, otherwise all media with a similar reference in your database will be overwritten.
Folders
Folders are the suppliers' input channels to your database. Refer to the Folders FAQ to learn about folder configuration and features.
Trash
Contains all the media removed from your database. To permanently delete media files from the database, choose between:
Delete all media in Trash
- Right-click the Trash folder and select Clear Trash in the context menu.
Delete selected media in Trash
- Multi-select the media files in you want to delete and select Edit > Delete from the top menu.
Auto-Delete
- Right-click the Trash folder and select Settings. Enable the Auto Delete is Active option and set the number of days you want to store files in Trash. The system permanently removes files older than the set limit.
Note
To restore media files from Trash, just drag and drop them into a Media Processing folder and republish them with the Publish Media (Archive) action.
Top Menu options
Menu: Edit
The Edit menu offers the following functions:
| Open | Use this command or double-click to open files for editing. |
| Batch Process | Edit multiple media files at once. |
| Download Media | Download media as a ZIP file, including published items from the Archive and files from Media Processing folders. The ZIP keeps original file names. For unpublished media, original metadata is included; for published media, metadata comes from Backstage. |
| Upload Media | Use this command to upload media directly into a folder or Archive. |
| Metadata Import | Import metadata from files. |
| Metadata Export | Export metadata to files. |
| Delete | Select files you want to delete and move them to Trash. |
| Select a file you want to print as a PDF file and pick a layout option from the list. |
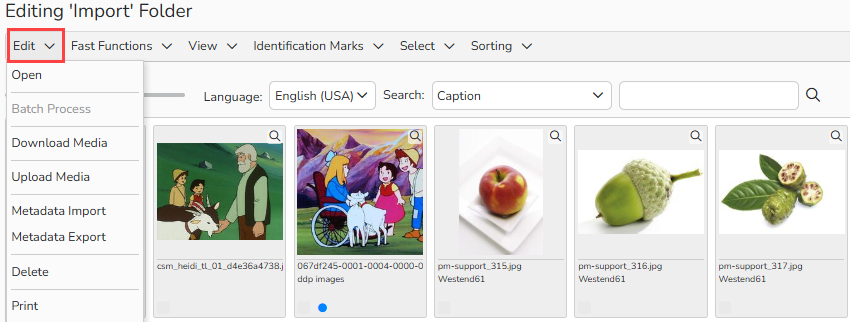
Import folder: Edit menu
Note
For more information, refer to following FAQs: Media Labeling, Document Management > Upload Media section, Metadata Import and Metadata Export.
Menu: Fast Functions
Fast functions are shortcuts that allow you to connect media to new or existing collections or to define rights directly in the media editing area.
| Batch Restrictions | Create distribution restrictions for media. (Media Management > Restrictions > Batch Restrictions). |
| Series | Create new series/add to existing series - a collection with one or more main media files that represent the entire collection, for example, topic-related reports (Media Management > Collections > Series). |
| CDs | Create new CD /add to existing CD - a collection with just one cover that represents the entire collection, for example, a CD or DVD with archive images on a specific topic (Media Management> Collections > CDs). |
| Offers | Create new media collection /add to existing media collection - essentially a series of tailored topics that you collect, describe, and then present (Media Management > Collections > Offers). |
| Website Collections | Group media files for your website (Web > Website Collections > Administration). |
Note
Find out more about the functions in corresponding FAQs.
Menu: Fast Functions (Finance)
With finance fast functions you can create a finance document directly with the media files from your Archive. Choose between Price Quote, Order, Delivery Note, or Invoice.
- Select media files.
- Click Fast Functions (Finance) and select a required document from the menu. A Customer Overview dialog opens.
- Select a customer record from the overview.
- The auto-generated document opens for editing.
- Click Save.
Menu: View
The View menu offers you options to display media files:
| Thumbnail | Display media files as thumbnails with the media number, file name, and author. |
| Thumbnail and Text | Display media files in a list view with thumbnail, media number, file name, caption, and keywords. |
| Tabular | Display media’s metadata fields in a table view without a thumbnail. You can configure the number of fields to be displayed. Find out more in the Advanced Table Views FAQ. |
| Editing | Switch from the Lightbox view to the Archive view. |
| Lightbox and Download | Switch from the Archive view to the Lightbox view. |
| Compare Media | Multi-select media files you want to compare and click View > Compare Media. You can compare up to six files at the same time. |
| Preview by Click Only | Double-click a media file to open its preview. |
| Preview by Mouseover | Hover your mouse over a media file to see its preview. |
Menu: Identification Marks
You can mark your media files with color or icons to be able to get important information at one glance.
Select a media file and assign it a mark from the list:
 |
Mark as Unread | Mark the file as new. |
| Mark as Read | Remove the Unread mark. | |
 |
Mark as Approved | Assign the Approved mark to the file. |
| Remove Approved status | Remove the Approved mark. | |
| Remove Error status | Remove the error status assigned by the system. | |
 |
Edit identification Marks | Add custom labels to the media. |
| Remove all Identification Marks | Remove all marks from the media. | |
| No Urgency | Remove the Urgency mark. | |
 |
Urgency rating 1-8 | Mark the media file with a color-coded urgency icon. |
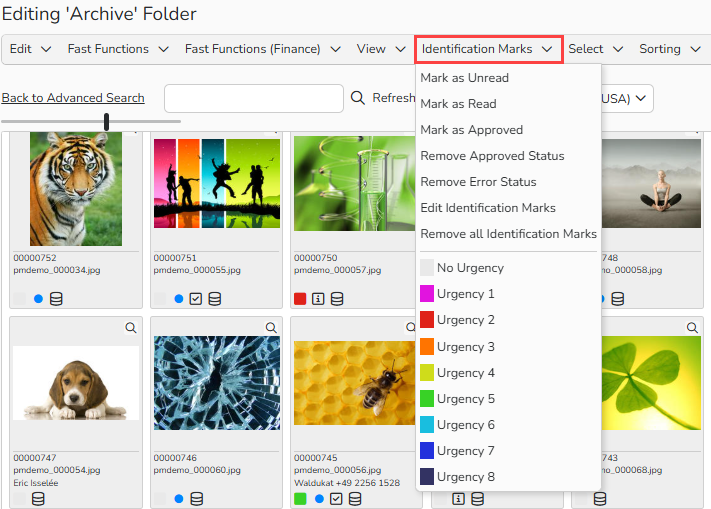
Archive folder: Identification Marks menu
Note
To learn how to create custom identification marks, refer to the Identification Marks FAQ.
Menu: Select
This menu item offers the following selection options:
| Select All | Select all media files. |
| Remove Selection | Clear the current selection. |
| Invert Selection | Select the files that you do not want to include in your selection and then use the command. |
| New Media | Select media files marked as new. |
| Media with Error Status | Select media files with errors. |
| Approved Media | Select media files marked as approved. |
| Urgency rating 1-8 | Select media files marked as urgent. |
Menu: Sorting
Sorting allows displaying your media files according to a specific metadata content. The current sort order is highlighted in the dropdown list.
Display and search controls
 |
Resize the thumbnails with the slider. |
 |
Set the language of the metadata you want to search for. Note that only the metadata mask of the selected language is searched. |
 |
Run a new full-text search. It does not consider the previous search settings. |
 |
Update the search results that match the query. (For example, newly imported media is displayed.) |
 |
Get back to the archive search screen to run a new search. |
View controls
The view controls offer the following options:
 |
Show/Hide Sidebar | Hide the bar on the right if you need more space for your media. |
  |
Collapse/Expand all Box Elements | View all the boxes with available actions, action runs, or fast functions. |
  |
Editing/Lightbox and Download | Switch between the archive editing view and the lightbox view. |
Note
Various functions that help you edit the media are grouped into boxes. Learn more about how to configure the bar in the Folders, Actions and Action runs and action run groups FAQs.
View Metadata panel
The View Metadata panel shows basic media details and history of operations without having to open the file first.
| Text Info | Display basic metadata fields of a selected file. |
| File Info | View file name, image size, quality, etc. |
| Camera Info | Display digital creation date, aperture value, etc. (only if the data is available for the file). |
| History | View a list of all operations related to the media file. |
| Statistics | View downloads from your system. These can include downloads made through your website, the picturemaxx Media Network, or any partner connections. |
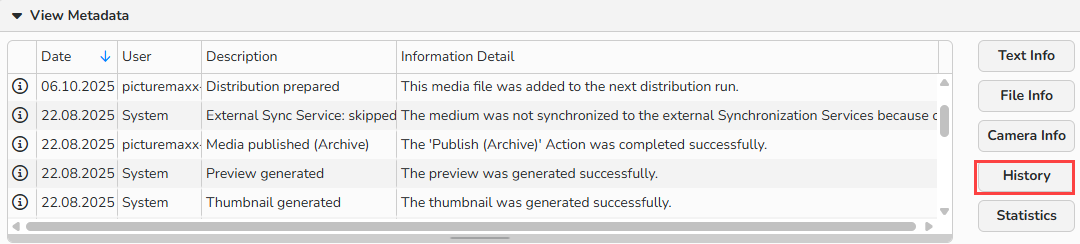
View Metadata panel > History: The processing log of the selected image
Keyboard Shortcuts
The following keyboard shortcuts are available for media editing in your Folders.
| ENTER | Open a media file |
| DEL | Delete a media file |
| CTRL+A (Windows) CMD+A (Mac) |
Select all media files |
| 1 – 8 | Assign Urgency rating to selected media files |
| SHIFT+Click | Multi-select a range of media files |
| CTRL + Click (Windows) CMD + Click (Mac) |
Multi-select several individual media files |