
Lightboxes
Download as PDFOverview
Lightboxes are one of the most powerful marketing tools available to your company. Create lightboxes for individual customers or entire customer groups directly from the archive or in the integrated lightbox module. You can share your lightboxes, make them public, or let your customers download files from a lightbox.
Make the most of the lightbox features to present your media in the best possible light.
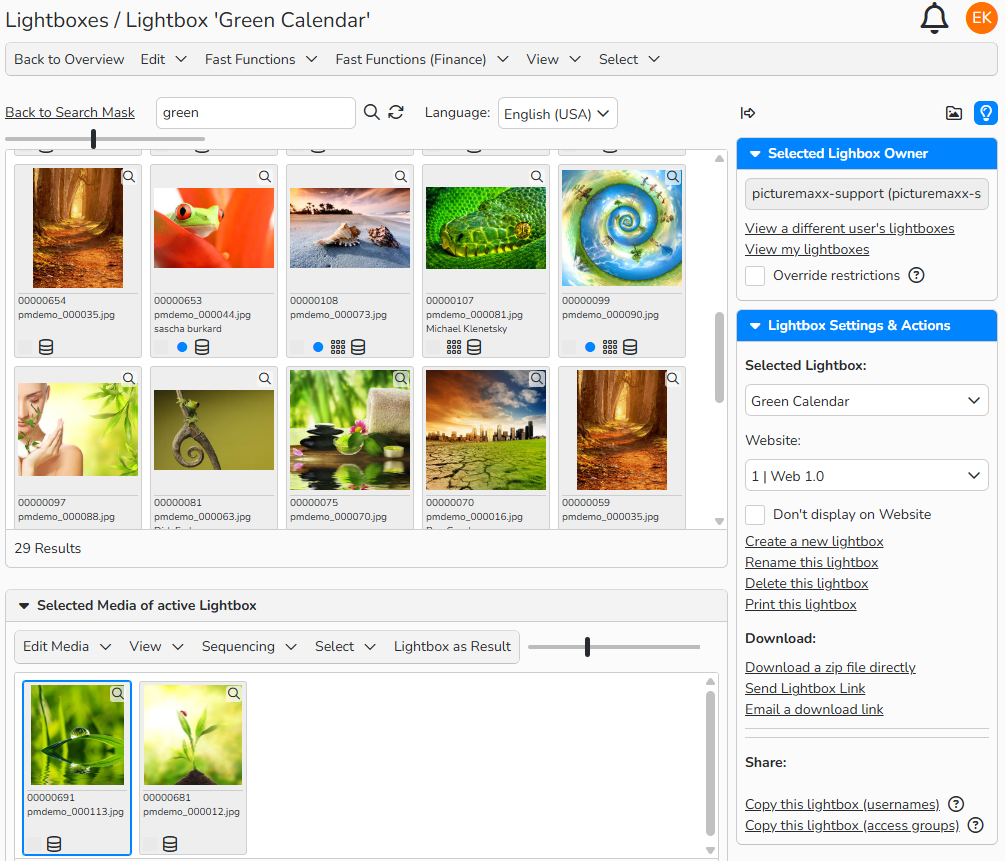
Lightbox features
Create lightboxes
To create a lightbox, proceed as follows:
- Navigate to Media Management > Lightboxes.
- In the Lightboxes overview, click Edit > New.
- Enter a name for your lightbox and click Save.
- To add images, within the search field, enter a search term, and click Enter.
- Pick the images you want to add to the lightbox.
- To multi-select a continuous range: Shift + Click
- To multi-select a non-continuous range: Ctrl (PC) or Cmd (Mac) + Click
- Drag the images into the Selected Media of active Lightbox panel below the search results.
- To share the lightbox with a client, use the Send Lightbox Link option in the sidebar. Alternatively, choose Email a Download Link to deliver the lightbox as a ZIP file.
-Or-
- Navigate to Media Processing.
- Perform a media search and then select View > Lightbox and Download to transfer the results to the lightbox area for further processing.
- Pick the images you want to add to the lightbox and drag them into the Selected Media of active Lightbox panel below the search results.
Tip
To rearrange media files within the lightbox, simply drag and drop them into the desired position. Additional features are available to support your workflow, refer to the information below for details.
Organize Lightboxes
Backstage offers various options to organize your lightbox:
Menu on the top:
Menu: Edit
The menu contains the following features:
- Open: Open a media file for processing. You can also open a file by simply double-clicking it.
- Batch Process: Edit multiple media files simultaneously.
- Print: Pick the media file you want to export as a PDF, then choose a layout from the available templates.
Note
For more information refer to the Media Labeling FAQ.
Menu: Fast Functions
Fast Functions are shortcuts that let you link media files to new or existing collections and define permissions directly within the media processing interface.
Batch Restrictions
Define distribution permissions for media files. (Media management > Restrictions > Batch Restrictions)
Series
Create series — a curated collection featuring one or more primary media items that represent the entire set. It is ideal for themed reports or editorial packages
(Media Management > Collections > Series).
Note
You can learn more about each feature in the corresponding FAQ
Menu: Fast Functions (Finance)
Use this feature to generate a document directly from the media files in your lightbox search results. You can choose from Price Quote, Order, Delivery Note, or Invoice.
- Select the media files you want to include.
- Click Fast Functions (Finance) and select a document type.
- Select the appropriate customer record.
- The system will automatically generate and open the document for further editing.
- Click Save.
Menu: View
Use the View menu to customize your media files display:
- Thumbnail: Display all media files as thumbnails, along with their media number, file name, and author information.
- Thumbnail and Text: All media appears in the list view with a thumbnail, media number, file name, description, and keywords.
- Tabular: All media appears in the table view without thumbnails; you can display selected metadata fields.
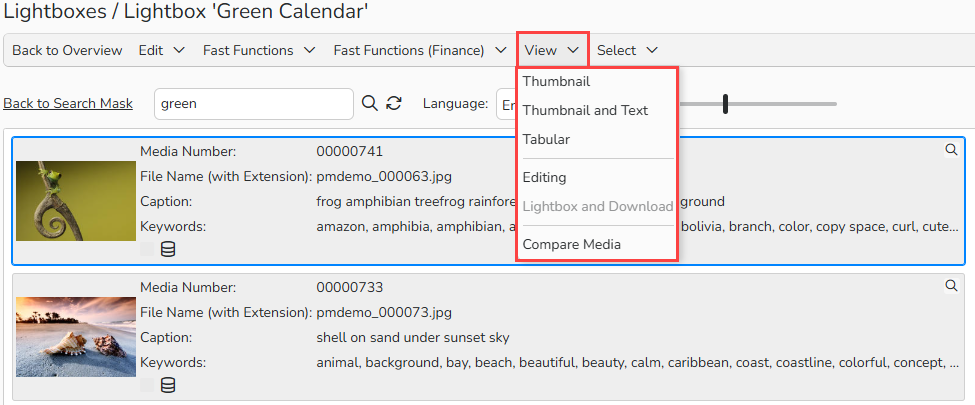
The View menu of a Lightbox: files appear as Thumbnail and Text
In the Tabular view, right-click anywhere on the table column header to access the metadata list and select the fields you want displayed.
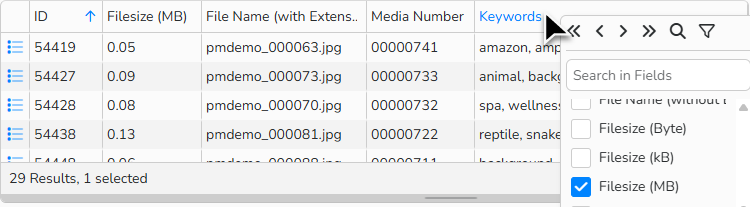
Tabular View: table’s context menu with metadata fields
- Editing/ Lightboxes and Download: Switch between the lightbox view and the archive view.
- Compare Media: To compare media files, select up to six items and click View > Compare Media. The system will display the files side by side for visual comparison.
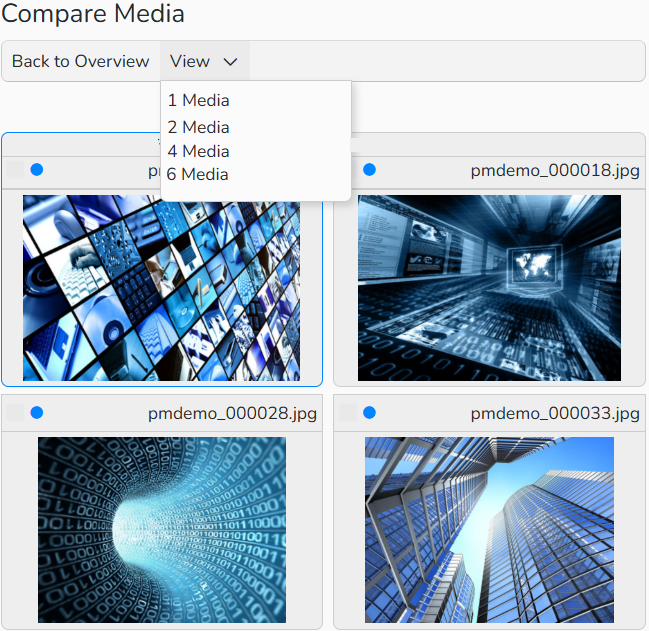
Compare Media: four media files selected for comparison
Menu: Select
Use this menu to manage your media selection:
- Select All: Mark all media files.
- Remove Selection: Clear all current selections.
- Invert Selection: Select all unmarked media files and clear currently selected ones.
Image scaling and search controls
Here is a brief description of image scaling and search controls:
 |
Use the slider to adjust the size of the displayed thumbnails. |
 |
Select the metadata language you want to search in. The system will search only the metadata fields in the selected language. |
 |
Start a new full-text search. The system ignores all previously configured search settings. |
 |
Refresh the archive results based on your previous search. For example, newly added media will be included. |
| Back to Search Mask | Return to the archive search interface to start a new search. |
Menu in the sidebar panel
Lightbox settings and sharing
In the Lightbox Settings & Actions sidebar panel, you can configure the following:
| Selected Lightbox: | Shows the lightbox you’re currently working in. Use the dropdown menu to switch between lightboxes within your access. |
| Website: | Shows the website where the lightbox will appear for the selected access. If you manage multiple websites via Backstage, use the dropdown menu to switch between them. |
 |
Enable the option to exclude the lightbox from a website. The lightbox will remain available only within the system. |
| Create a new lightbox | Create a new lightbox. |
| Rename this lightbox | Rename the lightbox. |
| Delete this lightbox | Delete the lightbox. |
| Print this lightbox | Select the media you want to print as a PDF and choose a layout from the available templates. |
| Download a zip file directly | Download your lightbox directly from the system to reuse the media. |
| Send Lightbox Link | Share a website link to the lightbox via email. In the Send Lightbox Link dialog, enter the recipient’s address and click Send. |
| Email a download link | Share a download link to the lightbox via email. In the Send Download Link dialog, enter the recipient’s address and click Send |
| Copy this lightbox (usernames) | Copy the lightbox and share it with selected access groups. Each copy can be filled independently. |
| Copy this lightbox (access groups) | Copy the lightbox and share it with selected access groups. Each copy can be filled independently. |
Access another user’s lightboxes
In the Selected Lightbox Owner sidebar panel, you can configure relevant access settings:
 |
View which access will apply when you create the lightbox. This is usually your own access. |
| View a different user's lightboxes | Create a lightbox under a different access, for example, to add files to a customer's lightbox. You can choose accesses of Sales, Purchasing, and Administration user master data. |
| View my lightboxes | If you’ve created a lightbox under another access, switch back to your own access here. |
 |
Some user types, such as Customers, may have restricted access to certain media files. Enable the option to temporarily bypass these restrictions when creating a lightbox. Important: Customers will only see authorized media if you send the lightbox as a download link. |
Menu of Selected Media of Active Lightbox
This panel is the actual lightbox where you can collect the selected media for further use.
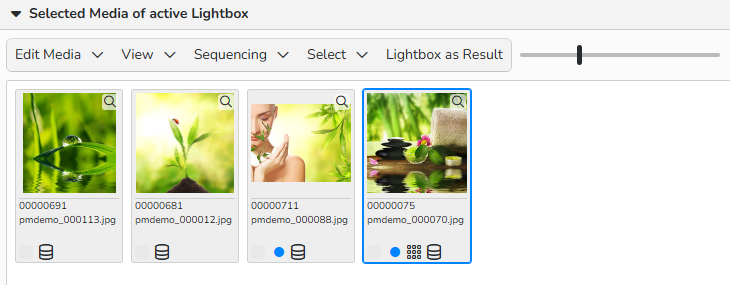
Lightbox: selected media
Menu: Edit Media
With this menu options you can make various selections:
- Remove: Remove the selected media files from the lightbox.
- Print: Pick the media you want to export as a PDF, then choose a layout from the available templates.
- Print Selected: Export only the currently selected media as a PDF.
Menu: View
Choose a view mode to display your media files:
- Thumbnail: Display all media files as thumbnails, along with their media number, file name, and author information.
- Thumbnail and Text: All media appears in the list view with a thumbnail, media number, file name, description, and keywords your media files display
Menu: Sequencing
Here you can define the order of media items in the lightbox.
Note
You can also rearrange the media files with drag & drop.
Menu: Select
Use this menu to manage your media selection:
- Select All: Mark all media files.
- Remove Selection: Clear all current selections.
- Invert Selection: Select all unmarked media files and clear currently selected ones.
Menu: Lightbox as Result
You can quickly move your lightbox media into the search results with this option.
Tip
You can view and open lightboxes for individual access directly in the Lightboxes tab of a customer/author/user record.
Note
If you search within a lightbox using a specific access, Backstage stores the searches and related downloads under that customer access for statistical purposes.
Manage lightboxes
You can find a list of all lightboxes in Media Management > Lightboxes.
Create a lightbox
- Select Edit > New from the menu.
Edit an existing lightbox
- Double-click an entry or select it and click Edit > Open. Make your changes and click Save.
Print a lightbox
- Select the entry you want to print and click Edit > Print
Delete lightbox
- Pick the lightboxes you don’t need any more and click Edit > Delete.
Keyboard shortcuts
The following keyboard shortcuts can be used in the lightbox:
| DEL | Deleting a media file |
| SHIFT+Click | Selection of a range of media |
| CTRL + Click (Windows) CMD + Click (Mac) |
Selection of individual media |