
Contact History
Download as PDFOverview
Backstage offers a Contact History feature for you to track all interactions with customers, authors, partners and users. It stores all communication with a company or individual in one central location.
You can easily add a new entry for a contact activity, such as a phone inquiry, email, or fax.
Create contact entries
To create a new entry that records a contact:
- Go to the relevant system area (Customers, Authors, Partners or Users) and select a master data record where you want to add the contact entry.
- Click the Contact History tab.
- The Date and Time fields will auto-fill with the current date and time. The Agent and Forwarding menus will display the IT User who is adding the entry. You can modify this data.
- Select a communication activity from the Type menu.
- In the New Entry field, enter contact details (for example, a phone call summary or an email copy).
- Click Save.
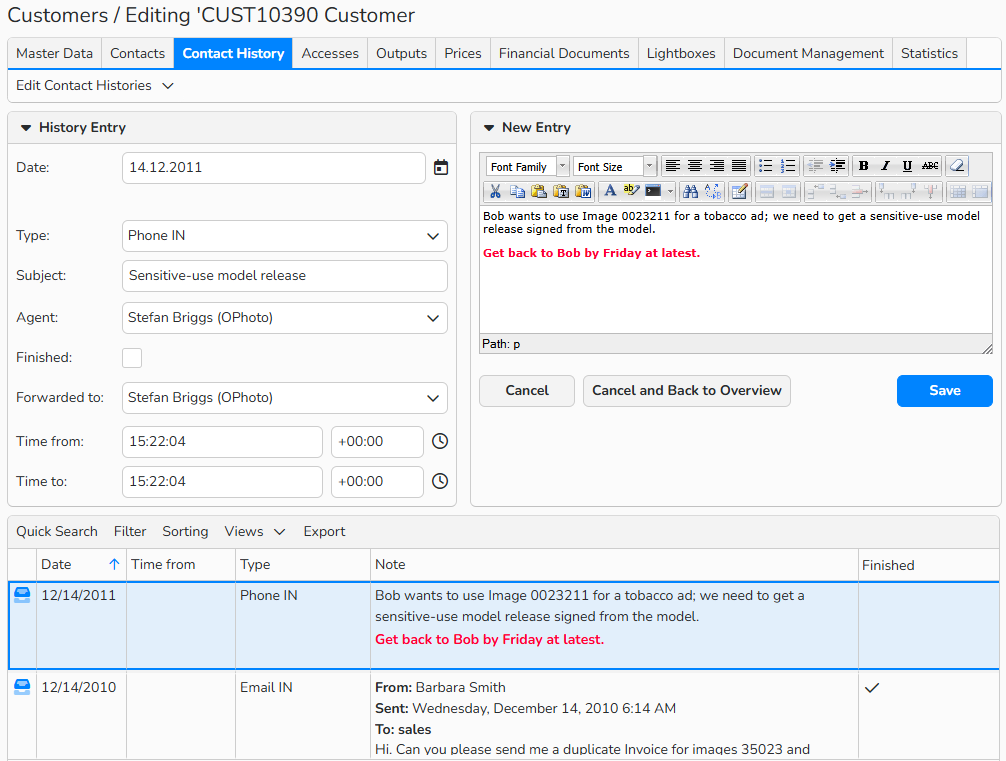
Customer master record: Contact History tab
Setup fields
| Date | For all new contact entries, the field automatically populates with the current date. You can adjust this date, if needed. Use the calendar icon  to select a new date or simply type in the date. to select a new date or simply type in the date. |
| Type | The dropdown menu lists types of contact activity. You can create custom types under Administration > Settings > Activity Types. |
| Subject | Here you can enter any identifying information -- an internal project name or a short summary. |
| Agent/Forwarding | By default, the field displays the name of the IT User currently logged into picturemaxx Backstage and creating the entry. A different user can be selected, if needed. The field displays the employee involved in the contact activity (who received the phone call or email, etc.). Use the Forwarding menu to assign the entry to another employee. You can also assign both fields to the same person. Both menus contain all the users from Administration > Users, where you can edit existing users or create new ones. |
| Finished | Enable the option to mark the contact activity as complete and indicate no follow up is needed. |
| Time from Time to |
For all new contact entries, the fileds automatically populate with the current time. You can modify these times, if needed. The two fields let you track the time spent on a contact activity. |
| New Entry | Here you can add details about the interaction — such as an email copy or key points from a call. The field offers standard Backstage editing tools. |
Manage contact entries
To view a list of contact entries for a company or an individual, go to the appropriate system area — Customers, Authors, Partners or Users — select a master record, and then click the Contact History tab.
The list of contact entries is always sorted by date and time, with the most recent entries on the top.
Create a new entry
- To add a new contact entry, select Edit > Add.
Copy an existing entry
- To duplicate an existing contact entry, select it and click Edit > Copy.
Delete an existing entry
- To remove an existing Activity Type, highlight it and select Edit > Delete.
Note
You can use the table’s built-in tools to search, filter, and sort records. For more details, including how to create custom views and export data, see Advanced Table Views.