
Modifier les métadonnées
Download as PDFAperçu
Backstage offre diverses options permettant de modifier simultanément les métadonnées de plusieurs médias, qu'il s'agisse de remplacer l'intégralité du contenu d'un champ ou seulement certains caractères.
Option 1 : Traitement par lot
Cette action vous permet d'appliquer simultanément les modifications à tous les médias sélectionnés :
- Remplacer complètement le contenu d'un champ de métadonnées
- Annexer ou préfixer du texte au contenu existant d'un champ de métadonnées.
Remarque
Pour des raisons de performances, le nombre de médias sélectionnés ne doit pas être trop important. Le traitement par lots n'est recommandé que pour quelques centaines de médias à la fois.
Remarque
Si le champ de métadonnées contient des valeurs différentes pour les médias sélectionnés, le champ apparaîtra vide.
Pour effectuer un traitement par lots, procédez comme suit :
- Sélectionnez les médias que vous souhaitez modifier.
- Sélection continue: SHIFT + Clic
- Sélection non continue : CTRL (PC) ou CMD (Mac) + Clic
- Allez dans Editer > Traitement par lot.
- Saisissez les données dans les champs appropriés.
- Utilisez le menu contextuel situé à gauche de chaque champ pour définir comment appliquer vos données.
- Annexer : Ajoute le nouveau texte à la fin du texte existant.
- Mettre en avant : Ajoute le nouveau texte avant le texte existant dans le champ.
- Ecraser : Remplace toutes les données existantes dans le champ par les nouvelles données.
- Ne pas modifier : Laisse le champ tel quel.
- Cliquez sur Enregistrer.
Remarque
Pour plus d'informations, consultez la section Indexation des média et Editeurs de masques.
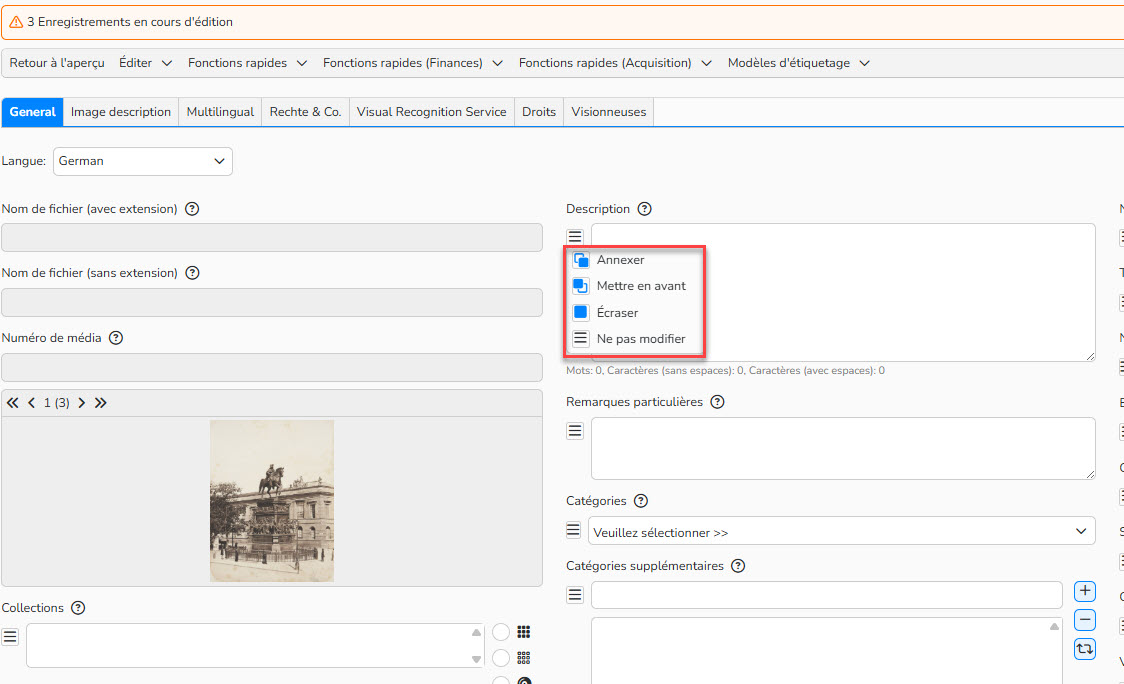
Edition des médias, traitement par lot de 3 médias
Option 2 : Action sur les métadonnées “Rechercher et remplacer”
Avec l'action sur les métadonnées Rechercher et remplacer, vous pouvez appliquer des modifications à tous les médias sélectionnés :
- Remplacer tout ou partie du contenu des champs de métadonnées.
- Supprimer des informations des champs de métadonnées.
Remarque
Cette action est utile, par exemple, pour corriger les fautes d'orthographe.
L'action Rechercher et remplacer les métadonnées est disponible directement dans les dossiers Archive ou d’import:
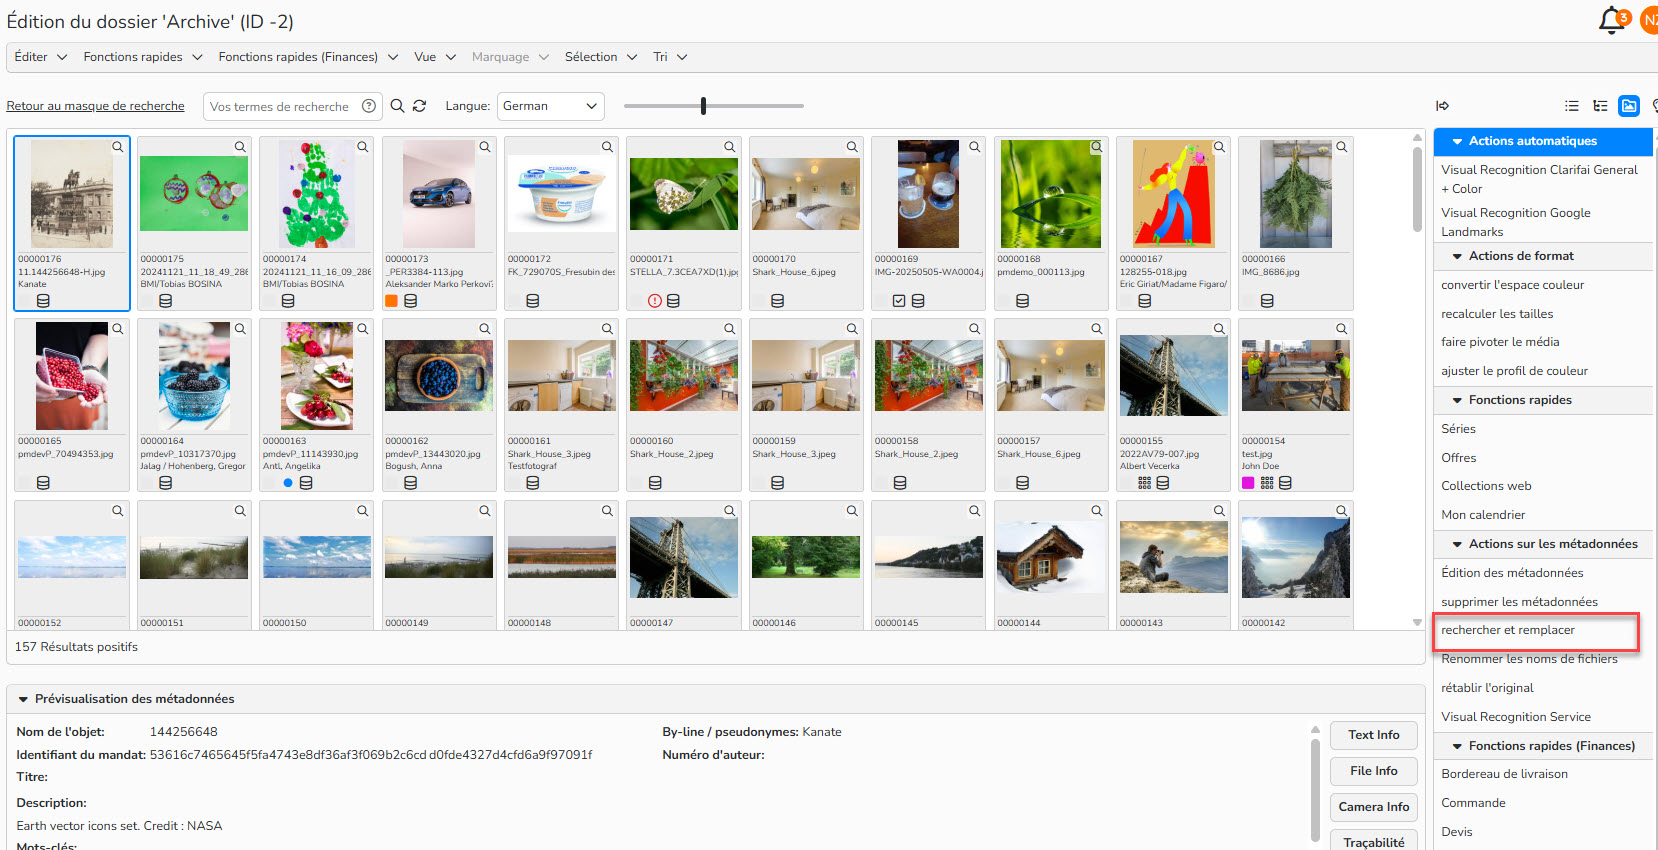
Archive, Actions sur les métadonnées Rechercher et remplacer
Remarque
Vous devrez peut-être d'abord activer l'action pour les dossiers sélectionnés. Cliquez avec le bouton droit sur un dossier pour afficher son menu contextuel, puis sélectionnez Paramètres pour ouvrir l'onglet Gestion des dossiers > Actions. Vous pouvez y ajouter l'action Rechercher et remplacer.
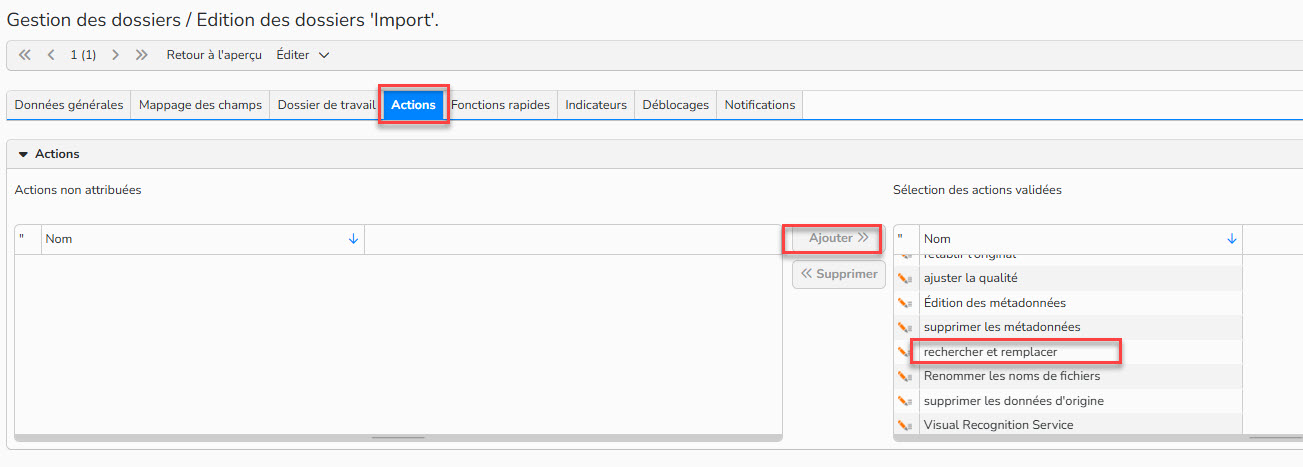
Gestion des dossier, Actions, Ajouter l’action Rechercher et remplacer
Pour effectuer une action Rechercher et remplacer, procédez comme suit :
- Sélectionnez Rechercher et remplacer à partir du menu Actions dans le dossier. La fenêtre Configurer une action s'ouvre.
- Sélectionnez les champs de la base de données :
- Sélectionnez les champs de la base de données individuellement ou cochez Sélectionner tout pour inclure tous les champs.
- Sélectionnez une langue de métadonnées.
- Dans Rechercher et remplacer, configurez :
- Le filtre pour définir comment le système doit traiter les données dans les champs sélectionnés :
- contient
- égal à
- commence par
- se termine par
- Entrez un ou plusieurs mots que le système doit rechercher.
- Dans Exécuter pour, sélectionnez l’une des options :
- Seulement la valeur : Remplacez les mots même si la valeur fait partie d'un mot plus long (par exemple, « run » mettra également à jour « runway » ou « outrun »).
- Mot entier : Remplacez uniquement les mots qui correspondent exactement au terme spécifié.
- Dans Action, sélectionnez l’action à appliquer :
- écraser
- supprimer
- Le filtre pour définir comment le système doit traiter les données dans les champs sélectionnés :
- Cliquez sur Démarrer une action.
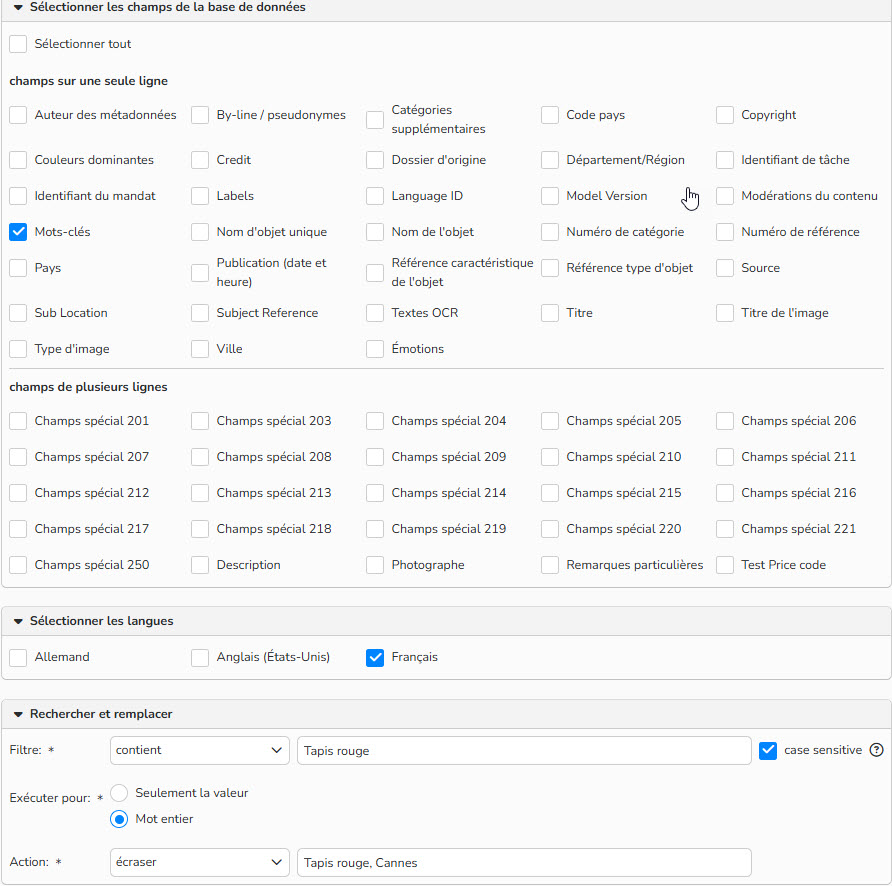
Action Rechercher et remplacer, configuration de l’action
Remarque
Cette action tient compte de la casse ; le système ne recherchera et ne remplacera que les termes dont l'orthographe est exactement identique. Pour plus d'informations, consultez la section Actions.
Option 3 : Export et import de métadonnées
To perform complex replacements or handle very large volumes of media files that the two methods above cannot manage, export the metadata from Backstage as a comma-separated text file. You can then edit this file in a text editor such as Notepad++ or a spreadsheet application like Microsoft Excel.
After making the changes, import the updated data back into Backstage.
Export metadata
To export metadata, follow these steps:
- In Media Processing, select Archive or other folder from which you want to export metadata.
- Click Edit > Metadata Export. In the Metadata Export dialog, configure the following settings:
- Configure Export Format: Specify the desired file format for the export. We recommend using the following settings:
- Field Separator: ;
- Text Start: "
- Character Set: UTF-8.
- Field mapping for the Export: Specify the exact metadata that you want to export by selecting relevant fields in the Field Mapping column.
- Language: Select a language for any field that can be in more than one language.
- Separator: Set separators for lists; for example, separate keywords with a comma (,).
- Add more metadata fields for export with the plus icon [+] or remove fields with the minus icon [-].
- Click Start Export.
- Configure Export Format: Specify the desired file format for the export. We recommend using the following settings:
- A metadata file is generated, and you can save it to your desktop.
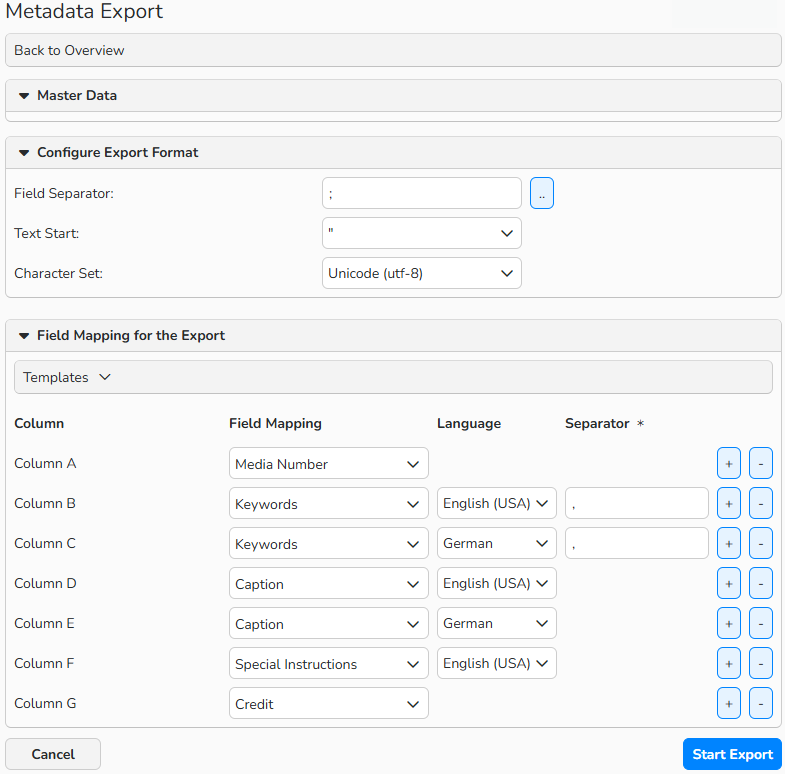
Metadata Export dialog
Remarque
When exporting from the archive folder:
Always include Media Number (or the file name for images that have not yet been published). This ensures the system has a reference field for mapping during import.
When exporting from an import folder:
Use the file name.
Edit the text file
Backstage generates a .txt file during export, which you can open in applications such as Excel.
Follow these recommendations to correctly save the export file:
- When you open the file, make sure to choose the UTF-8 as the encoding format to avoid character issues.
- Excel may remove leading zeros by default, which can change media numbers. To keep the leading zeros, do the following when importing the file in Excel:
- Set the column data format to Text in Excel’s Text Import Wizard.
- Use Excel’s Find and Replace tool to adjust the metadata as needed.
- Save the list locally as a CSV file.
Important
Select the CSV (UTF-8) option when saving. This keeps the correct encoding and prevents issues with special characters.
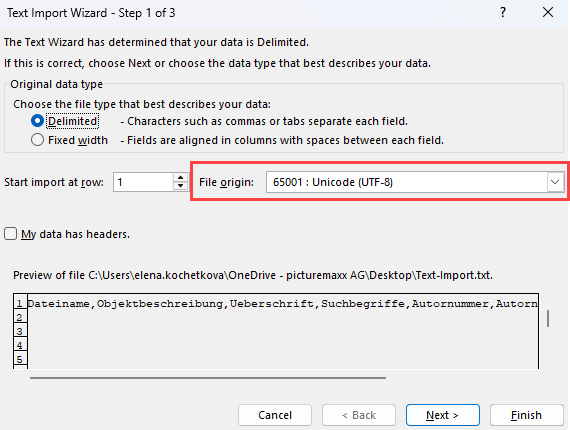
Text Import Wizard in Excel: select the Unicode (UTF-8) encoding format
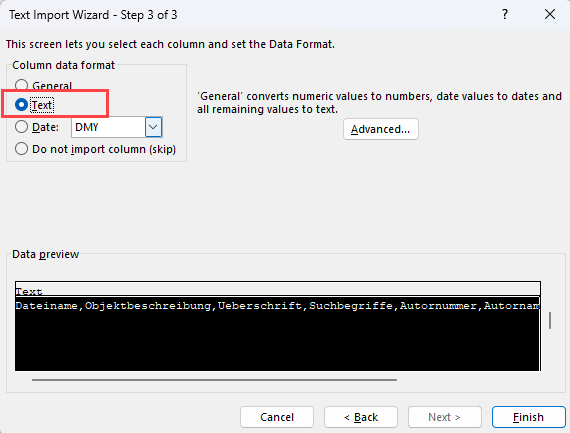
Text Import Wizard in Excel: Select “Text” as column data format

Windows “Save as” dialog: Save as type CSV UTF-8
Import metadata into Backstage
- Upload the CSV file to Backstage.
- You can use a new import folder that does not automatically publish content.
- Select a folder:
- To import metadata for unpublished media: go to Media > Media Processing and click an import folder name.
- To import metadata for published media, click Archive (under Media Processing) and do a search.
- In the selected folder, click Edit > Metadata Import. In the Metadata Import dialog:
- From the Choose Source menu, select the metadata file to import.
- In the Field Mapping for the Import panel, If you’ve completed all preparation steps correctly, the system displays the first media number from the list.
- Define what happens to the information in the other metadata fields. For each field, select:
- In the Field mapping column: a metadata field to update.
- In the Action column: an action to handle the data from the imported file. To replace metadata, select Overwrite.
- Optionally, set the language and delimiter for lists within the metadata field.
- Click Start Import. All images included in the file will now be updated. This may take some time (as a guideline: 1,000 images require approximately 5–10 minutes).
Remarque
You can find detailed information about the steps described in this guide in the following articles: Media Labeling, Form Editor, Actions, Metadata Export, Metadata Import.