
IP Restrictions
Download as PDFOverview
Every device connected to the Internet has a unique number assigned to it - an IP address. An IP address is used for targeted transport of data from the sender to the recipient.
You can control access to your website and Backstage for certain IP addresses with the following restrictions:
- Global IP restrictions: You can deny access to your website or Backstage to users with certain IP addresses (Negative) or allow access to certain IP addresses (Positive). For example, this allows you to block IP addresses from countries with high abuse rate.
- Access-related IP restrictions: You can apply IP restrictions to specific accesses or access groups. This is particularly useful when you want to ensure that access from a certain group is only permitted from a defined IP range. For example, to verify that requests are genuinely originating from a specific company.
- Automatic IP restrictions (block): If a user exceeds a predefined number of failed login attempts within a specified time period, their IP address can be automatically blocked from further access.
Set up IP restrictions
To configure global and access-related IP restrictions, proceed as follows:
- Navigate to Administration > IP Restrictions > Active IP Restrictions and select Edit > New.
- The new restriction setup window opens.
- Enter a distinctive name for the restriction.
- Enable the Status option to activate the IP restriction.
- Select Backstage and/or Webgate option to define where the restriction should apply.
- Enter the IP address or a specific subnet (in long notation) you want to restrict.
- Select whether the IP restriction should be Positive (allow access) or Negative (deny access).
- In the Global field, select Yes to apply the restriction globally or No to limit it to specific accesses or access groups.
- For the access-specific option, the system displays a list of accounts or access groups for you to select from.
- Select accesses and click Add. Undo the selection with Remove.
- For the access-specific option, the system displays a list of accounts or access groups for you to select from.
- Confirm with Save.
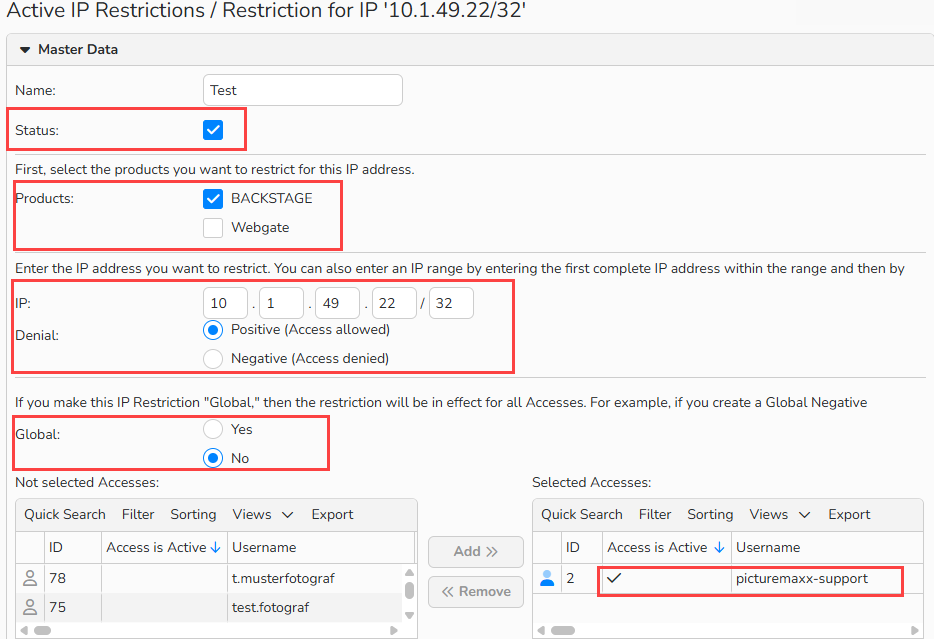
Active IP Restrictions: Access granted to Backstage, specified IP address range, and only to selected Access
Note
You can also configure this IP restriction in the Authentication Restrictions section of a corresponding Access/Access Group.
Set up automatic IP blocking
If multiple attempts to login to your Webgate from the same IP address fail, the access from that IP address can be temporarily blocked. Both you and the affected user will automatically receive an email notification. Once blocked, the user will no longer be able to view media content or access data. In some cases, other users sharing the same IP address may also be impacted.
To enable automatic IP blocking, proceed as follows:
- Navigate to Administration > IP Restrictions > Webgate Configuration.
- Optional for multiple websites From the Select Website dropdown, select a website to apply IP blocking.
- Select Enable IP blocking to activate the feature.
- In Number of failed login attempts, set the allowed number.
- In Timeframe in minutes, set the time interval to consider the failed attempts.
- Enable E-mail alerts to receive notifications when automatic IP blocking is triggered. Enter a name and recipient email address.
- Click Save.
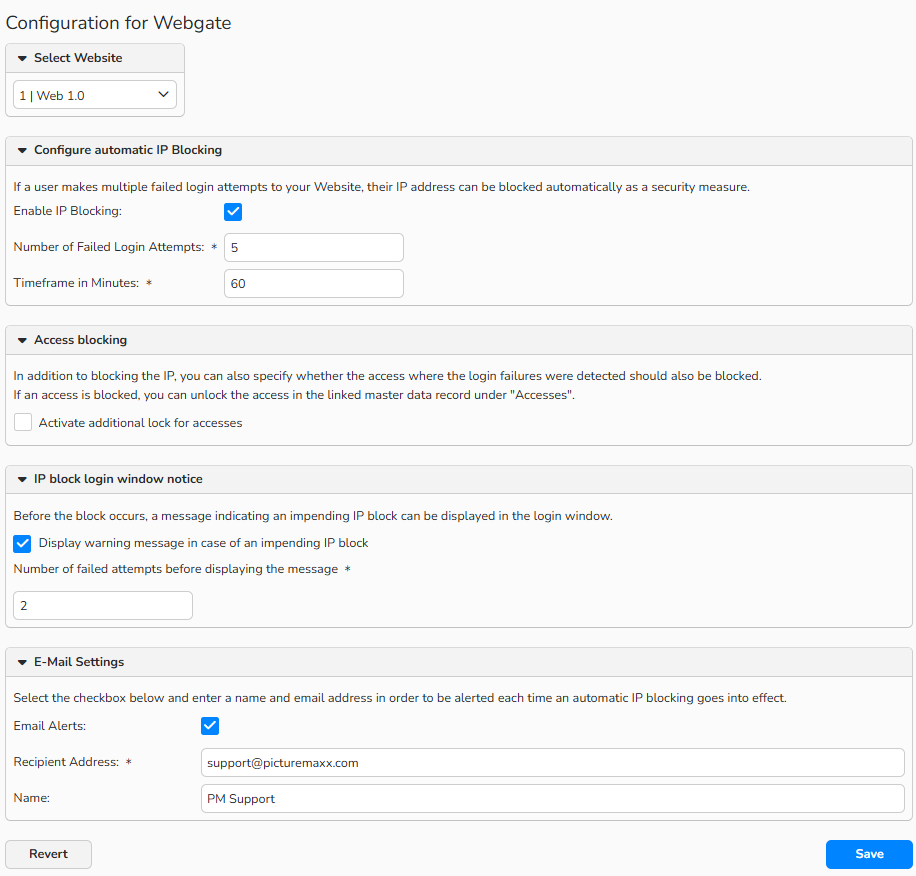
Webgate Configuration: Automatic IP blocking
Note
When a user exceeds the allowed number of failed login attempts within the specified time, the system automatically blocks the IP address. You can view the restriction under Administration > IP Restrictions > Active IP Restrictions and manually remove it if needed.
Activate access blocking
In addition to IP blocking, you can also choose to block the specific access where the failed login attempts occurred. This access block becomes active if a successful login was recorded within the past two days, indicating a potential breach. If an access is blocked, you can lift the restriction in the associated master data record under “Accesses.”
To enable this feature, follow these steps:
- Navigate to Administration > IP Restrictions > Webgate Configuration
- Optional for multiple websites From the Select Website dropdown, select a website to apply access blocking.
- Enable Activate additional lock for accesses.
- Confirm with Save.
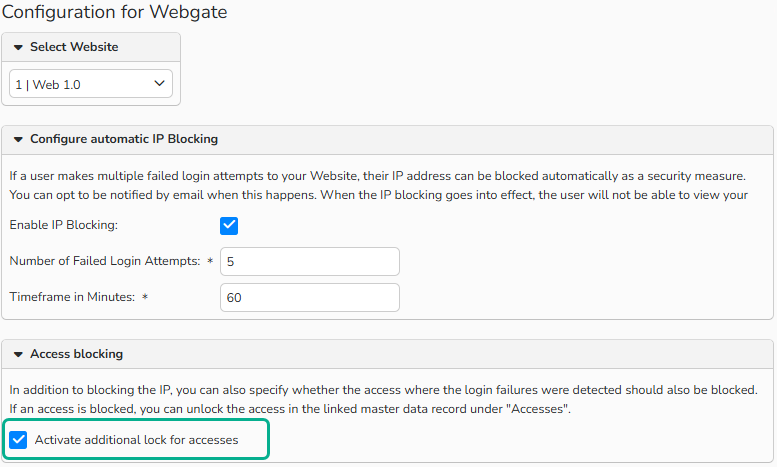
Webgate Configuration: Additional access blocking
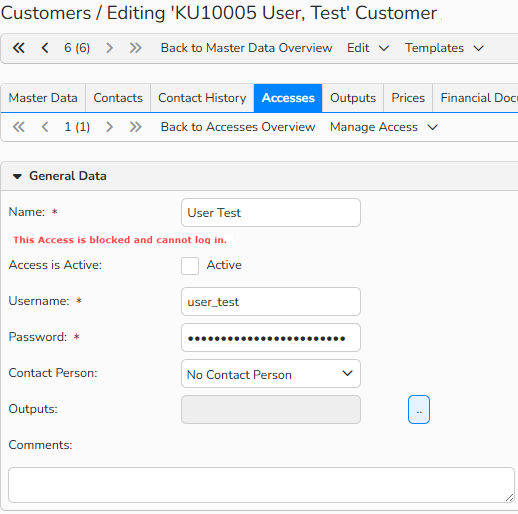
Customer master data window: Blocked access notification
Note
The blocked access message appears in the customer, partner, or user’s master data record under the Accesses tab. You can remove the block directly from there by enabling the Access is Active option.
Activate IP block warning upon login
If multiple attempts to login to your Webgate from the same IP address fail, you can temporarily block access from this IP address. If the user is unsure about their password, we recommend using the "Forgot your password" feature. You can display a warning message in the login dialog after a specified number of failed attempts.
To display the warning, proceed as follows:
- Navigate to Administration > IP Restrictions > Webgate Configuration.
- Optional for multiple websites From the Select Website dropdown, choose a website to apply IP blocking.
- Enable Display warning message in case of impending IP block to activate the feature.
- Set the number of failed attempts allowed before displaying the warning.
- Click Save.
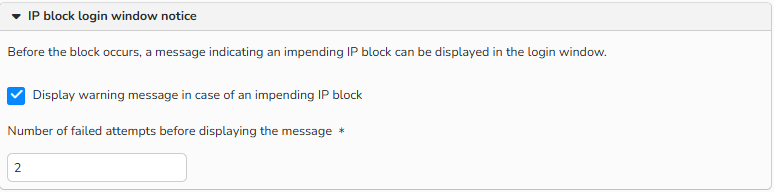
Webgate Configuration: Activate IP block message in the Webshop login dialog
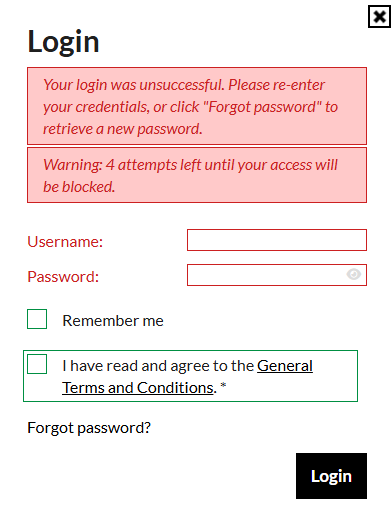
IP block message in the Webshop login dialog
Note
The warning text also displays the number of tries left.
Configure messages for blocked users
When an IP address is blocked, the user with this IP address will see a system message. You can tailor a message for global, automatic, and access-related IP restrictions.
- Navigate to Administration > IP Restrictions > Message Configuration.
- Optional for multiple websites From the Select Website dropdown, select a website to apply the message.
- Activate the areas where you want to display the message:
- Custom message for global IP restrictions
- Custom message for automatic IP blocking
- Custom message for access-related IP restrictions.
- Enter a heading and the message text for each activated language.
- Confirm with Save.
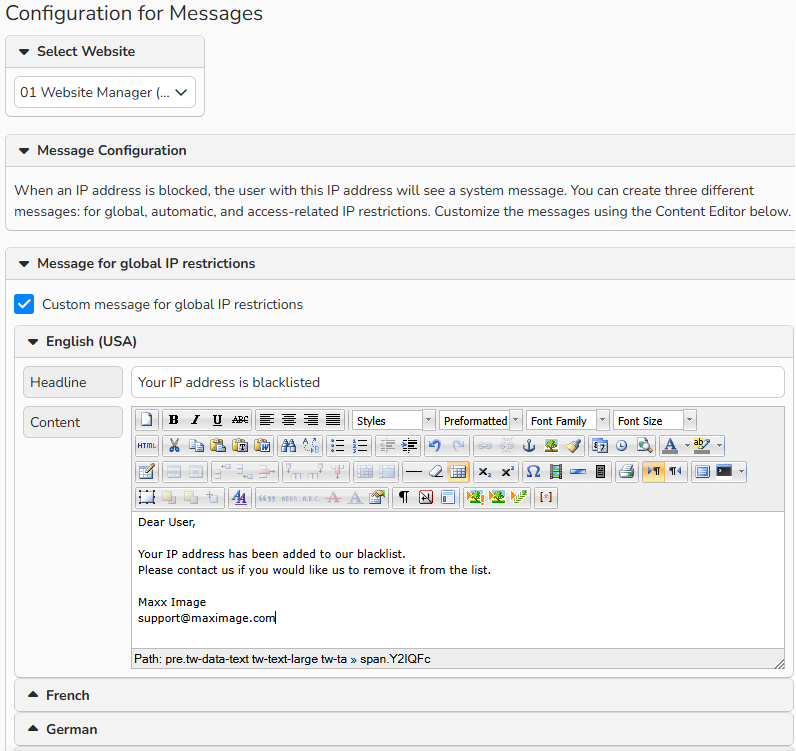
Configuration for messages: Customize system messages for blocked users
Manage IP restrictions
You can view a list of IP restrictions in Administration > IP Restrictions > Active IP Restrictions.
Create new IP restriction
- Edit menu > New.
Edit existing IP restriction
- Double-click or select a restriction name and Edit > Open.
- Make changes and click Save.
Delete existing IP restriction
- Select an IP restriction and Edit > Unblock.
Note
The integrated table functions allow you to search, filter, and sort records. For more information on these functions, as well as how to set up custom views and use the export function, see Advanced Table Views.